
Nail art has become a vibrant way to express individuality and creativity. If you’re like many people, you’ve probably found yourself scrolling through endless images of stunning manicures, dreaming about how to achieve that look for yourself. The good news is, you don’t need to go to a fancy salon or spend hours mastering complicated techniques. With just a few natural nail ideas, you can elevate your nail game and feel like a pro in no time! This guide is for anyone who loves fashion, beauty, or simply wants to try something new. Whether you’re a beginner or someone looking to refine your skills, these techniques are designed to be fun, easy, and achievable. You’ll find that with a little practice, you can create beautiful nail art that turns heads and showcases your personal style. So, roll up your sleeves and get ready to explore 11 natural nail techniques that will make you a nail art pro! In this post, you’ll discover a variety of nail art ideas, from minimalist designs to bold statements. Each technique is crafted to inspire you and boost your confidence. You’ll learn how to implement these styles at home using simple tools and materials. This means you can achieve that professional look without breaking the bank, all while having fun in the process!
Key Takeaways
– Discover 11 easy nail art techniques that you can master at home, perfect for all skill levels. – Learn how to create stunning minimalist French tips that never go out of style. – Explore the beauty of natural ombre effects and how they can add depth to your nails. – Get inspired by botanical designs that bring a fresh touch to your manicure. – Find out how to use nail art pens and stamps for precision and creativity in your nail designs.Contents
- 1. Minimalist French Tips
- 2. Natural Ombre Effect
- 3. Botanical Nail Art
- 4. Textured Nail Techniques
- 5. Negative Space Designs
- 6. Matte Nail Finish
- 7. Jewel Tones and Metallics
- 8. Color Block Nails
- 9. Nail Foils
- 10. Seasonal Color Schemes
- 11. Nail Art Pens and Stamps
1. Minimalist French Tips
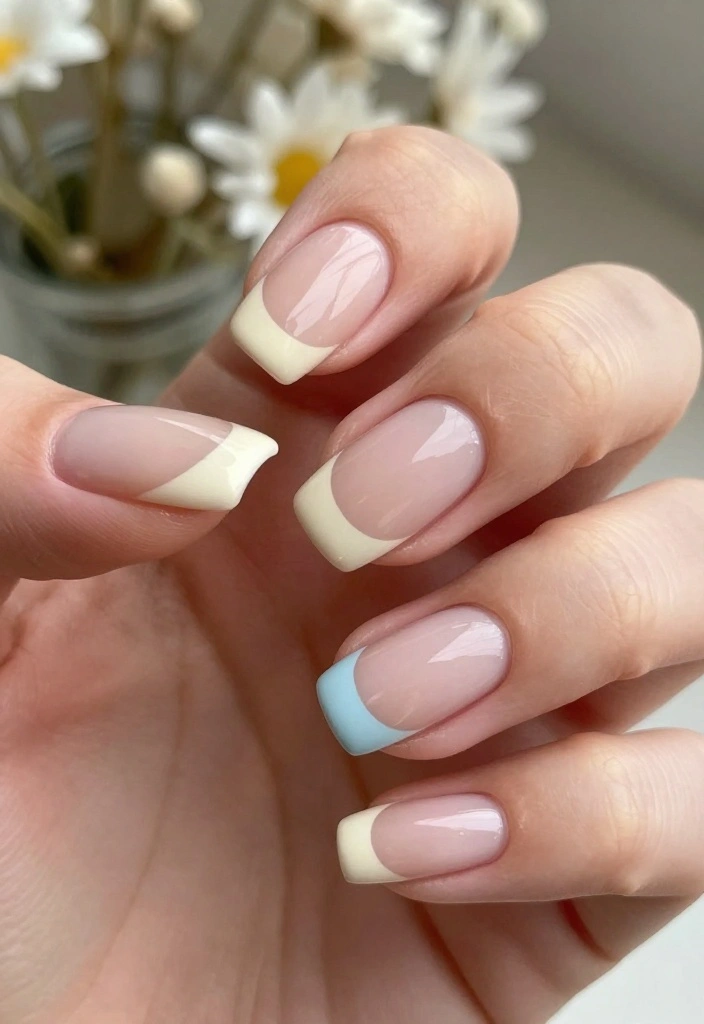
Minimalist French tips are redefining elegance in nail art. This contemporary take on the classic French manicure swaps the usual white tips for soft shades like nude, blush, or pastels. It’s an effortless look that radiates sophistication, perfect for daily wear without feeling too flashy.
The charm of this style lies in its simplicity and versatility. By using muted colors, you create a chic contrast that elevates any outfit. Whether at work, brunch, or a casual evening out, these nails are a perfect match.
Outfit Pieces:
– Nude base coat (choose a shade that matches your skin tone)
– Pastel shades like soft pink or lavender for tips
– Glossy top coat for a polished finish
– Optional: nail art tape for straight lines
Styling Tips:
– Start with a clean nail and apply a base coat for smooth application.
– Use a fine nail brush for precise tip application, curving or straightening as you prefer.
– Experiment with different tip widths to find what flatters your hands best.
– Keep the design uniform across all nails for a cohesive look.
These minimalist French tips are so versatile. Swap them for a bolder color palette for a night out or keep them soft for everyday elegance.
2. Natural Ombre Effect
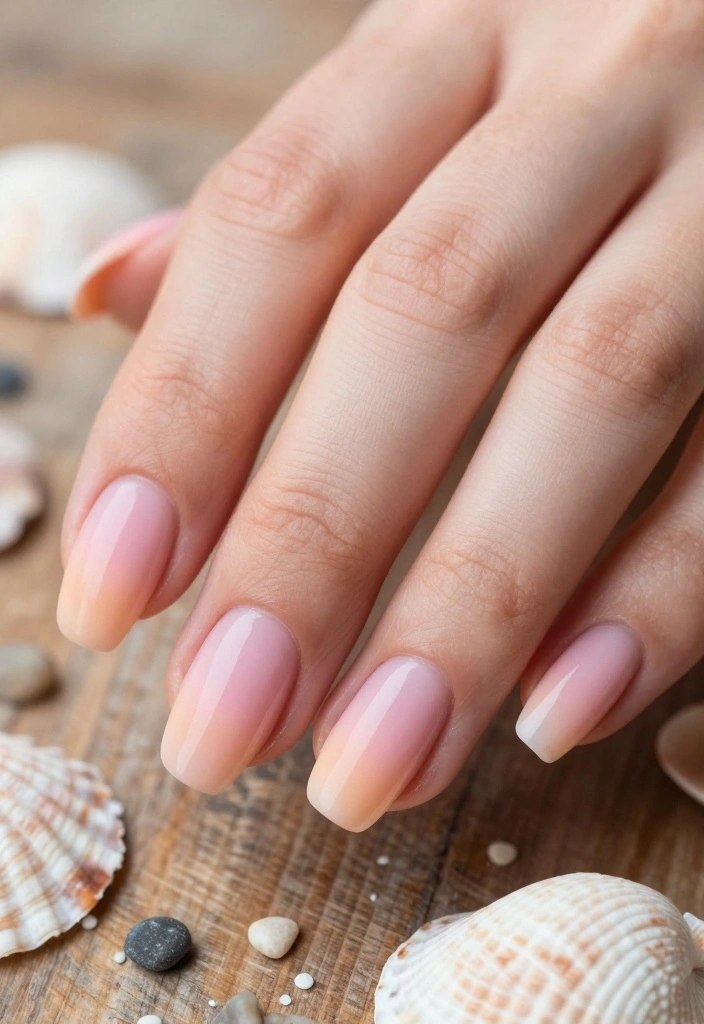
The natural ombre effect creates a stunning gradient that softly transitions between colors, providing a dreamy, understated look. This technique is all about blending shades seamlessly, and it allows for endless creativity, whether you choose soft nudes or vibrant hues.
What makes this technique special is its adaptability. You can customize the colors to fit any mood or occasion. From a subtle nude-to-pink for work to a bold sunset palette for a night out, your nails will always stand out.
Outfit Pieces:
– Light base color, such as pale beige or soft pink
– Second color for the ombre effect (choose a deeper shade for contrast)
– Top coat for a glossy finish
Styling Tips:
– Use a makeup sponge to dab on the second color, blending as you go.
– Practice the technique on paper to master the sponge effect before applying it on your nails.
– Add glitter to the tips for an extra touch of sparkle!
With this ombre effect, you can effortlessly transition from a casual lunch to an evening event, showcasing your creative flair without overwhelming your style.
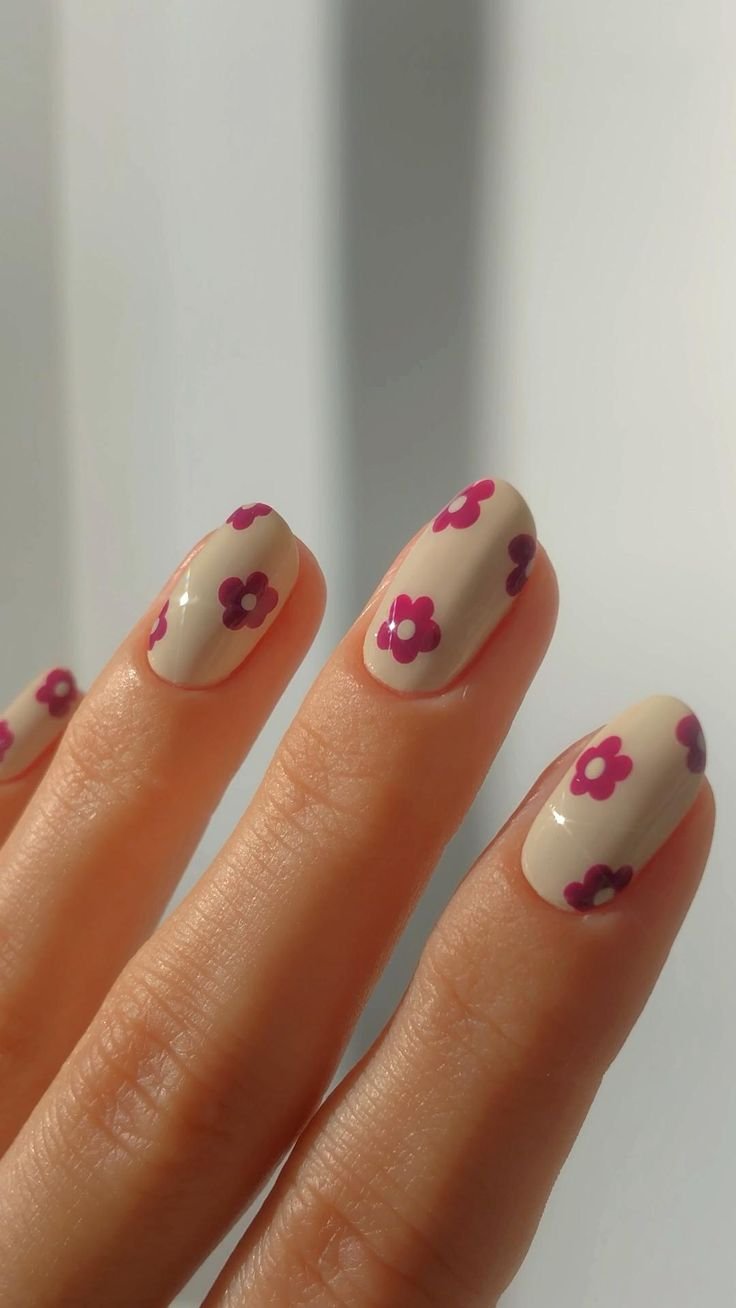
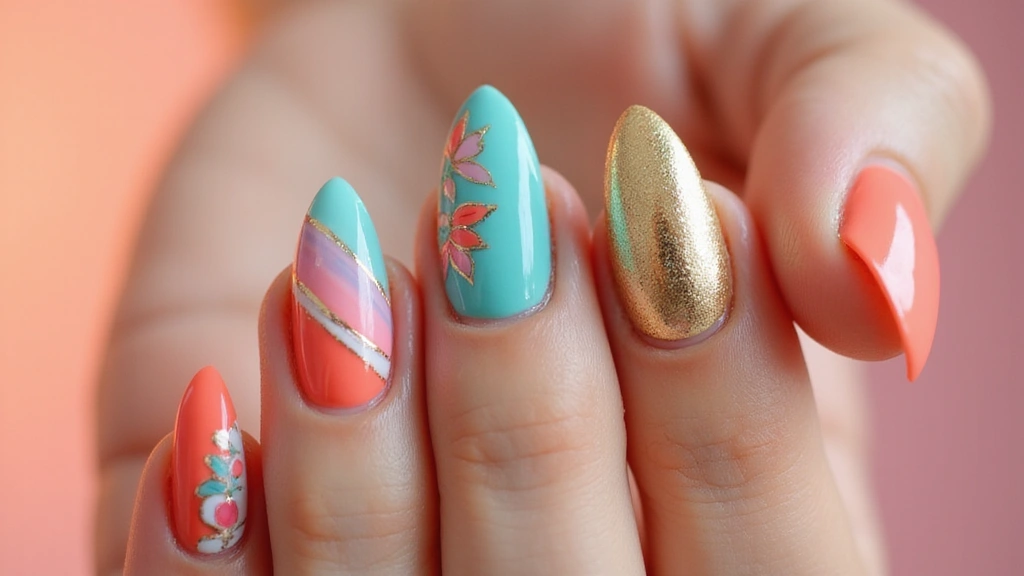
3. Botanical Nail Art
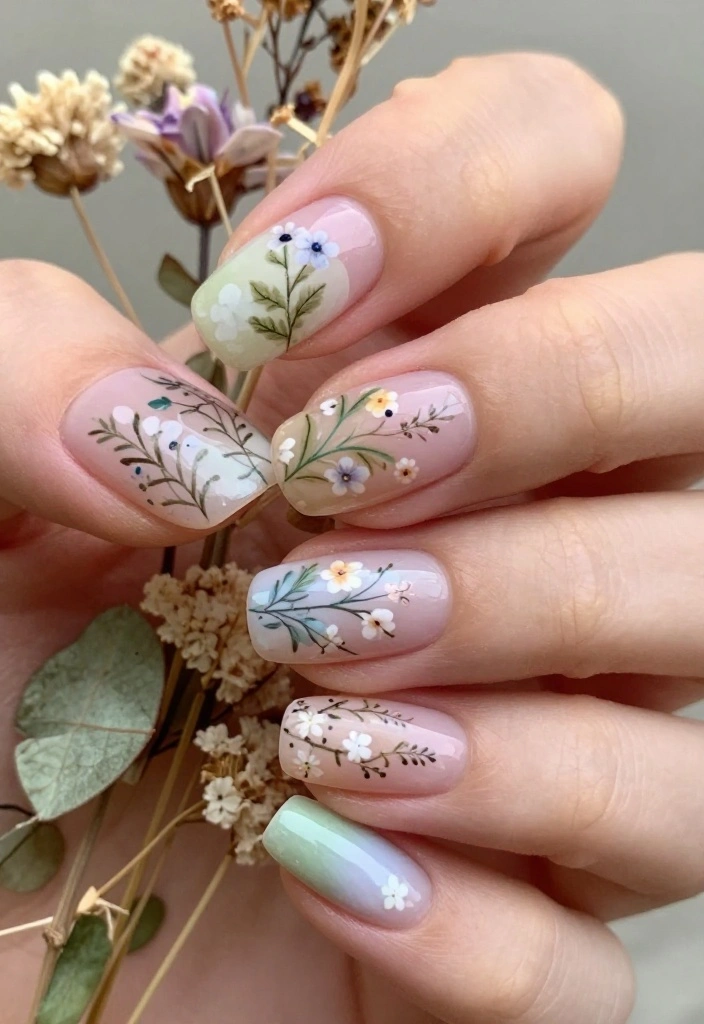
Bring a touch of nature to your nails with botanical nail art. This trend features charming floral designs or leafy patterns painted on a soft base, making it a beautiful way to express your love for the outdoors. It’s especially perfect for the spring and summer months.
The allure of botanical designs lies in their intricate details and artistic expression. You can personalize your nails with various plants and flowers, creating a unique look for any occasion. Whether you’re at a garden party or just enjoying a sunny day, these nails will complement your vibe.
Outfit Pieces:
– Light neutral or pastel base coat for a soft backdrop
– Fine nail brush or nail art pen for painting details
– Optional: floral stickers for a quick application
Styling Tips:
– Use thin brushes for detailed work to ensure precision in your designs.
– Explore different floral designs, like daisies or ferns, to diversify your look.
– Keep your color palette soft to create a harmonious overall appearance.
Botanical nail art is fresh and unique, offering endless opportunities for creativity that will brighten any outfit and occasion.
4. Textured Nail Techniques
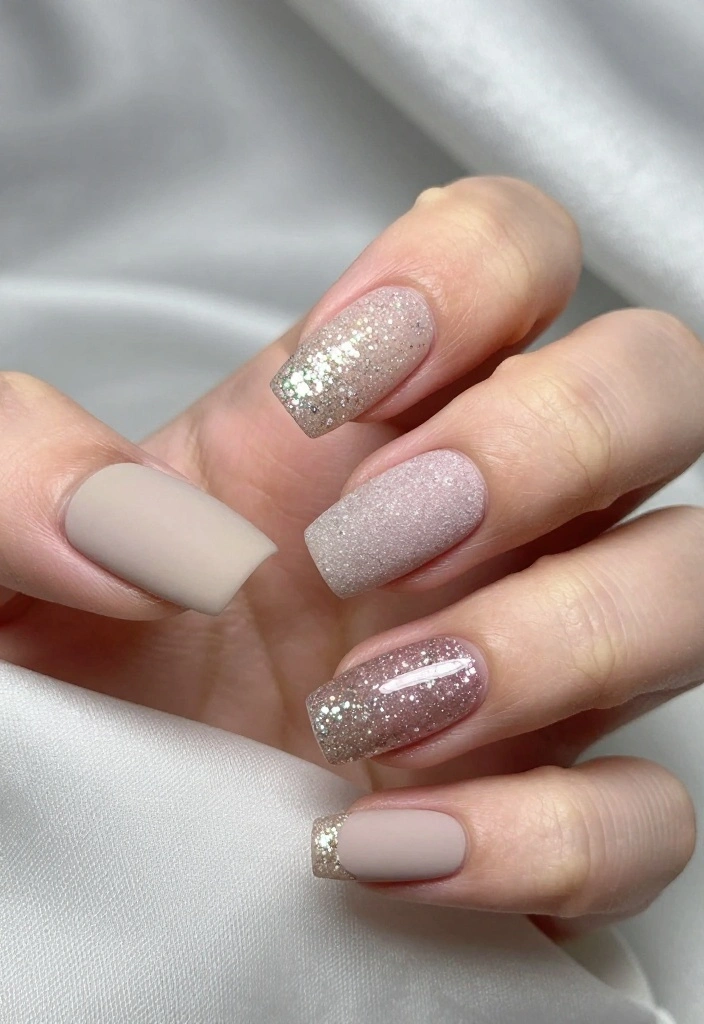
Textured nail techniques create a captivating and unique look for your manicure. By incorporating matte finishes, glitter, or sandy textures, you can add depth and interest to your nails, allowing for artistic flair while maintaining a chic appearance.
This style is appealing because it encourages creativity and experimentation. You can layer different textures to create a dynamic effect that stands out without being overwhelming. Perfect for both casual outings and formal events, textured nails can easily complement any ensemble.
Outfit Pieces:
– Base color of your choice (consider a bold or neutral shade)
– Matte top coat for a modern finish
– Glitter polish for added sparkle
– Optional: textured polish for sandy effects
Styling Tips:
– Layering various textures can result in a more captivating design.
– Use a top coat to seal in glitter and amplify the texture effect.
– Stick to a cohesive color scheme to keep the design looking intentional.
Textured nails provide a playful yet polished aesthetic, making them a fantastic choice for any occasion you have planned.
Textured nails unlock chic creativity—layer matte, glitter, and sandy textures for a unique nail ideas natural look. Experiment daily: start with two textures, then add a subtle sparkle. Pro tip: seal with a durable topcoat for lasting glam.
5. Negative Space Designs
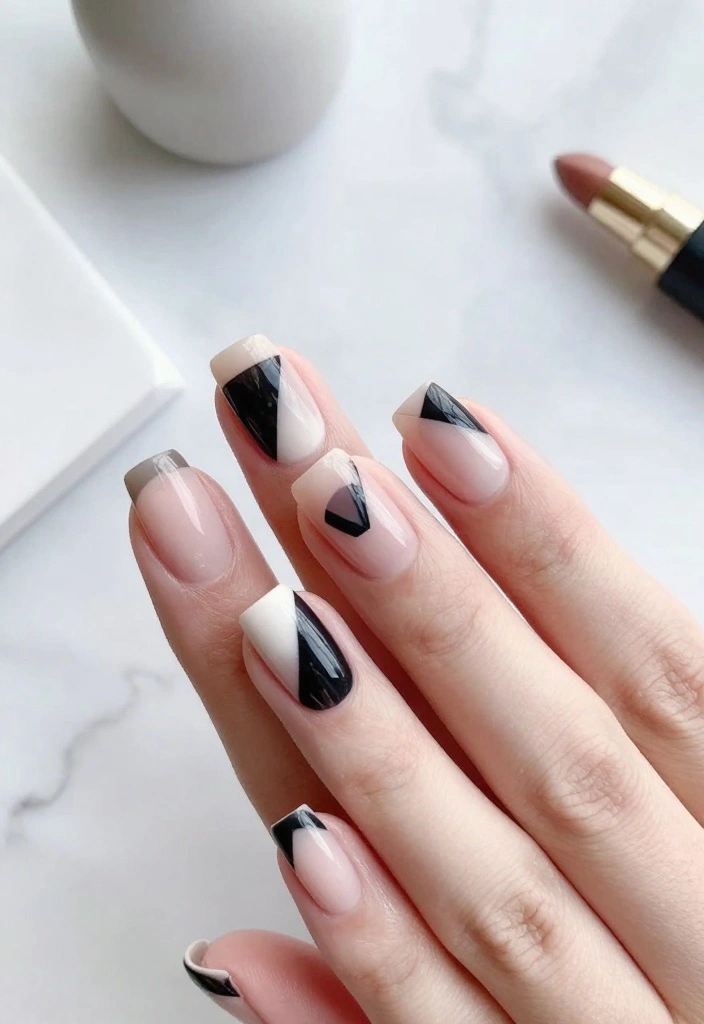
Negative space designs are a bold and modern way to let your natural nails shine. By incorporating geometric shapes or minimalist lines, this technique creates a striking visual that feels fresh and contemporary.
The beauty of negative space lies in its simplicity and versatility. You have the freedom to experiment with shapes and colors, making this style suitable for various settings, whether you’re at the office or enjoying a night out.
Outfit Pieces:
– Base coat of your choice (consider a nude or pastel)
– Nail tape or thin brush for creating shapes
– Color polish for filling in sections
Styling Tips:
– Use contrasting colors to make your design pop.
– Practice your designs on nail stickers to perfect your technique.
– Keep the design minimal to maximize impact.
Negative space designs offer countless interpretations, allowing your nails to remain stylish while keeping things fresh and modern for any occasion.
Fun fact: Negative space designs can make nails look 20–30% longer with just two colors and smart geometric shapes. This minimalist approach keeps the focus on your natural nail bed, making nail ideas natural pop for any setting.
📹 Related Video: King’s Day Nails 💅🏻 (Abstract Negative Space Nail Art) – femketjeNL
You might also like
6. Matte Nail Finish
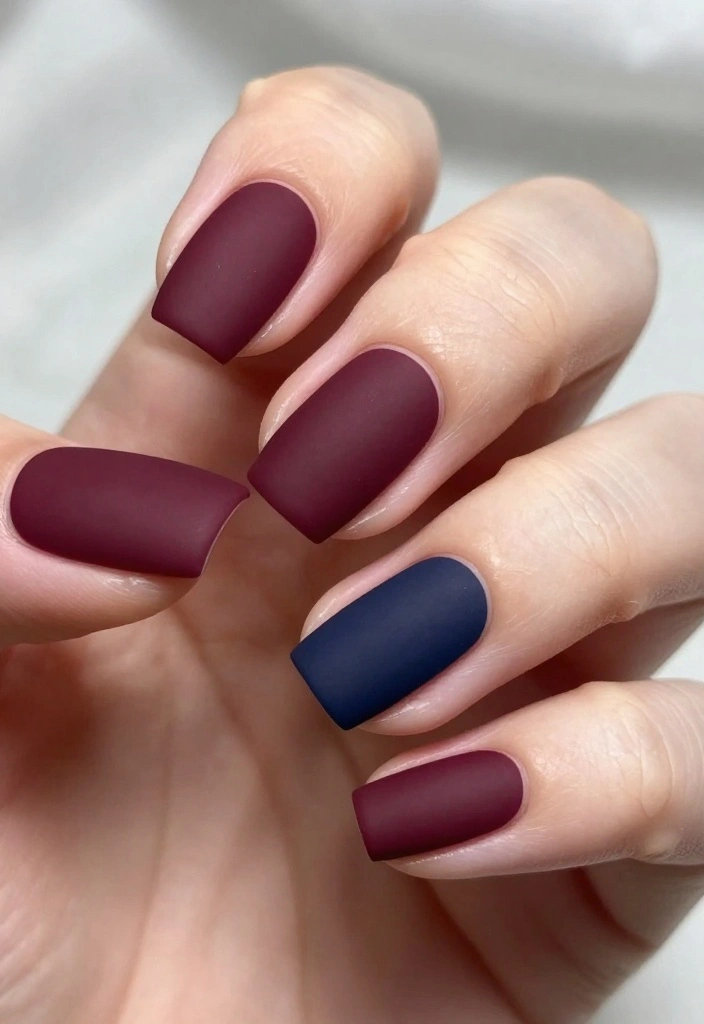
Matte nails embody a sophisticated elegance that sets them apart from traditional glossy finishes. This unique look is not only chic but also easy to achieve at home.
The appeal of a matte finish lies in its understated charm. It offers a distinct texture that can elevate your overall style, making it suitable for both everyday wear and special occasions. You can easily switch it up by adding subtle designs for contrast.
Outfit Pieces:
– Your favorite color polish for the base
– Matte top coat for that velvety effect
– Optional: glossy polish for creating designs
Styling Tips:
– Darker colors work beautifully for a dramatic matte finish.
– Ensure your base coat is completely dry before applying the matte top coat to avoid smudging.
– Keep your nails well-groomed to maintain a polished appearance.
Matte nails add a touch of sophistication to any ensemble, making them perfect for both casual and formal events, adapting effortlessly to your style.
7. Jewel Tones and Metallics
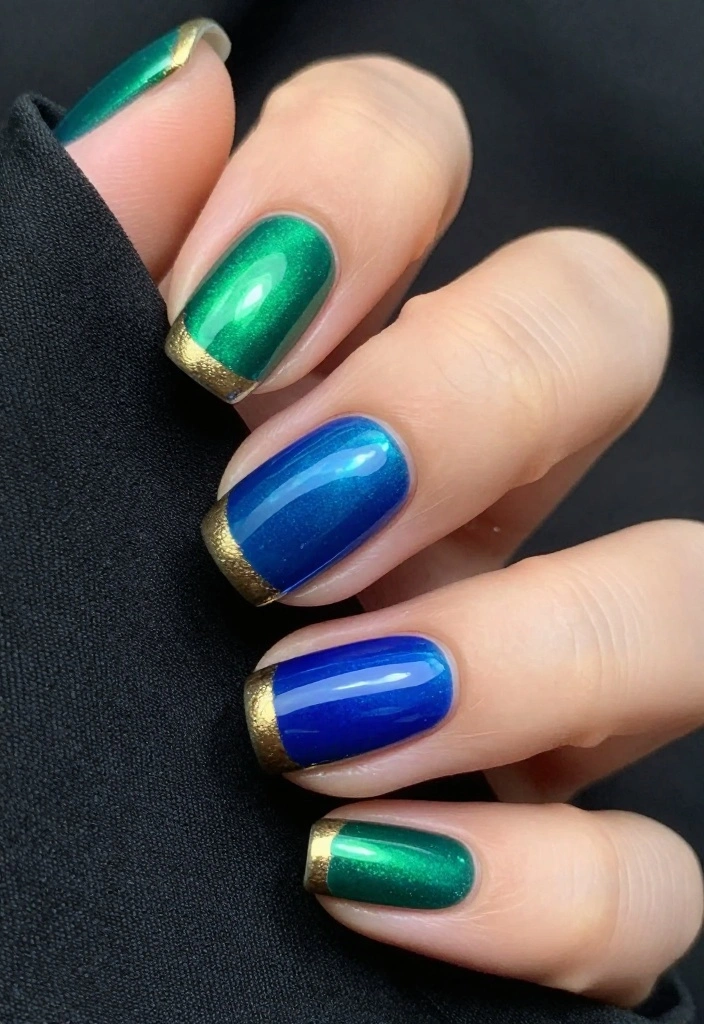
For those who crave a little glam, jewel tones and metallics bring a luxurious touch to your manicure. These rich shades effortlessly elevate your nails from ordinary to extraordinary, making them the perfect choice for special occasions.
The allure of jewel tones lies in their vibrant, deep hues, which can transform your look. Whether you opt for emerald green, royal blue, or ruby red, these colors pair beautifully with any outfit, making your nails the focal point.
Outfit Pieces:
– Rich jewel tone polish (emerald, sapphire, ruby)
– Base coat for protection against staining
– Metallic top coat or metallic stickers for added flair
Styling Tips:
– Start with a base coat to prevent any staining from darker colors.
– Experiment with metallic placement for a unique design, like tips or abstract shapes.
– Pair jewel tones with neutral outfits to let your nails take center stage.
This technique ensures your nails stand out beautifully, perfect for a night out or any special gathering where you want to shine.
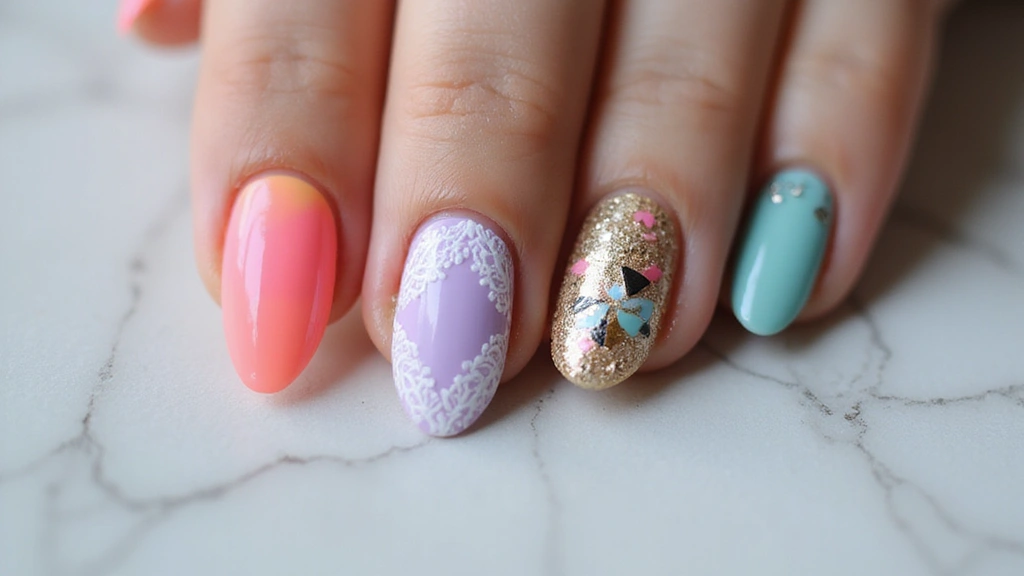
8. Color Block Nails
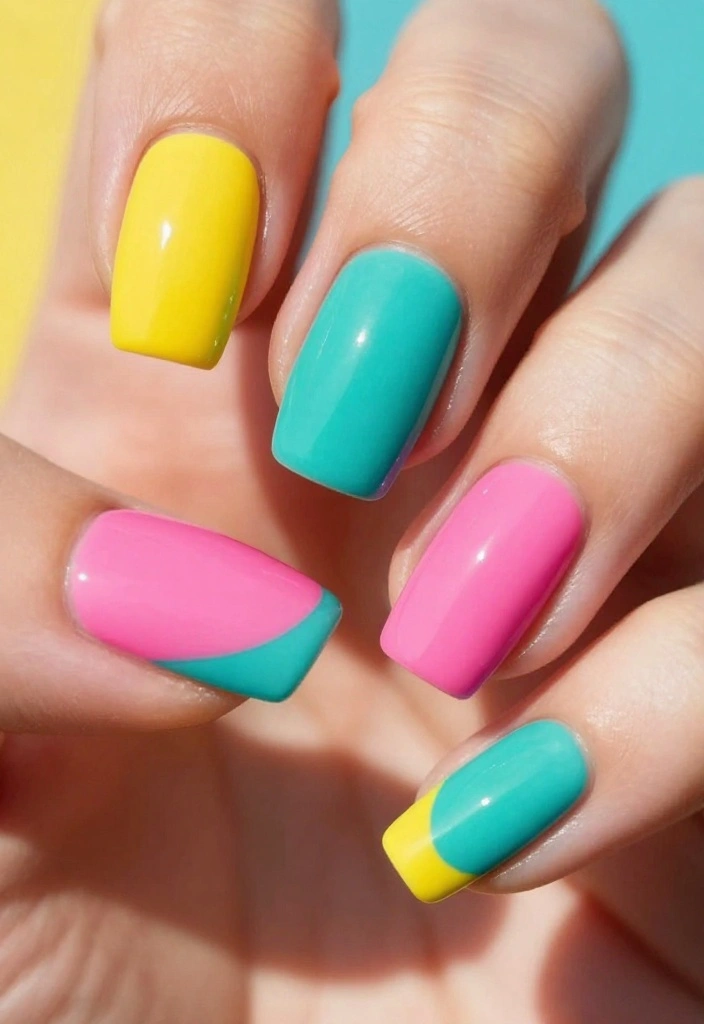
Color blocking is an exciting and vibrant trend that showcases bold, contrasting colors, whether on each nail or divided across a single nail. It’s a playful way to express your personality and creativity through your nails.
The fun of color blocking lies in its versatility. You can choose any combination of colors that reflect your mood or outfit. This style can make a statement on its own or complement your overall look beautifully.
Outfit Pieces:
– Light base coat for a clean canvas
– Bright contrasting colors for the blocks (think vivid yellows, blues, or reds)
– Tape to create sharp lines
Styling Tips:
– Use vibrant colors for a more energetic and lively vibe.
– Ensure each section is dry before applying tape to avoid smudges.
– Consider an accent nail for an added twist to your design.
Color blocked nails can either match your outfit or stand out as a bold statement, making them a versatile and fun choice for any event.
How To Choose Nail Ideas Natural
Choosing natural nail art ideas can enhance your fashion game and boost your confidence. Whether you want something easy or more professional-looking, there are several factors to consider. Here are some key points to help you select the perfect natural nail techniques. 1. Nail ShapeThe shape of your nails can influence the design you choose. Common shapes include round, square, oval, and stiletto. Round shapes often suit softer designs, while square nails can support bolder artwork.
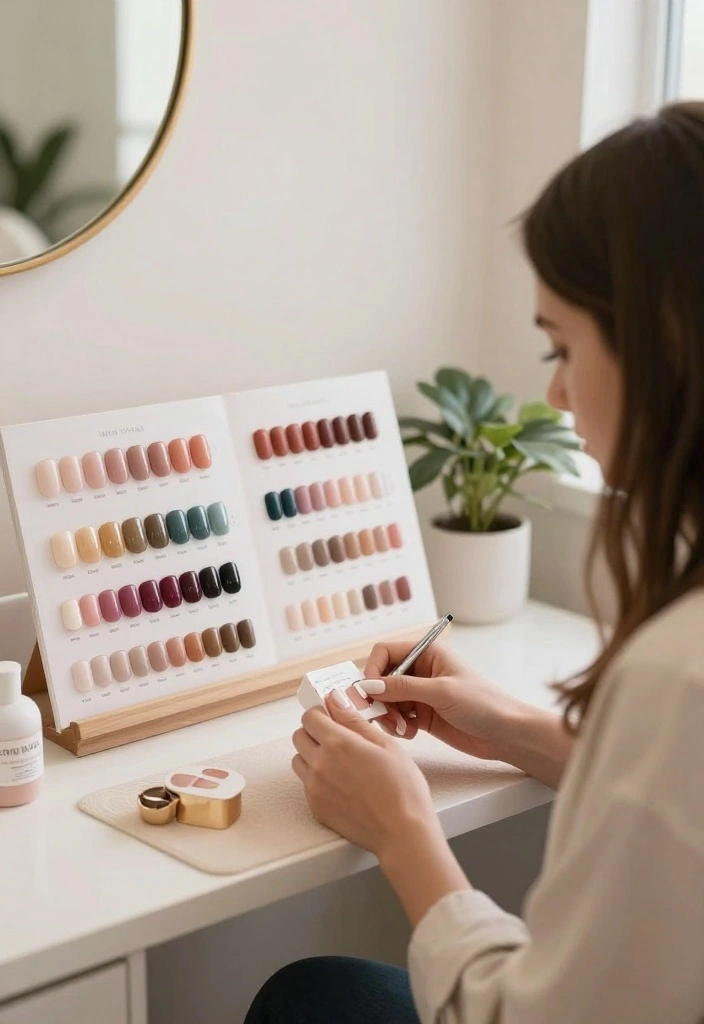
2. Color Palette
Natural nail designs benefit from a cohesive color palette. Earthy tones, pastels, and neutrals work well for a natural look. Think about what colors complement your skin tone. For example, peachy or nude shades suit warm tones, while cool undertones may look better with soft pinks or lavenders.
3. Design Complexity
Consider how much time you want to invest in your nail art. Simple designs, like minimalist French tips, are quick and easy to do. If you’re feeling adventurous and have more time, try intricate botanical designs or color block nails. Always choose a complexity level that matches your skill and patience.
4. Nail Health
Before diving into nail art, assess the health of your nails. If they are brittle or damaged, focus on healing them first. Use nourishing base coats or treatments to strengthen your nails. Healthy nails provide a better canvas for any design you choose.
5. Occasion
Think about where you’ll be showcasing your nails. Are they for everyday wear, a special event, or just for fun? Light, neutral colors work for everyday looks, while bright hues or metallics can elevate your style for events. Match your design to fit the occasion perfectly.
6. Tools and Supplies
Having the right tools can make all the difference in executing your nail art. Invest in quality nail polish, brushes, and pens. If you’re trying more advanced techniques like nail foils or stamping, ensure you have the necessary supplies. The right tools lead to a more polished and professional outcome.
Pro Tip: Before starting your nail art project, practice on a fake nail or a piece of paper. This will help you get comfortable with your chosen design. Don’t rush; enjoy the process and express your creativity!
With these considerations in mind, you can confidently choose natural nail ideas that reflect your style. Remember, the perfect nail art combines your personal taste with attention to detail and occasion. Happy nail designing!
9. Nail Foils
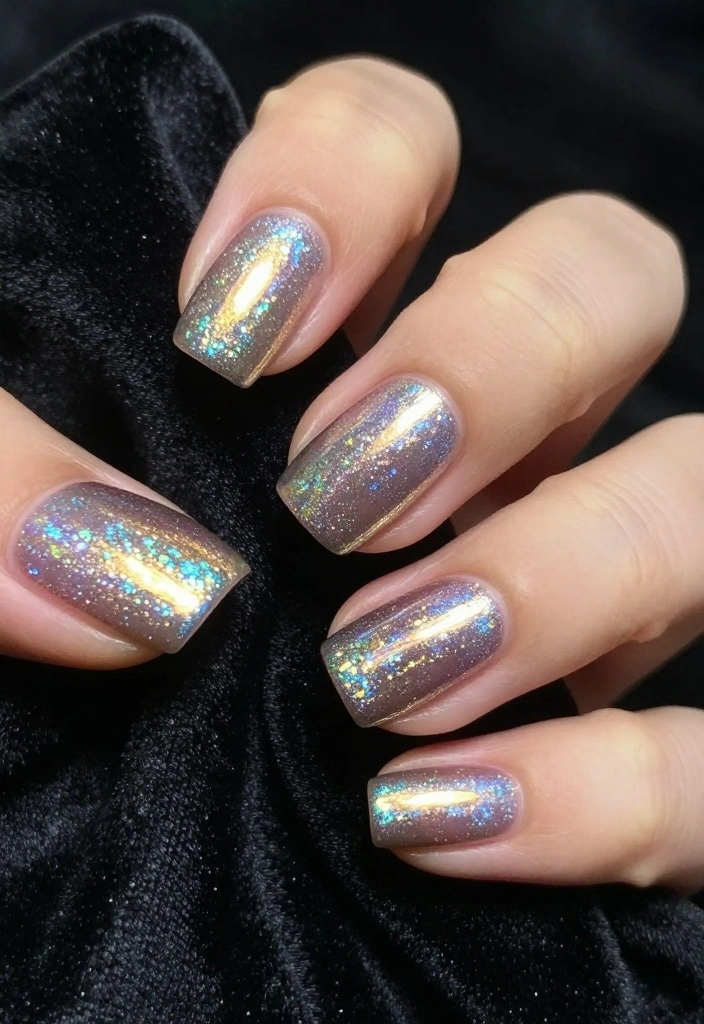
Nail foils are an exciting way to add glamour to your manicure. These thin sheets of metallic or holographic material adhere seamlessly, creating stunning designs that catch the light beautifully.
The charm of nail foils is their ability to transform a simple polish into something extraordinary. With a variety of colors and textures, you can create unique looks that stand out effortlessly, perfect for any occasion.
Outfit Pieces:
– Base coat of your favorite color
– Adhesive designed specifically for nail foils
– Top coat for durability
Styling Tips:
– Use foils on an accent nail for a subtle yet elegant touch.
– Mix and match different colors and textures of foils for a truly unique look.
– Ensure the adhesive is tacky but not too wet to avoid smudging.
Nail foils are ideal for anyone who loves a bit of shine and can easily elevate your look for any event.
You Might Also Like
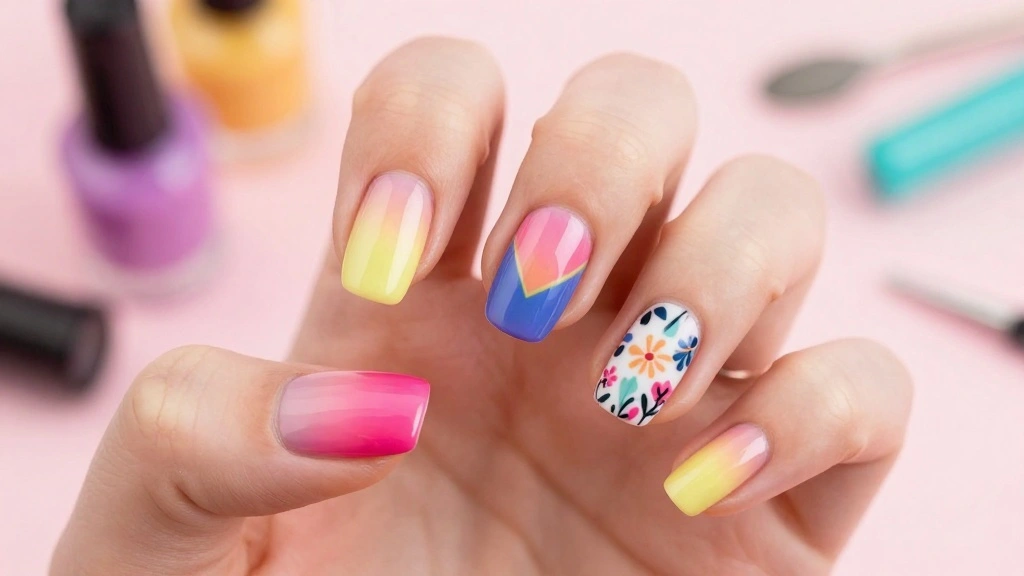
10. Seasonal Color Schemes
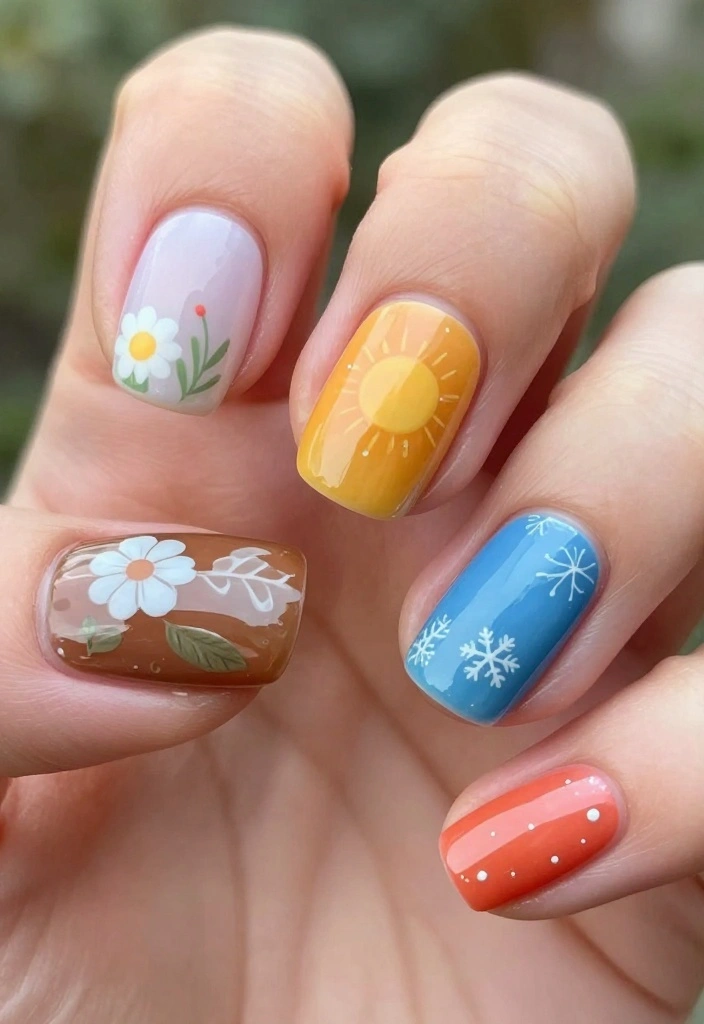
Every season brings an opportunity to refresh your look, and adapting your nails to reflect seasonal colors is a fun way to stay stylish. Seasonal color schemes allow you to express your creativity and embrace the changing weather.
For spring, think soft pastels; summer calls for vibrant colors; fall is ideal for earthy tones; and winter can showcase jewel tones or glitter. By aligning your nail colors with the season, you can showcase your style while celebrating the time of year.
Outfit Pieces:
– Seasonal base coat colors (pastels for spring, rich hues for fall)
– Nail stickers or stamps to add seasonal themes
– Neutral polish for balancing bold colors
Styling Tips:
– Keep up with seasonal trends for nail inspiration.
– Use stickers or stamps to add fun elements like snowflakes or flowers, depending on the season.
– Balance bold colors with neutral shades for a chic appearance.
Changing your nail colors with the seasons keeps your look fresh and allows for unlimited creative freedom, making your nails a delightful extension of your style.
11. Nail Art Pens and Stamps
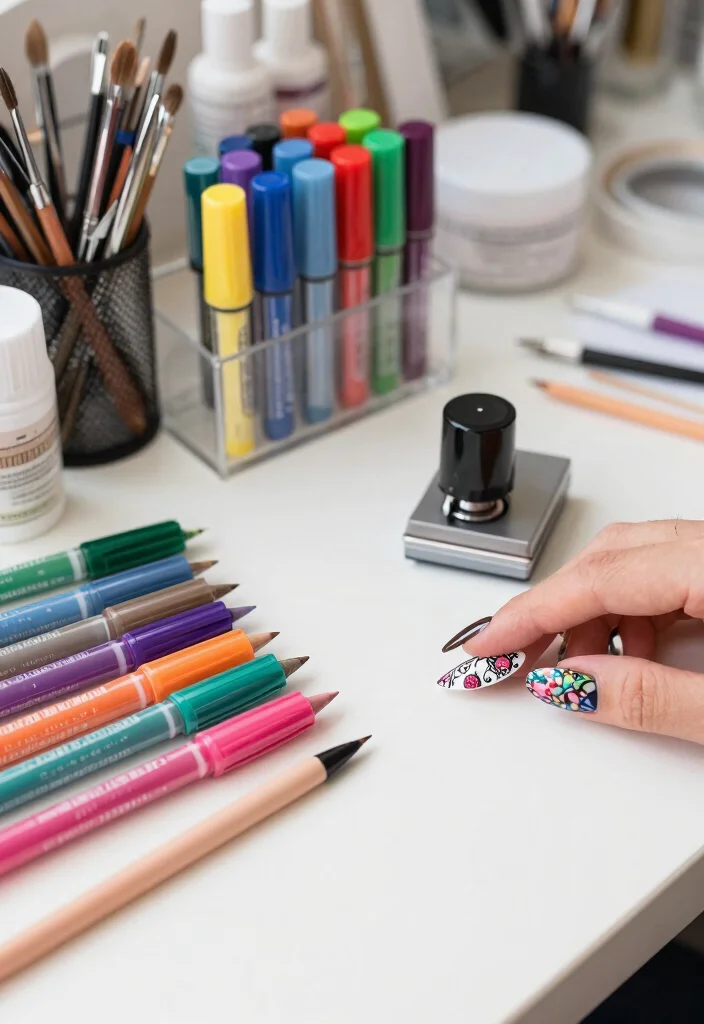
Nail art pens and stamps are fantastic tools for anyone looking to create intricate designs without the need for a steady hand. They provide precision and allow for endless creativity, making nail art an enjoyable experience for everyone.
To get started, apply your base coat and let it dry completely. Use the nail art pen to draw your designs freehand or utilize stamps for quick, intricate patterns. With a variety of colors available, you can easily explore different designs and styles.
Outfit Pieces:
– Base coat for a smooth application
– Nail art pens in various colors for diverse designs
– Stamping kit for quick patterns
Styling Tips:
– Experiment with different pen tips to achieve varying effects and styles.
– Practice your designs on paper to build confidence before applying them to your nails.
– Seal your designs with a top coat to add shine and durability.
Nail art pens and stamps make it easy to bring the salon experience home, making nail art accessible and enjoyable for everyone, allowing you to express yourself creatively.
Fun fact: 60% of nail art lovers say pens and stamps cut design time in half, turning complex nail ideas natural into quick, salon-ready looks. Pro tips: apply a base coat, then stamp or draw for precision without the steady hand.
Conclusion
Exploring these natural nail techniques opens up a world of creativity and personal style. Whether you’re a fan of minimalist designs or love playing with textures and colors, there’s something for everyone here. Take your time to experiment and find which techniques resonate with you the most, and soon enough, your nails will be the talk of the town. Happy painting!
Frequently Asked Questions
What are some easy nail ideas natural that still look professional?
Looking for easy nail ideas natural that still read professional? Start with clean, short nails and simple designs.
Try a sheer pink base with a crisp white tip, a subtle half‑moon, or minimalist dots. Keep lines thin and even, and finish with a high‑quality top coat to seal the look.
With a little practice, these nail ideas natural will feel polished without much fuss.
How can I achieve salon-worthy nail art at home without damaging natural nails?
You can get salon vibes by prepping properly and using the right products. Begin with clean nails, push back cuticles, and apply a thin base coat to protect the nail plate. Use gentle tools, avoid over‑ filing, and choose professional formulas (quality base/top coats). Work in thin layers, cure or dry fully between steps, and finish with a strong top coat for lasting shine. Rotate 1–2 techniques to keep nails healthy while you practice.
What tools and products are essential to master these natural nail techniques?
Here’s your starter kit for nail ideas natural that look polished: base coat, top coat, sheer or neutral polish, dotting tool, striping brush or tape, nail file and buffer, cuticle oil, and a quality nail cleanser. For gel or French looks, add a LED lamp, nail ideas natural compatible gel, and small brushes. Keep your brushes clean and your nails dry between steps for crisp results.
How can I extend the longevity of nail art on natural nails?
To make nail ideas natural last longer: prep well, use a solid base coat, apply thin layers, seal with a glossy top coat, and reapply every 3–5 days. Avoid prolonged water exposure, wear gloves when cleaning, and moisturize cuticles. Gentle filing to maintain shape, and skip aggressive picking or peeling to prevent lifting.
Are these techniques suitable for beginners or should I start with simpler designs?
Absolutely beginner-friendly. Start with 1–2 techniques and build confidence before tackling more complex nail ideas natural. Practice on one hand first, use steady strokes, and keep a clean workspace. Watch tutorials, take your time, and remember that every pro started as a beginner.
Related Topics


")
")
")
")
I love the tips you shared! I once tried to do a gradient design and ended up with a rainbow explosion on my hands. Have you ever had a nail art fail like that?
These techniques are awesome! Speaking of nails, why did the nail go to school? Because it wanted to be a little sharper! 😂
Did you know that the oldest known nail polish dates back to 3000 BC in China? They used it from flower petals and beeswax! It’s amazing how far we’ve come since then!
Reading this post reminded me of the time I got a little too creative with my nails and ended up with glitter everywhere for weeks! My cat thought it was a new toy. Do you have any funny nail art stories?