
Here is why I made this post. The days feel busy and I keep craving nails that look stylish without a long setup. I want nails you can do at home that stay neat all week. This post shows you how to get chic acrylic looks with simple steps that actually work.
Who is this for? If you love easy beauty and DIY nails, this one’s for you. You want a salon vibe at home without the big price tag. You care about looks that fit real life, from desk to dinner. You like clear, friendly steps you can follow tonight.
What you’ll get: I pulled together 20 stunning simple nail designs in acrylic that are easy to copy. Each design uses common supplies and short steps. The ideas span clean French tips, soft marble, bold color blocks, and a touch of glitter. They work on short and long nails alike, with tips for practice and speed.
These designs bring real value. You will learn quick, repeatable moves that save time. You will see how to fix small missteps with simple tweaks. You will get color suggestions and pairing ideas so you can mix and match. You will also get maintenance tips to keep nails strong between sessions.
Here is how to use them. Start with a flexible nude or pale pink base. Add an accent nail with a single design, such as a stripe or dot. Keep your brush clean and the layers thin so the look dries fast. Practice on a swatch nail before you try it on your own nails.
Next steps are simple. Pick 3 designs you love and gather the basics: an acrylic kit, a nail file, top coat, and a dotting tool. Try one design this weekend and see how it fits your routine. If you share your results, I might cheer you on and learn what you want next.
Contents
- 1. Classic French Tips
- 2. Glitter Ombre
- 3. Minimalist Geometric Patterns
- 4. Marble Effect
- 5. Soft Pastel Shades
- 6. Floral Accents
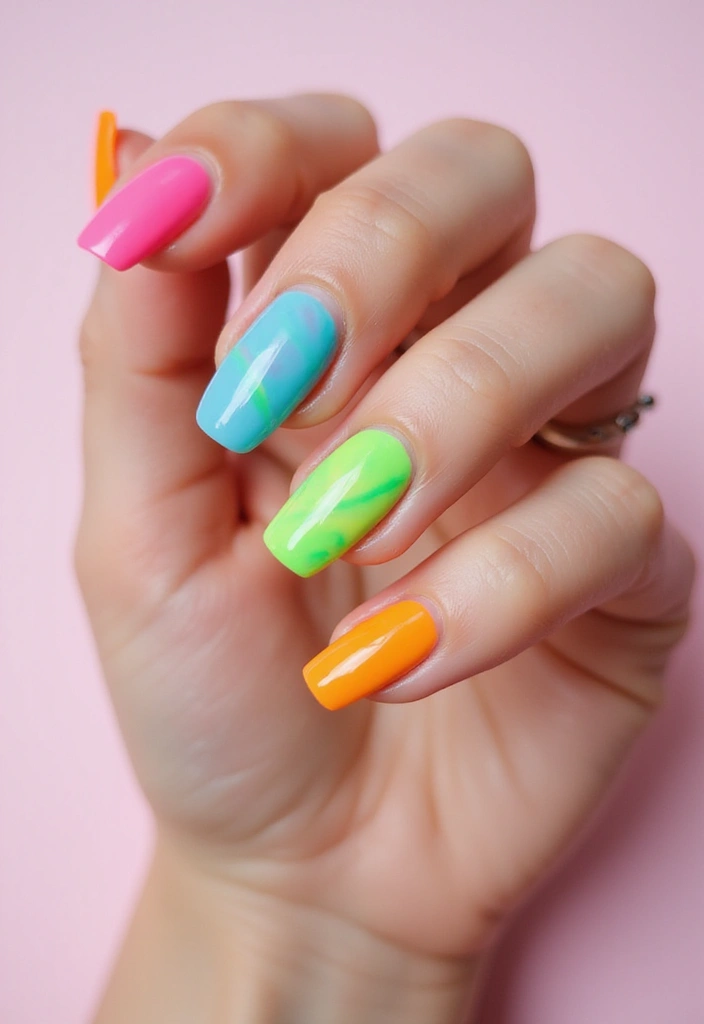
- 7. Neon Pop
- 8. Textured Matte Finish
- 9. Color Block
- 10. Half-Moon Design
- 11. Jewel Tones
- 12. Rainbow Swirl
- 13. Animal Prints
- 14. Tie-Dye Effect
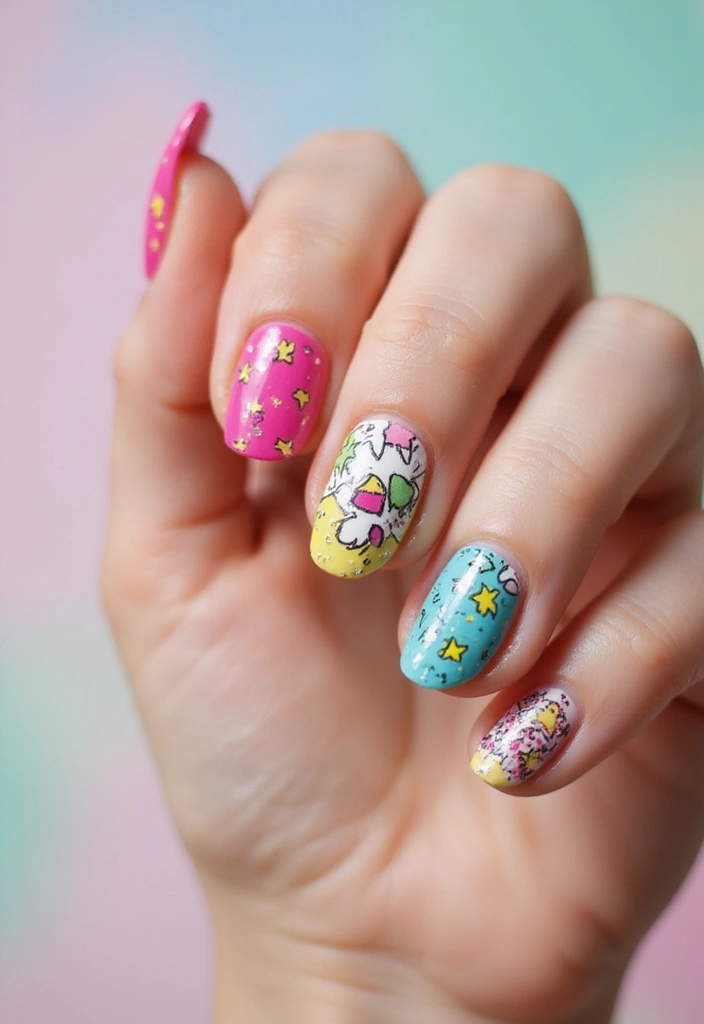
- 15. Sparkly Stars
- 16. Colorful Doodles
- 17. Bright Stripes
- 18. Radiant Rainbow
- 19. Sweet Candy Colors
- 20. Whimsical Clouds
1. Classic French Tips
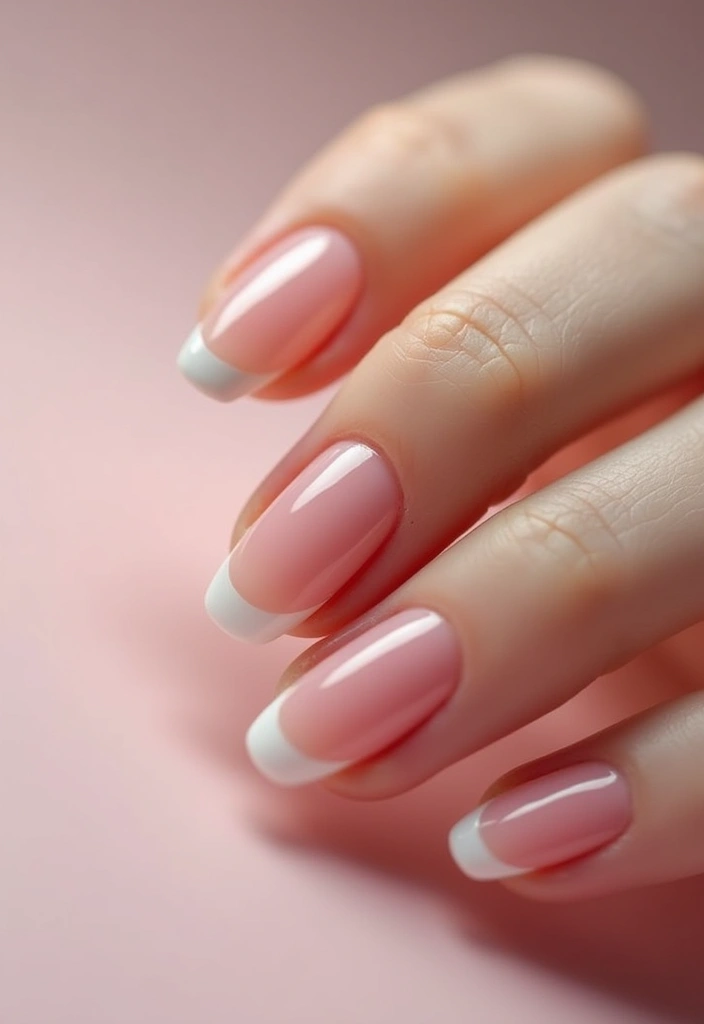
You want nails that look neat and stylish with little effort. Classic French tips on acrylic nails fit the bill. They stay timeless and work for many events. They never look loud. Here is why they shine: a sheer nude base makes your nails look longer, and a crisp white tip adds a clean edge.
Next steps:
– 1. Prep the nail. Shape with a file and smooth the surface. Wipe away dust so the polish sticks well.
– 2. Apply the sheer base. Use a pale nude shade and let it dry completely before you move on.
– 3. Paint the tips. With a fine brush, draw a straight white line on the free edge. Keep the line thin and even.
– 4. Add a twist (optional). A touch of glitter at the tip or a hint of color near the edge freshens the look.
– 5. Seal and care. Finish with a clear top coat. If you choose gel, cure under the lamp and recoat every few days to prevent chips.
Tips for best results: it works on short and long nails. Practice on a nail wheel first if you’re new. Pick a nude shade close to your skin tone. Keep the white line crisp and clean.
1. Classic French Tips
Editor’s Choice

Acrylic Nail Kit for Beginners: Clear White Pink Powder and Liquid Set P…

Sally Hansen Insta-Dri®, Taupe Priority, Quick Dry, Long Lasting, Streak…
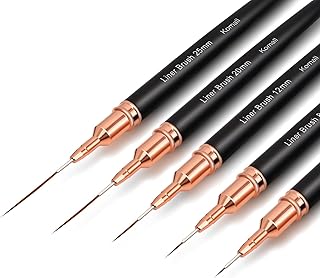
Metallic Nail Art Brushes, 5Pcs Liner Brush Set, UV Gel Polish Painting …
2. Glitter Ombre
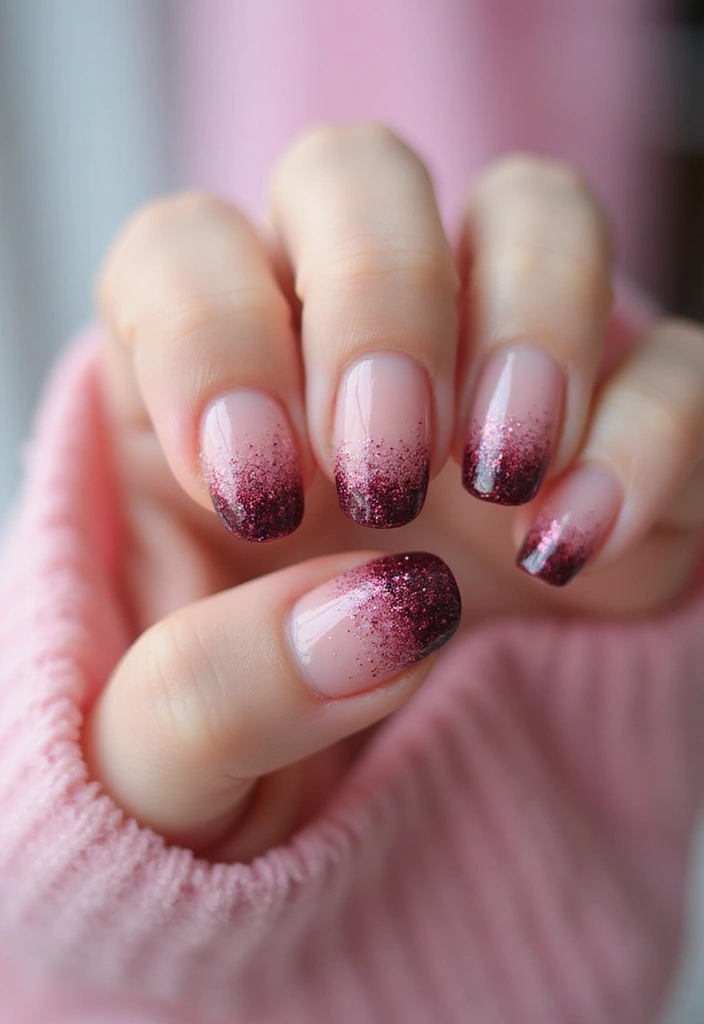
Glitter Ombre on Acrylic Nails
You want nails that shine but stay chic. Glitter ombre does that. It starts soft and ends with sparkle.
Here is why it works: a light base makes the glitter pop without looking loud.
What you’ll need
– A light base color (pink, nude, or pale lavender)
– Fine glitter or glitter gel
– A small makeup sponge
– Top coat and base coat
Step-by-step
– Apply base coat, then two thin coats of your chosen base. Let each coat dry.
– Put a small amount of glitter on the sponge. Tap near the tip of the nail and gently blend toward the middle.
– Repeat until you reach the right fade.
– Build the glitter layer gradually. Less is more at first, you can add more to deepen the sparkle.
– Finish with a seal of top coat to lock in color and add shine. Cure if you use gel, or air-dry if you use regular polish.
Color ideas
Pink to gold gives a warm glow. Silver to blue creates a cool, icy look. Try champagne to rose for a soft, romantic vibe.
Next steps: clean edges, push back cuticles, and keep up with a quick top-coat refresh every few days.
2. Glitter Ombre
Editor’s Choice
Acrylic Nail Kit for Beginners: Clear White Pink Powder and Liquid Set P…

LEOBRO Glitter, Fine Glitter for Resin, Set of 32 Colors, for Nail Body …

Beetles 2 Pcs 15ml No Wipe Gel Top Coat and Base Coat Set – Shine Finish…
3. Minimalist Geometric Patterns
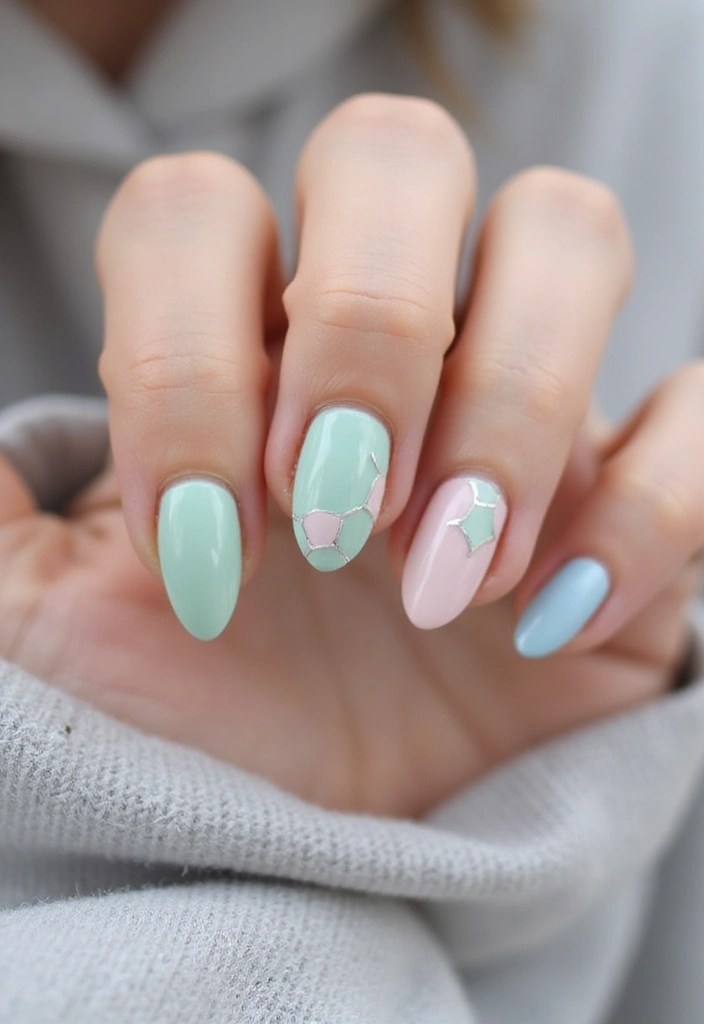
Here is why minimalist geometric patterns work for acrylic nails. They feel fresh, tidy, and easy to wear every day. You get style with calm lines that don’t shout.
What you need
– Soft base shade: cream, pale pink, or milky beige
– Dark contrast for lines or dots: black, navy, or charcoal
– A thin nail brush, a striping brush, or tape for clean edges
– A dotting tool or toothpick
– Top coat and base coat
– Nail file and lint-free wipes
Next steps
– Prep nails: file smooth, push back cuticles, wipe clean
– Apply base coat, then the soft base color. Let it dry fully
– Plan the look on one nail, then copy it on others for balance
– Draw slim lines with the thin brush or lay tape across the nail to guide edges
– Add tiny dots at line ends or intersections
– Seal with top coat. If you use gel, cure under lamp as directed
Design ideas
– One diagonal stripe from corner to opposite edge
– A row of small dots along the cuticle line
– Two thin lines that meet in a small triangle in a corner
Pairing and upkeep
– Finish with a bold ring or simple band
– Reapply top coat every few days for shine
– With acrylics, avoid long hot soaks to protect the finish
Try these steps this week and feel how easy it is to keep nails looking neat with simple art
3. Minimalist Geometric Patterns
Editor’s Choice

Artdone 31pcs Nail Art Brushes, Nail Art Tool Set, Dotting Tools, Dust B…

5PCS Dotting Pens with 3 PCS Nail Painting Brushes, Nail Art Design Tools

Sally Hansen Double Duty™, Base and Top Coat, Quick Dry, Long Lasting, S…
4. Marble Effect
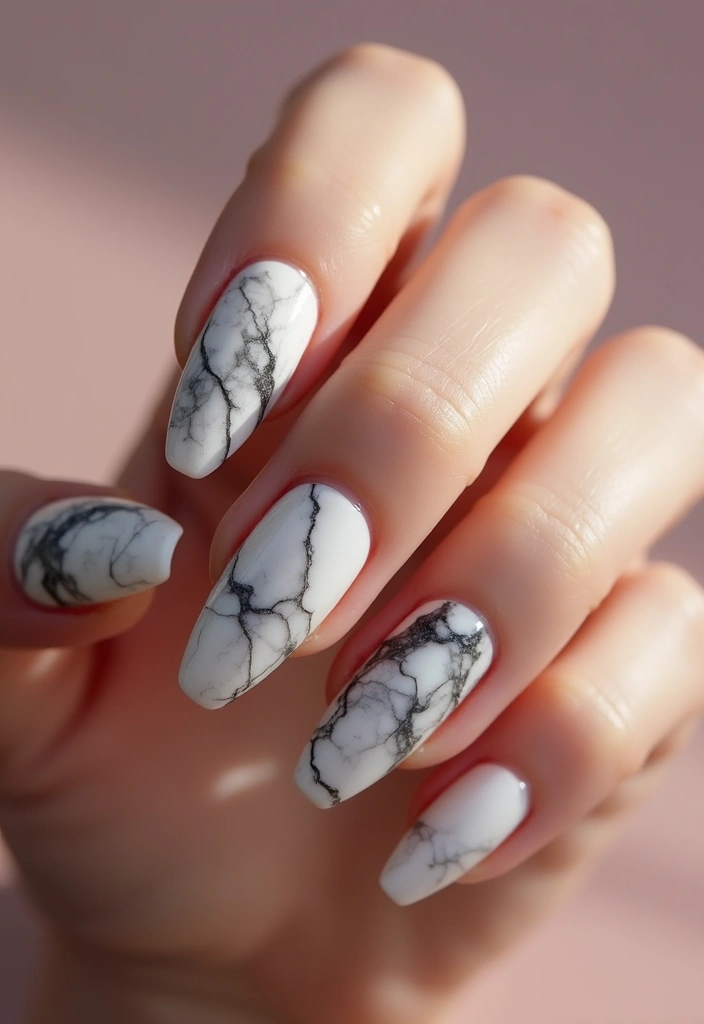
– Marble Nail Magic on Acrylic You want a look that feels classy and creative. Marble nails swap in white, gray, and black to create soft swirls. It looks like tiny art on your nails. You can use acrylics or just natural nails with the right polish. Here is why this style wins and how you can copy it at home.
– What you need
– Acrylic nails or a strong natural bed
– White base polish
– Gray and black polish or thin acrylic paints
– A fine brush or a toothpick
– Clear top coat and base coat
– Next steps: how to do it
1. Prep your nails. Clean, file, and push back cuticles. Apply base coat.
2. Paint a light base color. White or pale gray works best. Let it dry.
3. On a tiny palette, drop small dots of gray and black. Swirl them with the brush to form veining.
4. Gently drag a faint line of white or light gray across the mix to add natural veins. Don’t overdo it.
5. Seal with a clear top coat. Let it cure or dry completely.
– Tips and easy variations
– Work fast so the swirls stay fluid.
– For a calmer look, use a white base with fewer veins.
– Try a matte top coat for a fresh vibe.
– Care tips
– Apply thin layers. Thick coats hide the pattern.
– Reapply top coat every few days to keep shine and protection.
Marble effect nails are like mini masterpieces on your fingertips! With just a few shades of acrylic and a little creativity, you can transform your nails into a stylish statement that reflects your unique flair.
4. Marble Effect
Editor’s Choice
Acrylic Nail Kit for Beginners: Clear White Pink Powder and Liquid Set P…

Beetles 31pcs Nail Art Brushes, Dotting Tools, Nail Art Pens, Dust Brush…
Sally Hansen Double Duty™, Base and Top Coat, Quick Dry, Long Lasting, S…
5. Soft Pastel Shades
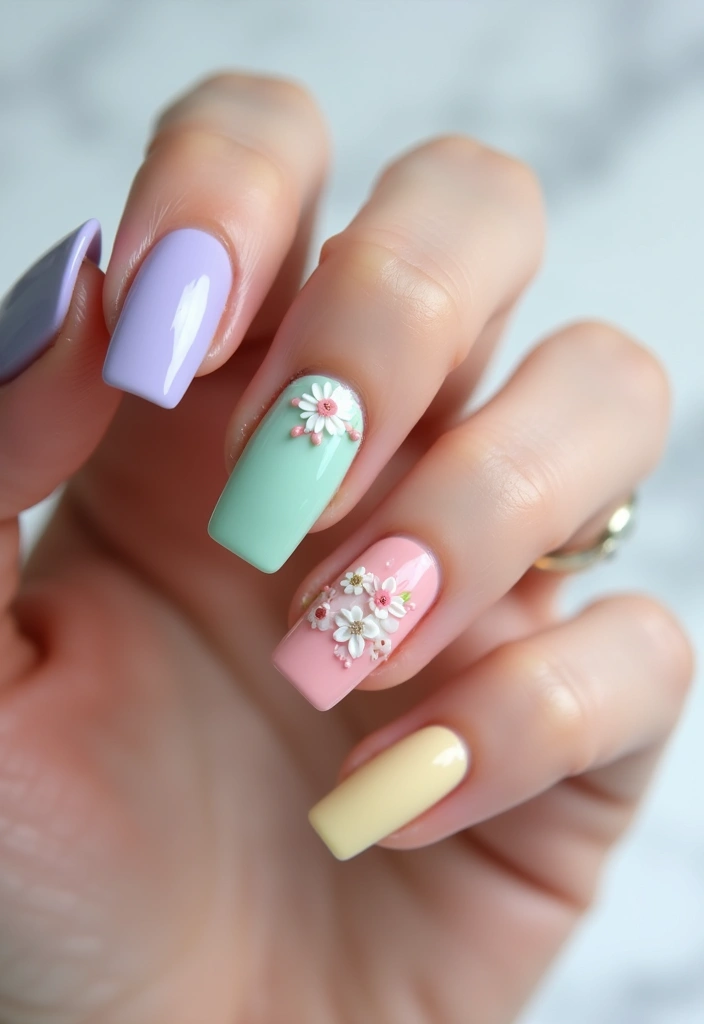
Soft pastels give you a gentle, feminine vibe on acrylic nails. You can wear them alone for a calm look or blend several pastels for a soft rainbow. Try mint green, lavender, and baby pink. These shades glow in spring light and can also brighten a gloomy day. A matte top coat adds a chic, modern touch.
Here is why pastel colors work well: they look clean, they make digits look longer, and they pair with many outfits. Use one shade for a clean nail or mix two or three for a subtle gradient. To apply well, start with clean, filed nails. Push back cuticles, then prime with a base coat. Lay on two thin coats of color, letting each dry. Finish with a glossy or matte top coat depending on your mood. For a trendy twist, try a soft gradient from sheer pink to mint at the tips, or add a thin white line for a simple nail art accent.
Care and maintenance tips: avoid harsh scrubs on pastels, and use a gentle remover. Keep nails strong with a daily cuticle oil.
Next steps: pick your shades, test a small nail art idea, and schedule a fill when you see growth.
Soft pastels on acrylic nails not only elevate your style but also make your digits look longer! Mix mint green, lavender, and baby pink for a sweet, modern twist. Embrace the pastel power this season!
5. Soft Pastel Shades
Editor’s Choice
Acrylic Nail Kit for Beginners: Clear White Pink Powder and Liquid Set P…
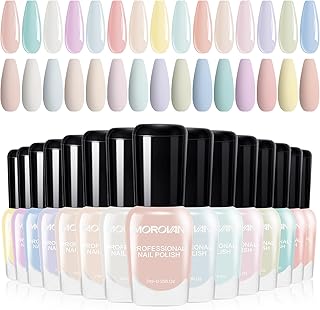
Morovan Fingernail Nail Polish Set: 15 Colors Pastel Macaron Nail Polish…

Sally Hansen Vitamin E Nail and Cuticle Oil™, Natural Essential Oil, Vit…
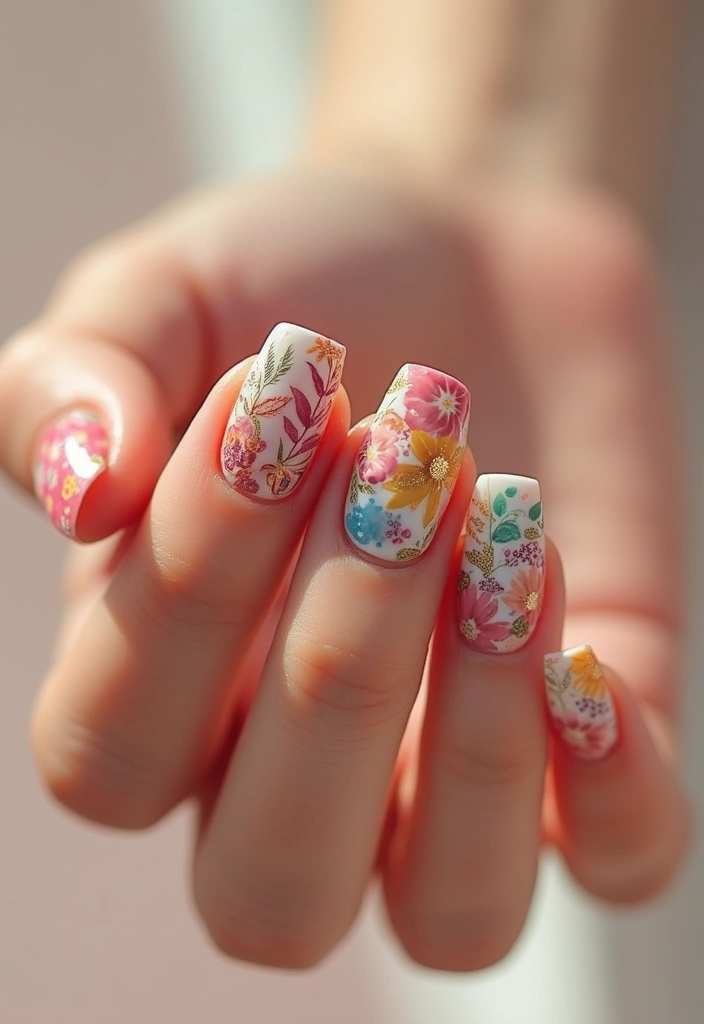
6. Floral Accents
Craving a fresh look that isn’t fussy? Floral accents on acrylic nails can brighten your whole hand. It feels fresh and fun to wear.
Tools and base
Start with a nude or pale base. A soft shade lets the flowers stand out. Use tiny brushes or nail art pens to draw. A dotting tool helps with centers.
Flower ideas
Choose daisies with white petals and yellow centers, classic and cheerful. Try simple roses for romance. Or go modern with abstract petals and gentle swirls.
Placement and style
Place a few blooms on one nail as a focal point. Or scatter tiny flowers across several nails for a light garden vibe. Keep lines thin and petals simple so the look stays chic.
Color and finish
Keep petals in white, pink, or peach. Centers can be yellow or gold. Seal with a glossy top coat to deepen color and add shine. If you wear gel acrylics, cure as directed; if not, air-dry fully.
Care and wear
Avoid harsh cleaners right after shaping the design. A quick top-up every few days helps it last.
Next steps: practice on a nail wheel, then test on a real nail with a slow hand. With patience, you can master this look in a weekend. Jump in now and make your own garden on nails.
6. Floral Accents
Editor’s Choice
Beetles 31pcs Nail Art Brushes, Dotting Tools, Nail Art Pens, Dust Brush…
5PCS Dotting Pens with 3 PCS Nail Painting Brushes, Nail Art Design Tools

OPI Nail Lacquer Top Coat | Clear Nail Polish Top Coats | Classic, Quick…
7. Neon Pop
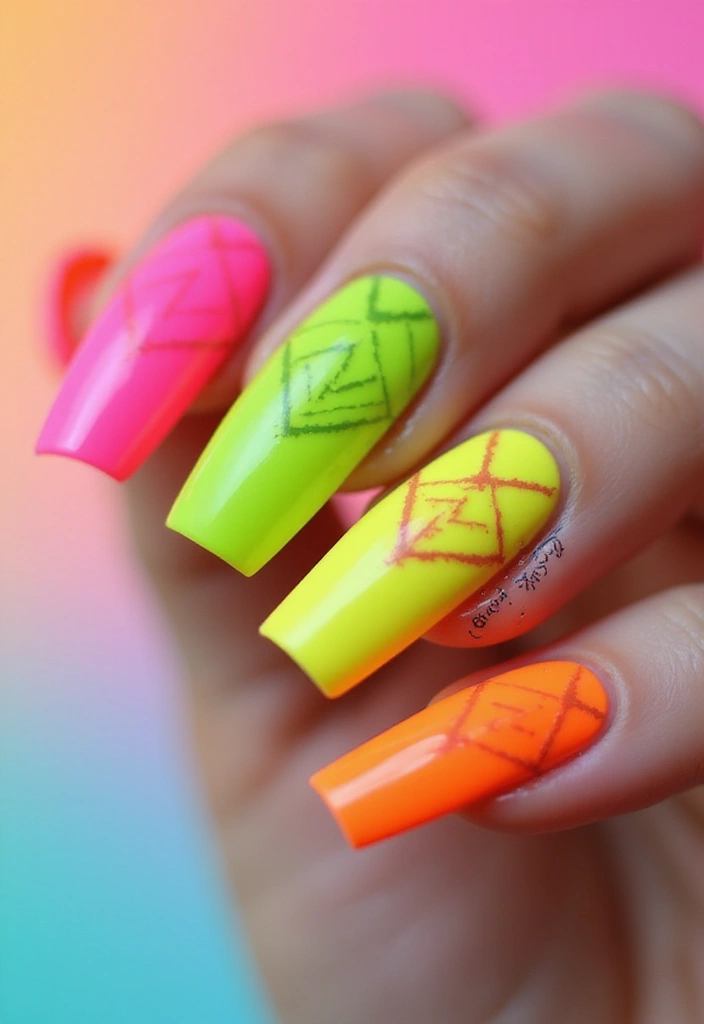
Neon Pop on Acrylic Nails
You want nails that grab attention fast. Neon pop nails do just that. Bright neon shades light up in sun and under party lights. Electric pink, lime green, and sunny yellow feel bold and playful. You can cover all nails in one neon shade or mix shades for a rainbow look. This style fits summer parties and music festivals. Keep the rest of your outfit simple so the nails can shine.
Here is why the neon pop look stands out on acrylics. Neon colors hold strong on a thick nail base. They show depth and glow under lights. With a clear top coat, the color stays glossy and lasts longer. The finish looks smooth, not chalky, with the right shade pairings.
How to get the neon pop look on acrylics
– Prep nails: file, buff, and push back cuticles for a clean surface
– Base coat: apply a thin layer to protect the nail
– Neon layers: paint two coats of your neon polish, letting each dry
– Rainbow option: put different neon shades on each nail or use one bright accent nail
– Seal the color: finish with a clear top coat for shine and wear
– If you use gel polish: cure under a UV or LED lamp as directed
– Dry time: wait until nails are fully dry before activity
Style tips to make it last
– Pair with a simple white tee, denim, or a solid dress
– Skip busy prints so the nails stand out
– Care after parties: use a gentle remover and a light hand when cleaning nails
– Quick touch ups: carry a small brush for tiny chips
Next steps
– Pick two neon shades you love and try this look for your next night out.
7. Neon Pop
Editor’s Choice

Morovan 15 Bright Color 0.27oz Air Quick Dry Nail Polish Gift Set for Women

Top Coat Nail Polish Clear: Quick Dry Nail Polish No Chip High Shine Lon…

SUNUV UV LED Nail Lamp, Gel Light for Nail Polish UV Dryer with 3 Timers…
8. Textured Matte Finish
Want a chic nail look that hides scratches and feels soft? A textured matte finish could be your go-to. It swaps gloss for a velvety, calm vibe.
Matte nails give a calm, modern vibe. They look smooth and quiet. You can keep it simple with one solid color, or add stripes for depth. The texture adds interest without shouting.
Here is why it works. It hides flaws, dries quickly, and looks good in photos. It works on acrylic, gel, or natural nails.
How to apply the textured matte look
Getting this look on acrylic nails is easy:
– Step 1: paint your base color and dry.
– Step 2: add a simple design, then seal with a clear top coat.
– Step 3: finish with matte top coat and dry.
Care tips
Keep oils away from the tips after you finish; they dull the look.
Seasonal styling ideas
Fall and winter outfits pair well with coffee browns, charcoal gray, and deep greens.
Be aware of limits
Matte surfaces can show fingerprints and dust. Chips can show up sooner than on gloss. A light touch when filing helps.
Ready to try? Grab a matte top coat and a color you love, and give it a go. It wears well when you treat it gently and keep nails clean.
8. Textured Matte Finish
Editor’s Choice

OPI Nail Lacquer Top Coat | Clear Nail Polish Top Coats | Classic, Quick…
Acrylic Nail Kit for Beginners: Clear White Pink Powder and Liquid Set P…
Beetles 31pcs Nail Art Brushes, Dotting Tools, Nail Art Pens, Dust Brush…
9. Color Block
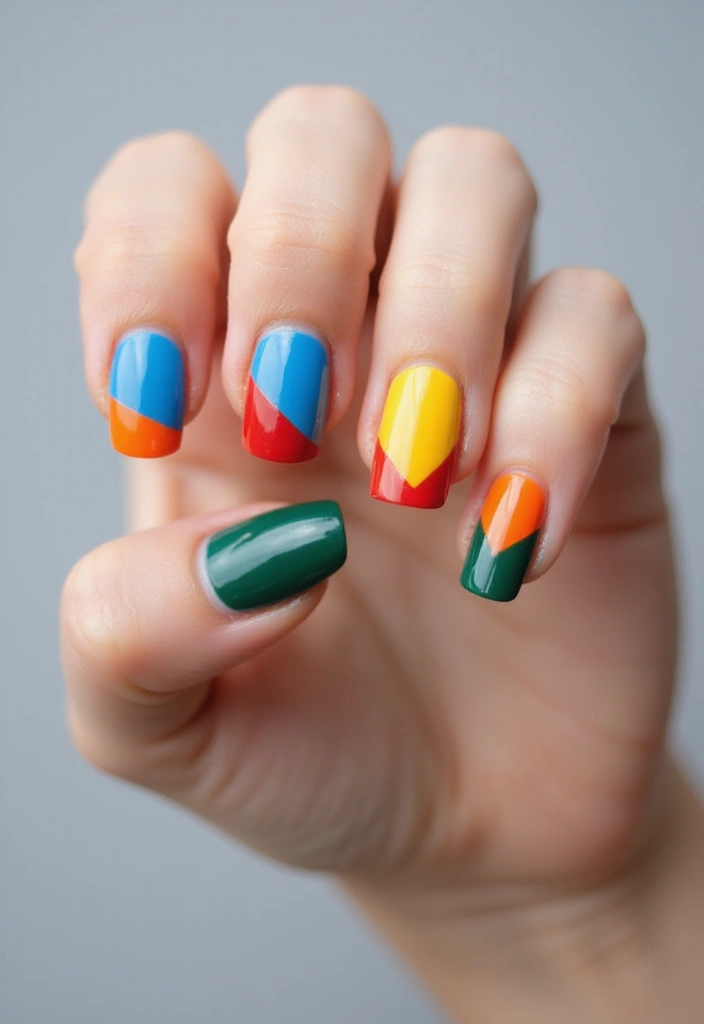
Color blocking nails give you a clean, bold look you can do at home. You pick two or more colors and place blocks on each nail. The result is modern and easy to read from far away.
What you need
– Two or more nail polish colors you love
– A base coat and a top coat
– Nail art tape or thin striping tape
– A small brush or a clean cotton swab for tidy edges
– An optional matte top coat for a softer finish
Here is how to do it
– Start with clean acrylic nails. Shape them and push back cuticles. A smooth surface helps the colors stay put.
– Apply a thin base coat. Let it dry for a minute.
– Place tape to block off the areas you want to color first. Press edges flat so paint won’t leak.
– Paint the first color over the exposed area. While the paint is still wet, carefully lift the tape to reveal a crisp edge.
– Repeat with the second color in a new block. You can mix sizes and positions for a playful look.
– If lines look shaky, touch them with a fine brush and a tiny amount of polish remover. Let all layers dry completely.
– Finish with a top coat to seal the design and add shine. For a softer vibe, try a matte top coat.
Tips and tricks
– Pair a nude base with bright blocks for a chic look.
– Add a metal stripe or dot near the edge for extra pop.
– Color block over clear tips for a modern negative-space effect.
Common questions
– Do I need fancy tape? No. Regular nail tape works, but use thin tape for crisper lines.
– Will it chip quickly? A good top coat helps. Reapply every few days.
– Can I do this on acrylics? Yes. Start with a smooth base and seal with top coat.
Next steps
Try bold color pairings you see in fashion. With practice, you’ll nail crisp edges and even overlapping blocks that turn heads.
Color block your way to nail art perfection! With just a few colors and some simple tape, you can create a bold, modern look that’s totally DIY-friendly. Let your creativity shine and elevate your style with simple nail designs in acrylic!
9. Color Block
Editor’s Choice

3pcs/Set Nail Art Tape Roll Wrap Adhesive Decoration Edge Guide Tips Des…
Beetles 2 Pcs 15ml No Wipe Gel Top Coat and Base Coat Set – Shine Finish…

Acrylic Nail Brush Set, 10PCS Professional Nail Art Brushes for Acrylic …
10. Half-Moon Design
Looking for a nail look that is chic yet simple? The half-moon design fits. A small curved cut near the cuticle forms a crescent that stays quiet yet stylish.
Choose colors you love. Classic white or red work well. Soft pastels or bright neons create a bold twist. The crescent can stay clear or be painted in a different shade for a subtle contrast. This style shines on acrylic nails and suits workdays and weekends alike.
What you need
base coat, your color choices, curved stencil or striping tape, a fine nail brush, top coat.
How to do it
1. Prep the nail: trim, file, push back cuticles, and buff lightly.
2. Paint the full nail with the main color. Let dry.
3. Place curved tape near the cuticle to mask the crescent.
4. Paint the second color over the masked area. Remove tape carefully.
5. Finish with top coat and cure as directed.
Finishes and tips
Glossy top coats make the crescent pop. A matte finish gives a neat, quiet look. Short nails read the crescent clearly; long nails show a bigger arc.
Next steps
Practice on a few nails first. Adjust the curve to fit your nail shape. Use a dotting tool and a thin brush to tidy edges.
This design adapts to many nail shapes and stays fresh with a quick top-coat touch-up every few days.
10. Half-Moon Design
Editor’s Choice
Sally Hansen Double Duty™, Base and Top Coat, Quick Dry, Long Lasting, S…

60 Colors Nail Striping Tape Line 2 Pieces Nail Tape Dispensers Free Tap…

Super Fine Nail Art Brush Set for Thin Lines, Tiny Details, Fine Drawing…
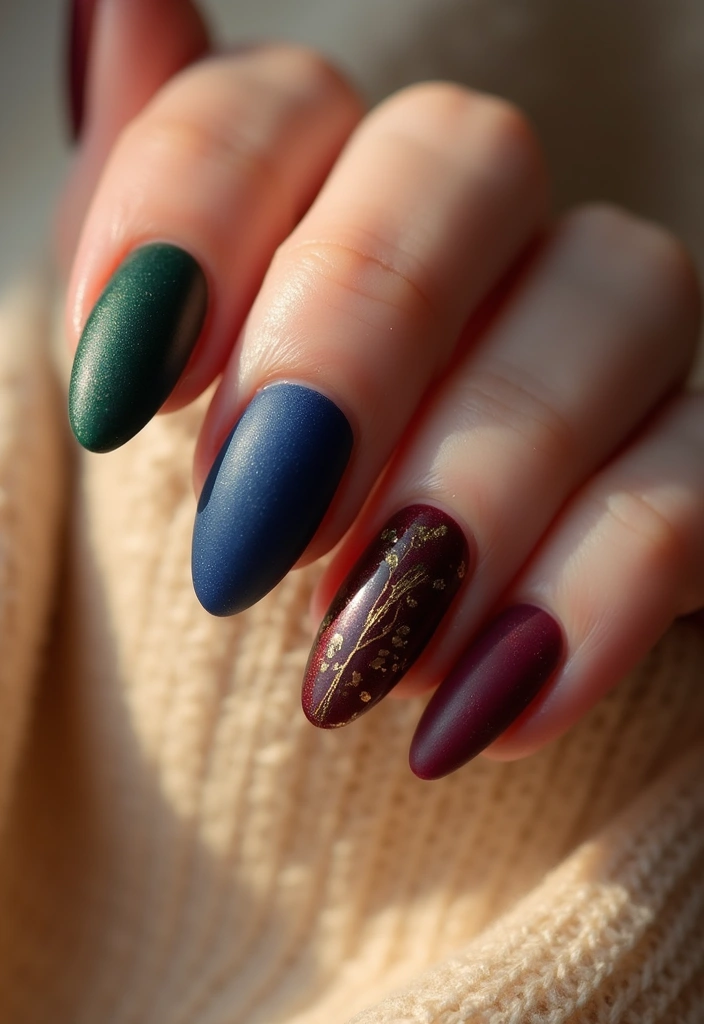
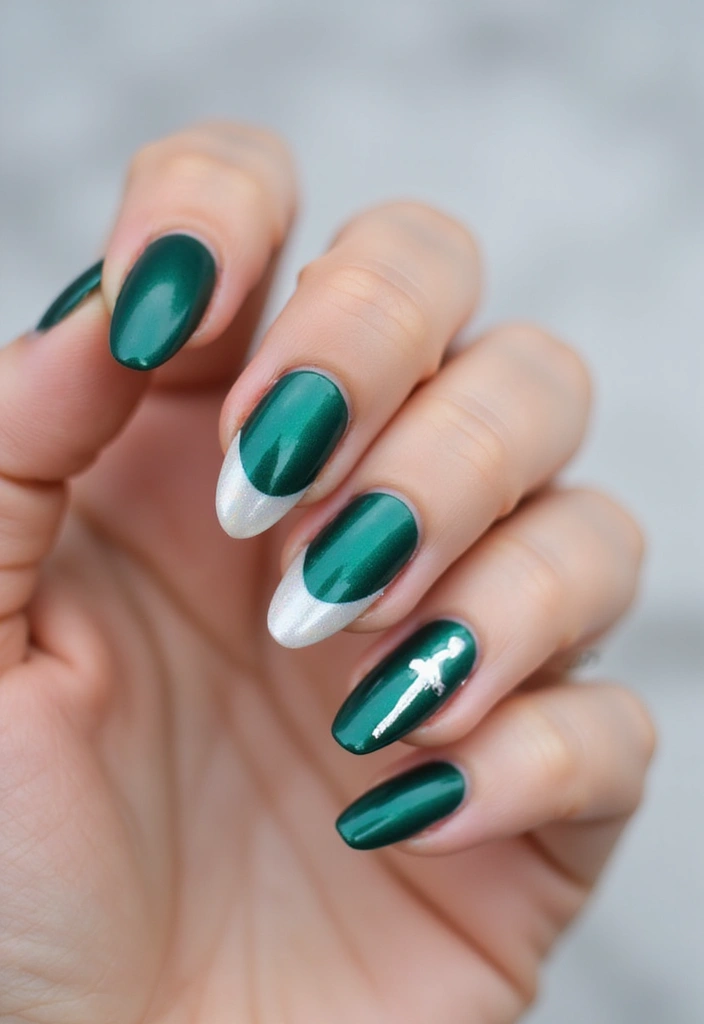
11. Jewel Tones
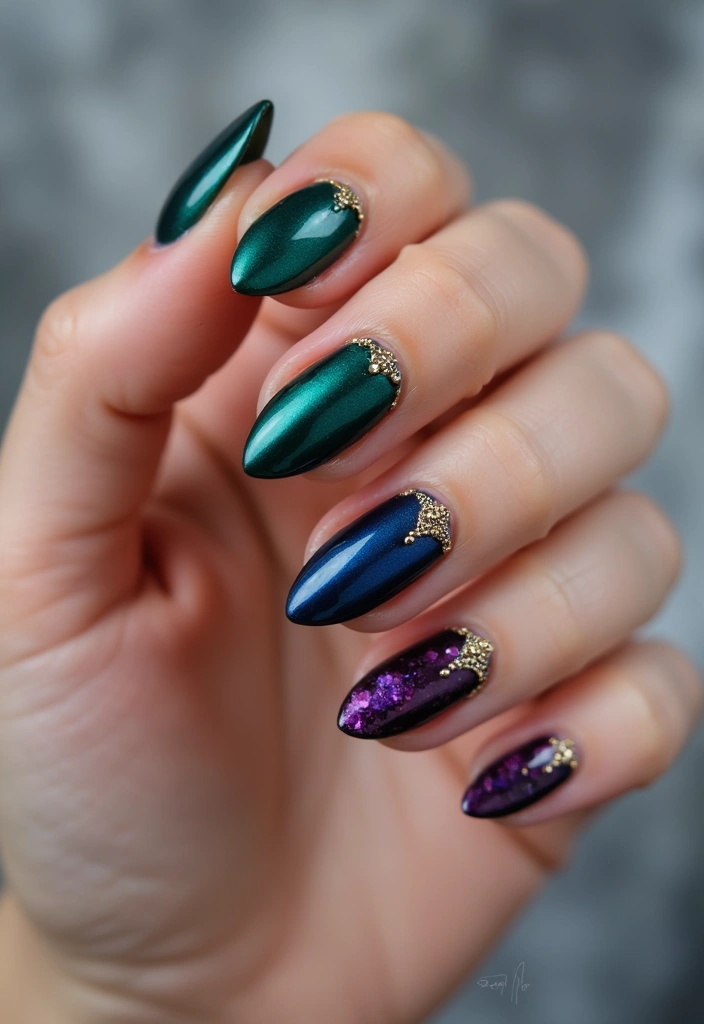
If you want nails that look rich and chic, jewel tones are your best bet. Deep emerald, royal blue, and rich burgundy feel premium on acrylic. They pop in photos and catch the eye in person. These shades suit fall and winter, and they work for special occasions too. Add gold or silver foil for an extra glow. A clean single color is stunning, but a hint of sparkle draws attention.
– Shades to try
– Emerald green
– Royal blue
– Deep burgundy
– Amethyst purple
– Midnight teal
– How to apply on acrylic
1) Prep your nails. Shape, buff, and push back cuticles.
2) Put on a base coat to protect the nail.
3) Apply two coats of your chosen jewel color.
4) Add foil accents. Press small pieces of gold or silver foil onto a tacky top layer or use foil glue, then smooth them flat.
5) Finish with a top coat. Let it seal the color and foil.
– Finish ideas and quick tips
– Glossy top coats make colors look bold.
– Matte tops give a soft, velvety feel.
– For longevity, reapply a thin top coat every few days.
– Care and suitability
These shades flatter many skin tones. They pair well with black, cream, or metallic outfits. Keep nails strong with proper prep and gentle removers to avoid lifting.
Next steps: pick your favorite jewel tone, try the foil accent, and show off a luxe mani with minimal effort.
11. Jewel Tones
Editor’s Choice
Acrylic Nail Kit for Beginners: Clear White Pink Powder and Liquid Set P…

Holographic Nail Glitter Foils, 12 Colors Sparkly Ultra-Thin Aluminum Fo…
Sally Hansen Double Duty™, Base and Top Coat, Quick Dry, Long Lasting, S…
12. Rainbow Swirl
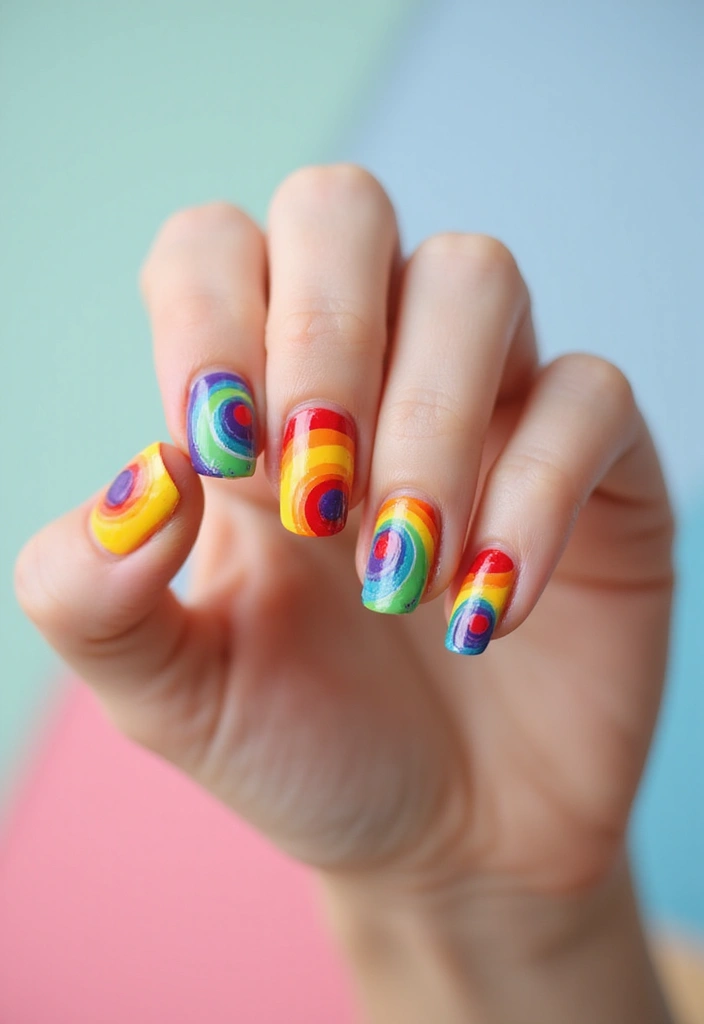
Want a colorful, easy look you can wear on acrylic nails? Rainbow Swirl is the answer. It blends several shades into a soft, flowing mix that catches light and makes you smile when you glance down. This style works on short or long nails and hides small mistakes. Here is why it helps: it uses many colors in one design and stays playful without heavy art.
What you need
– Base coat
– Top coat
– 4–5 color polishes that get along
– A thin nail-art brush and a dotting tool
– Acetone and a cleanup brush
How to do it
1) Prep the nail: file, push cuticles, wash hands.
2) Apply base coat and let it dry.
3) On each nail, place small blobs of color on the nail plate.
4) Use the thin brush to swirl colors in small circles until they blend. You can also dab spots and lightly drag to mix.
5) Clean the edges for neat lines.
6) Seal with a top coat and let it harden.
Care tips
– Work quickly before the polish dries to keep the mix smooth.
– Use 3–4 shades to avoid muddy looks.
– On acrylic nails, don’t rub hard or you may lift the tips.
Next steps: practice on one finger, then try a full hand. With a bit of patience, your rainbow swirl nails will shine in any light.
12. Rainbow Swirl
Editor’s Choice
Beetles 2 Pcs 15ml No Wipe Gel Top Coat and Base Coat Set – Shine Finish…
Metallic Nail Art Brushes, 5Pcs Liner Brush Set, UV Gel Polish Painting …
Morovan 15 Bright Color 0.27oz Air Quick Dry Nail Polish Gift Set for Women
13. Animal Prints
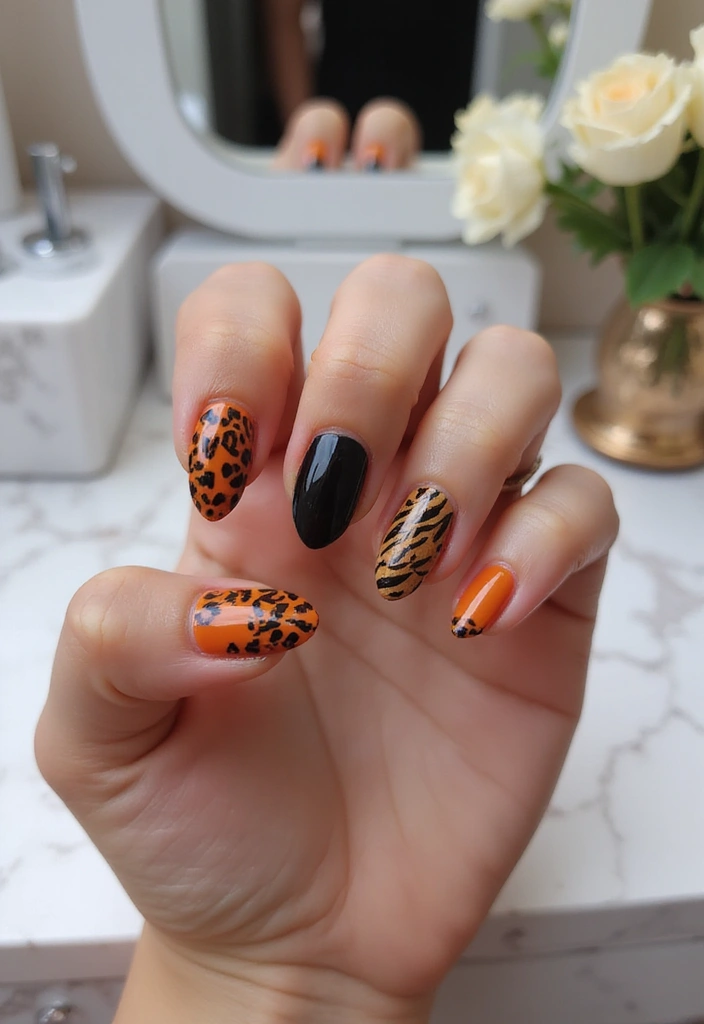
You want nails that stand out but stay easy to wear. Here is why animal prints work on acrylic nails. They mix bold shapes with simple lines, and you can dial the vibe from chic to wild. Let’s break it down with leopard, zebra, and snake skin styles.
Print options
– Leopard prints start with a neutral base. Leave the base creamy or beige, then add brown spots that vary in size to mimic real fur.
– Zebra stripes use a pale base with bold black lines. Keep the lines even, and let one or two bend slightly for a natural look.
– Snake skin shows tiny dots with subtle shading. Add a thin curved line to mimic the ridges, then blend with a light wash.
What you need
– A fine brush or dotting tool keeps prints tidy.
– A small palette of base and print colors in acrylic for easy blending.
– A clear top coat to seal the design and add gloss.
How to apply
– Apply base color and let it dry completely for a smooth canvas.
– Use a thin brush to draw the prints in a contrasting shade, building the pattern in light layers.
– Finish with a clear top coat for long wear and shine.
Care tips
– Moisturize cuticles and avoid harsh scrubs that can lift the art.
– If chips appear, fix them quickly with a small touch up.
Next steps
– Practice on a nail wheel before wearing out.
– Try different base colors to match outfits and moods.
13. Animal Prints
Editor’s Choice
Metallic Nail Art Brushes, 5Pcs Liner Brush Set, UV Gel Polish Painting …
Pro Nail Art Painting Color Toning Glass Board Makeup Palette Eyelash Ex…
Top Coat Nail Polish Clear: Quick Dry Nail Polish No Chip High Shine Lon…
14. Tie-Dye Effect
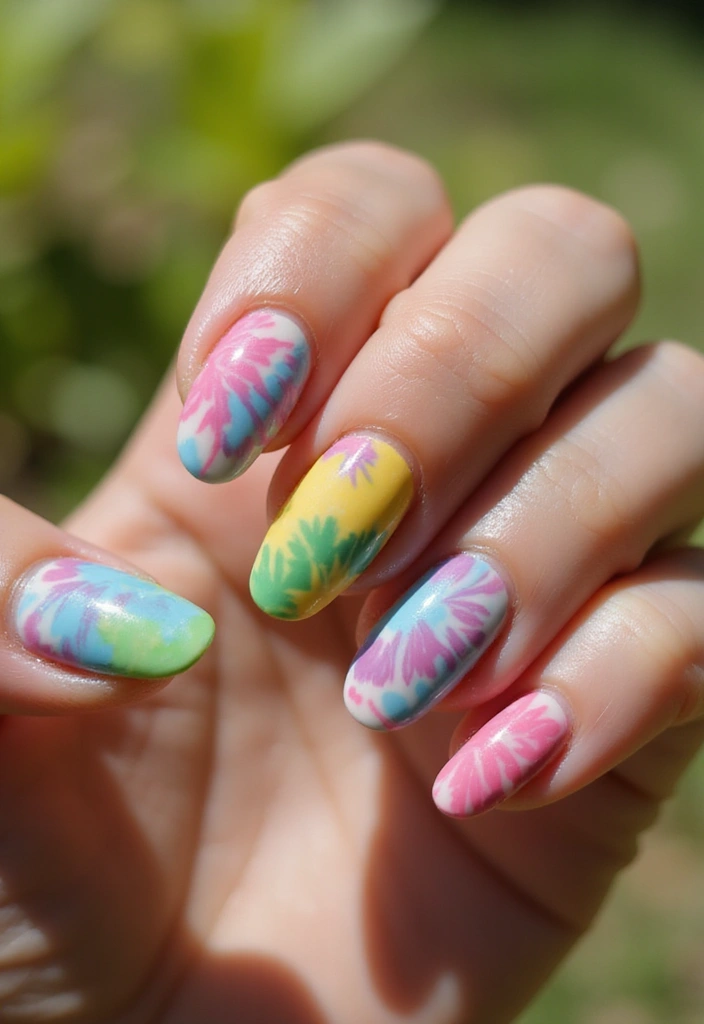
You want nails that pop without a long, fussy process. The tie-dye effect on acrylic nails gives swirls of color that feel sunny and fresh. It suits hot days, festivals, and beach outings.
Here is why this look works. It’s playful, easy to customize, and easy to touch up.
Materials
– White acrylic base or white nail polish for the base
– 2–4 bright colors
– A small makeup sponge or nail sponge
– Clear top coat for shine
– Small brush for cleanup
Steps
1) Paint a clean white base and let it dry.
2) Dab color onto the sponge in a random pattern.
3) Gently press the sponge onto the nail to create soft swirls.
4) Move the sponge a touch to blend, but keep some white gaps.
5) Apply a glossy top coat to seal the look.
Tips
– Work fast so colors stay bright.
– Clean the edges with a tiny brush for neat lines.
– If you don’t love a swirl, dab again or add a new layer on that nail.
– For extra flair, add one tiny dot with a dotting tool after the polish is dry.
Next steps: try this on one accent nail or all nails, then adjust colors to suit your mood and outfit.
14. Tie-Dye Effect
Editor’s Choice
SAVILAND Acrylic Nail Kit with Drill: Professional Nail Kit Acrylic Set …

Soft Sponges with Grabbing Pen for Ombre and Aura Nail Art with Brush, P…
Sally Hansen Double Duty™, Base and Top Coat, Quick Dry, Long Lasting, S…
15. Sparkly Stars

Want a night-sky glow on your acrylic nails? Sparkly stars are a quick, wearable way to wow at any event.
What you will need
– Dark base color (black, navy, or deep plum)
– Glitter polish with tiny star shapes or star nail stickers
– Optional small rhinestones for extra glam
– Clear top coat to seal the look
– A slim brush or toothpick for tiny stars
Step-by-step
1. Paint the nails with the dark base and let them dry completely.
2. Create the star pattern. If you use stickers, place them where you want stars to appear and press flat. If you paint stars, use the slim brush or toothpick to dot and shape little stars.
3. Add rhinestones if you like extra sparkle. Set each stone with a drop of clear polish or nail glue.
4. Finish with a clear top coat. This locks the stars in place and adds long-lasting shine.
Tips and variations
– For a subtle look, add stars to one accent nail or keep the layout sparse.
– For a bold vibe, scatter stars across several nails or cover more surface with star decals.
– Short nails still shine; use smaller stars and place them near the tip or cuticle for balance.
Care and wear
– Reapply top coat every 3–4 days to prevent chipping.
– If you use glitter polish, cap with clear polish first to make removal easier.
FAQs
– Will tiny stars work on all nail lengths? Yes, tiny shapes suit short and long nails alike.
– How do I remove glitter without damage? Soak gently, then use a soft remover cloth and mild polish remover.
15. Sparkly Stars
Editor’s Choice
wet n wild Wild Shine Nail Polish, Kaleidoscope, Glitter Top Coat, Nail …
12 Sheets Gold Star Nail Art Stickers Decals 3D Self Adhesive Gold White…
Top Coat Nail Polish Clear: Quick Dry Nail Polish No Chip High Shine Lon…
16. Colorful Doodles
Want nails that feel playful yet easy to pull off? Colorful doodles on acrylic nails are your go-to. Here is why they work: they fit any mood, hide small mistakes, and stay simple or bold. You can use fine liners or small nail art brushes to draw.
What you need
– Two colors
– White or black liner
– Clear top coat
– Steady hand
– Practice on a swatch
How to do it in 5 steps
– Prep and base. Clean nails, push back cuticles, apply base coat.
– Add a soft base color if you want. A pale pink, baby blue, or mint makes doodles pop.
– Start doodling. Use one color for outlines, then add hearts, stars, spirals, or abstract squiggles. Vary line thickness.
– Layer and fix. Add dots or tiny accents. If you mess up, wipe with a small brush and redraw.
– Seal. Finish with a glossy top coat. Let it dry fully.
Design ideas
– A set where each nail shows a different doodle.
– All nails share one motif with tiny twists.
Next steps
– Pick a palette, sketch on a swatch, then try one feature nail with a bold doodle.
16. Colorful Doodles
Editor’s Choice
Artdone 31pcs Nail Art Brushes, Nail Art Tool Set, Dotting Tools, Dust B…
BORN PRETTY Acrylic Powder Set 36 Colors Spring Summer Acrylic Nail Powd…
Top Coat Nail Polish Clear: Quick Dry Nail Polish No Chip High Shine Lon…
17. Bright Stripes
If you want nails that pop but stay simple, bright stripes are your move. Stripes suit many outfits and moods. You can be crisp and chic or bold and fun, all with clean lines. They also look great on acrylic nails too.
What you need
– Base color and stripe color
– Tape or a thin brush for lines
– Top coat and a nail file
– Clean-up brush and remover
Two methods
1) Tape and stripe: Paint the base. Let it dry. Lay a strip of tape where you want the stripe. Paint over with the stripe color. Peel away the tape while the polish is still tacky for sharp edges. Finish with top coat.
2) Freehand stripes: Use a thin brush or a toothpick. Draw straight lines across each nail. Let each line dry before adding the next to avoid smears. Seal with top coat.
Color ideas
– High contrast: black and white
– Pink and turquoise
– One accent nail with a wide stripe
Tips
– Quick-dry top coat speeds up
– Press tape down gently
Next steps
Practice on a nail wheel first, then try your own nails with a stripe look. Have fun and learn as you go. You’ll get cleaner lines with practice.
17. Bright Stripes
Editor’s Choice
Acrylic Nail Kit for Beginners: Clear White Pink Powder and Liquid Set P…
60 Colors Nail Striping Tape Line 2 Pieces Nail Tape Dispensers Free Tap…

Sally Hansen Insta-Dri®, Clear Top Coat, Quick Dry, Long Lasting, Streak…
18. Radiant Rainbow
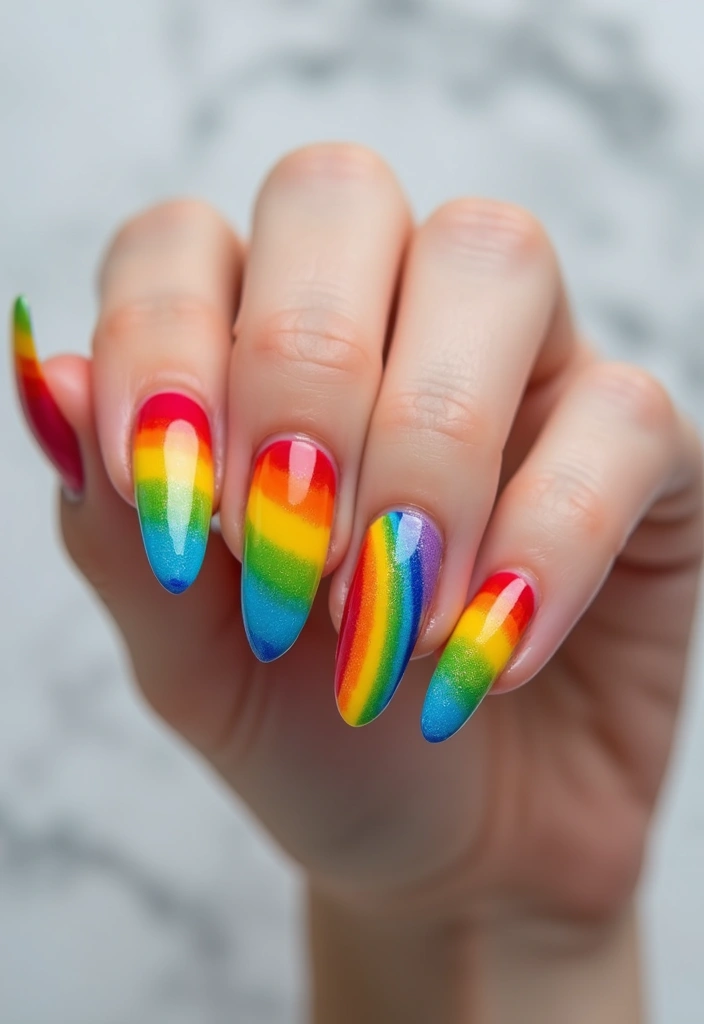
Want nails that pop with color but stay easy to wear? The rainbow design does that. It brings a playful look to your acrylic nails. You can paint each nail a different shade or run a rainbow across all nails for a softer flow.
Here is why it works: it fits many moods and the look is quick to finish.
– Option A: One color per nail. Pick 5 colors that work together. Paint each nail in a bold shade. Clean tiny edges with a nail brush. Let it dry and seal with a top coat.
– Option B: A gradient across all nails. Choose 3–4 colors that blend well. Put color on a small sponge and dab from one nail to the next. Start light near the cuticle and add darker tones toward the tip. Finish with a glossy top coat.
Next steps: prep your nails, apply a base coat, and cure if you use gel. Wipe away tacky residue and check for smooth edges.
Care tips: avoid harsh cleaners, keep nails dry, and recoat every few days to keep shine. This rainbow approach is great for summer and any time you want a bright mood lift.
Color your world with stunning simple nail designs in acrylic! Embrace the radiant rainbow – it’s playful, versatile, and a breeze to achieve. Your nails deserve to shine with personality!
18. Radiant Rainbow
Editor’s Choice
5PCS Dotting Pens with 3 PCS Nail Painting Brushes, Nail Art Design Tools
Artdone 31pcs Nail Art Brushes, Nail Art Tool Set, Dotting Tools, Dust B…

beetles Gel Polish No Wipe Gel Top Coat – Clear Color Top Coat Gel Nail …
19. Sweet Candy Colors

Sweet Candy Colors on Acrylic Nails
Want nails that feel sweet without being over the top? Candy colors give a light, bright vibe you can wear daily.
Soft shades like bubblegum pink, mint green, and lavender read playful and grown up. Add peach or pale yellow for extra sunshine. Pastels shine on acrylic nails, whether short or long.
Wear them alone for a clean look. Or mix two or three hues on different nails for a playful vibe. Keep it simple. Pick one dominant color and add a small accent nail in another shade.
On acrylic nails, candy colors stay smooth and true longer. Use a sheer base, then paint in thin layers. Finish with a glitter top coat for extra sparkle.
Here is how to apply in a few easy steps:
– Prep nails: shape, buff, and clean the surface.
– Pick 1 to 3 candy tones that fit your mood.
– Paint in thin coats; wait for each layer to dry.
– Seal with top coat; add a glitter topper for extra shine.
Next steps: match your candy colors to outfits, and try a spring or summer nail look that is soft yet bold. If chips show, recoat the tips at the end of the week.
Give candy colors a try this season and adjust as you go.
19. Sweet Candy Colors
Editor’s Choice
Acrylic Nail Kit for Beginners: Clear White Pink Powder and Liquid Set P…

Beetles Pastel Nail Polish Set -6 Colors Pink Blue Yellow Nude Pink Purp…

GAOY Glitter Gel Top Coat, 16ml Silver Iridescent Gel Nail Polish Sparkl…
20. Whimsical Clouds
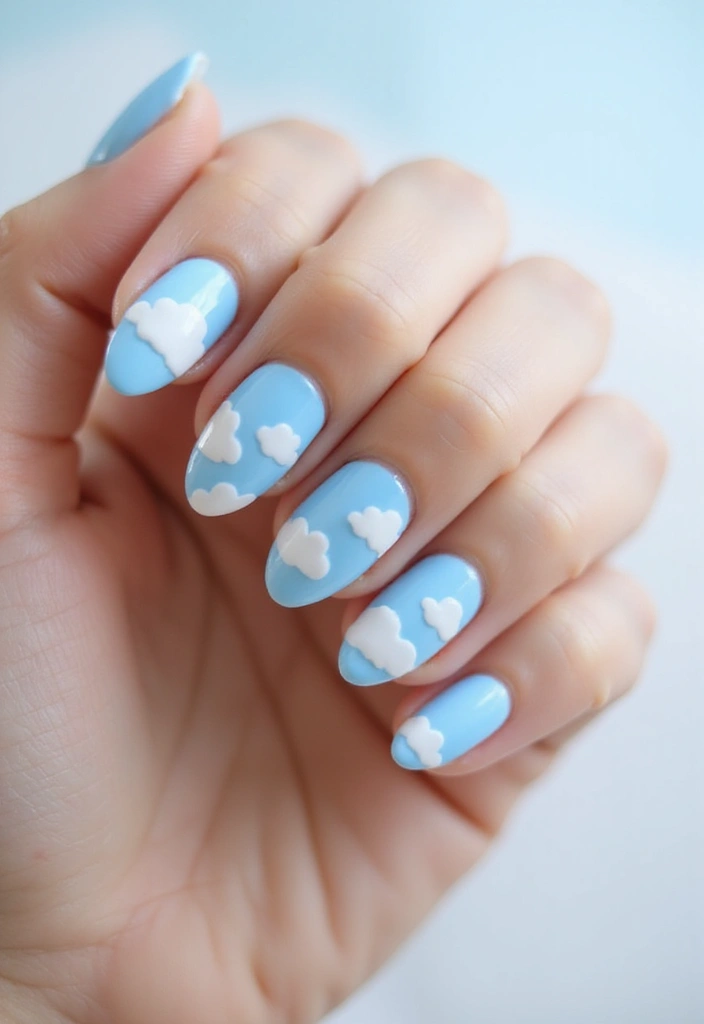
– What you need
Gather a light blue or pastel base for your acrylic nails.
White polish or white acrylic to create the clouds.
A thin brush or dotting tool to shape fluffy clouds.
A small sponge for soft edge blending.
Tiny gold or silver flecks for sky sparkle.
A clear top coat for shine and protection.
– Steps to paint
Here is why this look works.
Start with clean, prepped acrylic nails.
Paint the pastel base and let it dry completely.
Dip the thin brush into white and sketch rounded clouds.
Keep cloud edges soft and rounded for a dreamy look.
Gently blend the edges into the base so clouds fade in.
Place a few tiny flecks of gold or silver on the clouds.
Finish with a clear top coat and let it set.
– Variations you can try
Paint clouds on just a couple nails for a modern touch.
Make a full sky by adding several small clouds.
Line the cloud edges with pale glitter for a subtle glow.
Try cloud tips near the cuticle for a halo.
– Tips for long wear
Let each layer dry before moving on.
Cap the free edges to reduce chipping.
Be gentle brushing or filing to keep it intact.
If a cloud goes off track, wipe and retry with a steady hand.
20. Whimsical Clouds
Editor’s Choice
Beetles 31pcs Nail Art Brushes, Dotting Tools, Nail Art Pens, Dust Brush…
5PCS Dotting Pens with 3 PCS Nail Painting Brushes, Nail Art Design Tools
beetles Gel Polish No Wipe Gel Top Coat – Clear Color Top Coat Gel Nail …
Conclusion
With these 20 stunning simple nail designs in acrylic, you’re ready to set your next manicure apart!
Whether you prefer bold colors, soft pastels, or intricate patterns, there’s no shortage of inspiration.
Let your nails do the talking and express your unique style with every design. Happy painting!
Note: We aim to provide accurate product links, but some may occasionally expire or become unavailable. If this happens, please search directly on Amazon for the product or a suitable alternative.
This post contains Amazon affiliate links, meaning I may earn a small commission if you purchase through my links, at no extra cost to you.
Frequently Asked Questions
What Are Some Easy Acrylic Nail Designs for Beginners?
If you’re just starting out with acrylic nails, you might want to try simple designs like Classic French Tips or Soft Pastel Shades. These styles are not only trendy but also easy to achieve at home! French tips are timeless and elegant, while pastels give a gentle, feminine vibe that’s perfect for any occasion.
Remember, practice makes perfect, so don’t hesitate to experiment with different colors and techniques!
How Do I Ensure My Acrylic Nail Designs Last All Week?
To keep your acrylic nail designs looking fresh throughout the week, start with a good base coat and finish with a top coat. This adds shine and protects your designs from chipping. Also, consider using gel top coats for added durability. Lastly, maintaining your nails with regular care, such as moisturizing your cuticles, will help prolong the life of your stunning designs!
What Tools Do I Need for Simple Nail Designs in Acrylic?
To create beautiful simple nail designs in acrylic, you’ll need a few essential tools. First, gather a nail file, acrylic brush, and dotting tool for precise designs. Depending on the style, you might also want nail tape for geometric patterns or a fine brush for floral accents. These tools make it easier to achieve professional-looking results right at home!
Are There Any Trendy Acrylic Nail Designs Suitable for Special Events?
Absolutely! If you’re looking for trendy acrylic nail designs that are perfect for special events, consider styles like Glitter Ombre or Jewel Tones. Glitter ombre offers a touch of sparkle that’s chic yet understated, while jewel tones like deep emerald or royal blue add a luxurious feel. Both designs will make your nails stand out without overpowering your overall look!
How Can I Personalize My Simple Nail Designs in Acrylic?
Personalizing your simple nail designs in acrylic can be a fun process! You can mix colors to match your outfit or mood, or incorporate unique elements like floral accents and colorful doodles. Try blending various patterns like half-moon designs with vibrant shades to create a personalized masterpiece. Don’t be afraid to express your creativity; your nails are a canvas!
Related Topics
simple nail designs
acrylic nails
easy nail art
trendy nail styles
minimalist designs
glitter ombre
floral accents
color blocking
beginner friendly
5-minute nail art
pastel nails
bold nail trends
")


")

These nail designs are so cute! I love how simple yet stunning they are. Have you tried any of these styles yourself?
I love the one with the little hearts! It reminds me of the time I tried to paint my nails while watching a movie and ended up with popcorn on my fingers instead! 😂
Did you know that acrylic nails have been around since the 1970s? It’s amazing how much they have changed since then! These designs really show that evolution.
I once tried a simple ombre nail design for my friend’s wedding and it turned out to be a huge hit! Everyone was asking me to do their nails too. That was a fun day!