
Christmas is just around the corner, and with it comes the delightful urge to add some sparkle to our lives. As the holiday season approaches, I’ve found myself craving the perfect festive touch for my nails. There’s something magical about Christmas nail designs that instantly lifts your spirits and makes you feel ready to embrace the festivities. If you’re like me and enjoy expressing yourself through nail art, this post is tailored for you.
This guide is for anyone who loves nail art and is eager to explore unique and glamorous Christmas nail designs. Whether you’re preparing for holiday parties, family gatherings, or simply want to brighten your day, these nail ideas will help you shine bright this season. I’ve gathered 24 fabulous designs that are not only eye-catching but also easy to recreate or bring to your favorite nail salon.
By the end of this post, you’ll find a treasure trove of inspiration to elevate your holiday look. From classic red glitter ombré to whimsical Christmas trees, there’s something for everyone. Let’s dive into the world of holiday glam and discover the nail designs that will make you stand out this Christmas!
Key Takeaways
– Explore 24 dazzling Christmas nail designs that mix traditional holiday motifs with contemporary styles for a stunning look.
– Find inspiration in festive colors like red, green, gold, and silver, perfect for celebrating the season.
– Discover easy-to-recreate nail art ideas that are great for both beginners and seasoned nail enthusiasts.
– Get tips on choosing the right nail designs to match your personality, outfits, and holiday events.
– Learn about the tools and techniques needed to achieve these beautiful Christmas nail designs at home or in a salon.
How To Choose The Right Christmas Nail Design
Choosing the perfect Christmas nail design can be overwhelming, especially with so many fabulous options available. Here’s a simple guide to help you select a style that fits your personality and the festive vibe you want to create.
1. Consider Your Style
Think about your personal style. Do you lean towards classic elegance or playful whimsy? Your choice should reflect who you are. A classic red and gold stripe may appeal to traditionalists, while bright multicolor nails might suit a more fun-loving vibe.
2. Match with Your Outfit
Consider the outfits you plan to wear during the festivities. Choosing a nail design that complements your clothing will create a cohesive look. For instance, if you’re wearing a cozy sweater, a cozy knit sweater nails design could be the perfect fit.
3. Think About the Occasion
Different events call for different styles. A holiday office party may call for something more subdued and classy, like elegant green with gold accents. Meanwhile, a family gathering could be the perfect opportunity to showcase playful designs like whimsical Christmas trees.
4. Assess Your Skill Level
Be realistic about your nail art skills. If you’re a beginner, you might want to choose simpler designs, such as frosty snowflakes or candy cane twists, that require less intricate work. There are fantastic options that look impressive yet are relatively easy to achieve.
5. Gather Inspiration
Look for inspiration from various sources, such as social media, nail art blogs, or even your favorite nail salon’s portfolio. Don’t hesitate to mix and match ideas to create a unique design that reflects your personality.
Pro Tip: When in doubt, stick to classic colors like red, green, and gold, which never go out of style during the holiday season.
How Do Christmas Nail Designs Work?
Creating beautiful Christmas nail designs involves a few key techniques and tools, whether you’re doing it yourself or getting them done at a salon. Here’s a quick overview of how the process works.
1. Prepare Your Nails
Start by cleaning your nails and removing any old nail polish. Trim and file them to your desired length and shape. Applying a base coat helps protect your nails and gives a smooth surface for polish.
2. Choose Your Colors
Select the holiday colors you want to use. Popular choices include red, green, gold, and silver. You can also think about adding glitter or metallic accents to make your design pop.
3. Apply the Base Color
Apply two coats of your chosen base color, allowing each coat to dry thoroughly. This sets the foundation for your design and helps it stand out.
4. Add Nail Art
Use nail art tools, such as brushes, dotting tools, or even nail stickers, to add your festive designs. Whether you’re painting snowflakes or applying glitter, this is where you can let your creativity shine.
5. Seal the Design
Finish with a clear top coat to seal your design and add shine. This step helps protect your artwork and ensures it lasts throughout the holiday season.
Best for: This process is ideal for anyone looking to add a personal touch to their holiday look, whether at home or in a salon.
How To Use Nail Art Tools
Using nail art tools can elevate your nail game, helping you achieve stunning Christmas designs with ease. Here’s how to effectively use some popular tools.
Tools You’ll Need:
– Nail polish (various colors)
– Base and top coat
– Nail art brushes
– Dotting tool
– Nail tape or stencils
Step 1: Gather Your Materials
Before you start, gather all your materials. Having everything on hand will make the process smoother and more enjoyable.
Step 2: Start with Clean, Prepared Nails
Ensure your nails are clean and dry. Apply a base coat and let it dry completely before moving on to color application.
Step 3: Apply Base Colors
Choose your base colors and apply them with a brush. If you’re using multiple colors, allow each layer to dry fully.
Step 4: Create Designs Using Tools
Use your nail art brushes and the dotting tool to create intricate designs. For more precise lines or shapes, nail tape can help create clean edges.
Step 5: Finish with Top Coat
Once you’re satisfied with your designs, seal everything with a top coat to keep your nails looking fresh and prevent chipping.
⏱ Time: ~1-2 hours | 💡 Tip: Practice on paper before working on your nails to build confidence in your designs!
Contents
- 1. Sparkling Red Glitter Ombré
- 2. Frosty Snowflakes
- 3. Gold and Silver Metallic Mix
- 4. Elegant Green with Gold Accents
- 5. Candy Cane Twist
- 6. Chic Black and Gold
- 7. Whimsical Christmas Trees
- 8. Festive Plaid
- 9. Glittering Stars
- 10. Vintage Christmas Ornaments
- 11. Joyful Reindeer Nail Art
- 12. Classy Metallic Blue
- 13. Sweet Gingerbread Houses
- 14. Classic Red and Gold Stripes
- 15. Snowy Winter Wonderland
- 16. Festive Santa Hats
- 17. Bright and Bold Jewel Tones
- 18. Playful Elf Nails
- 19. Silver Snowflakes on Blue
- 20. Cozy Knit Sweater Nails
- 21. Elegant White and Gold
- 22. Cute Penguin Nails
- 23. Festive Ombre with Glitter
- 24. Bright Multicolor Nails
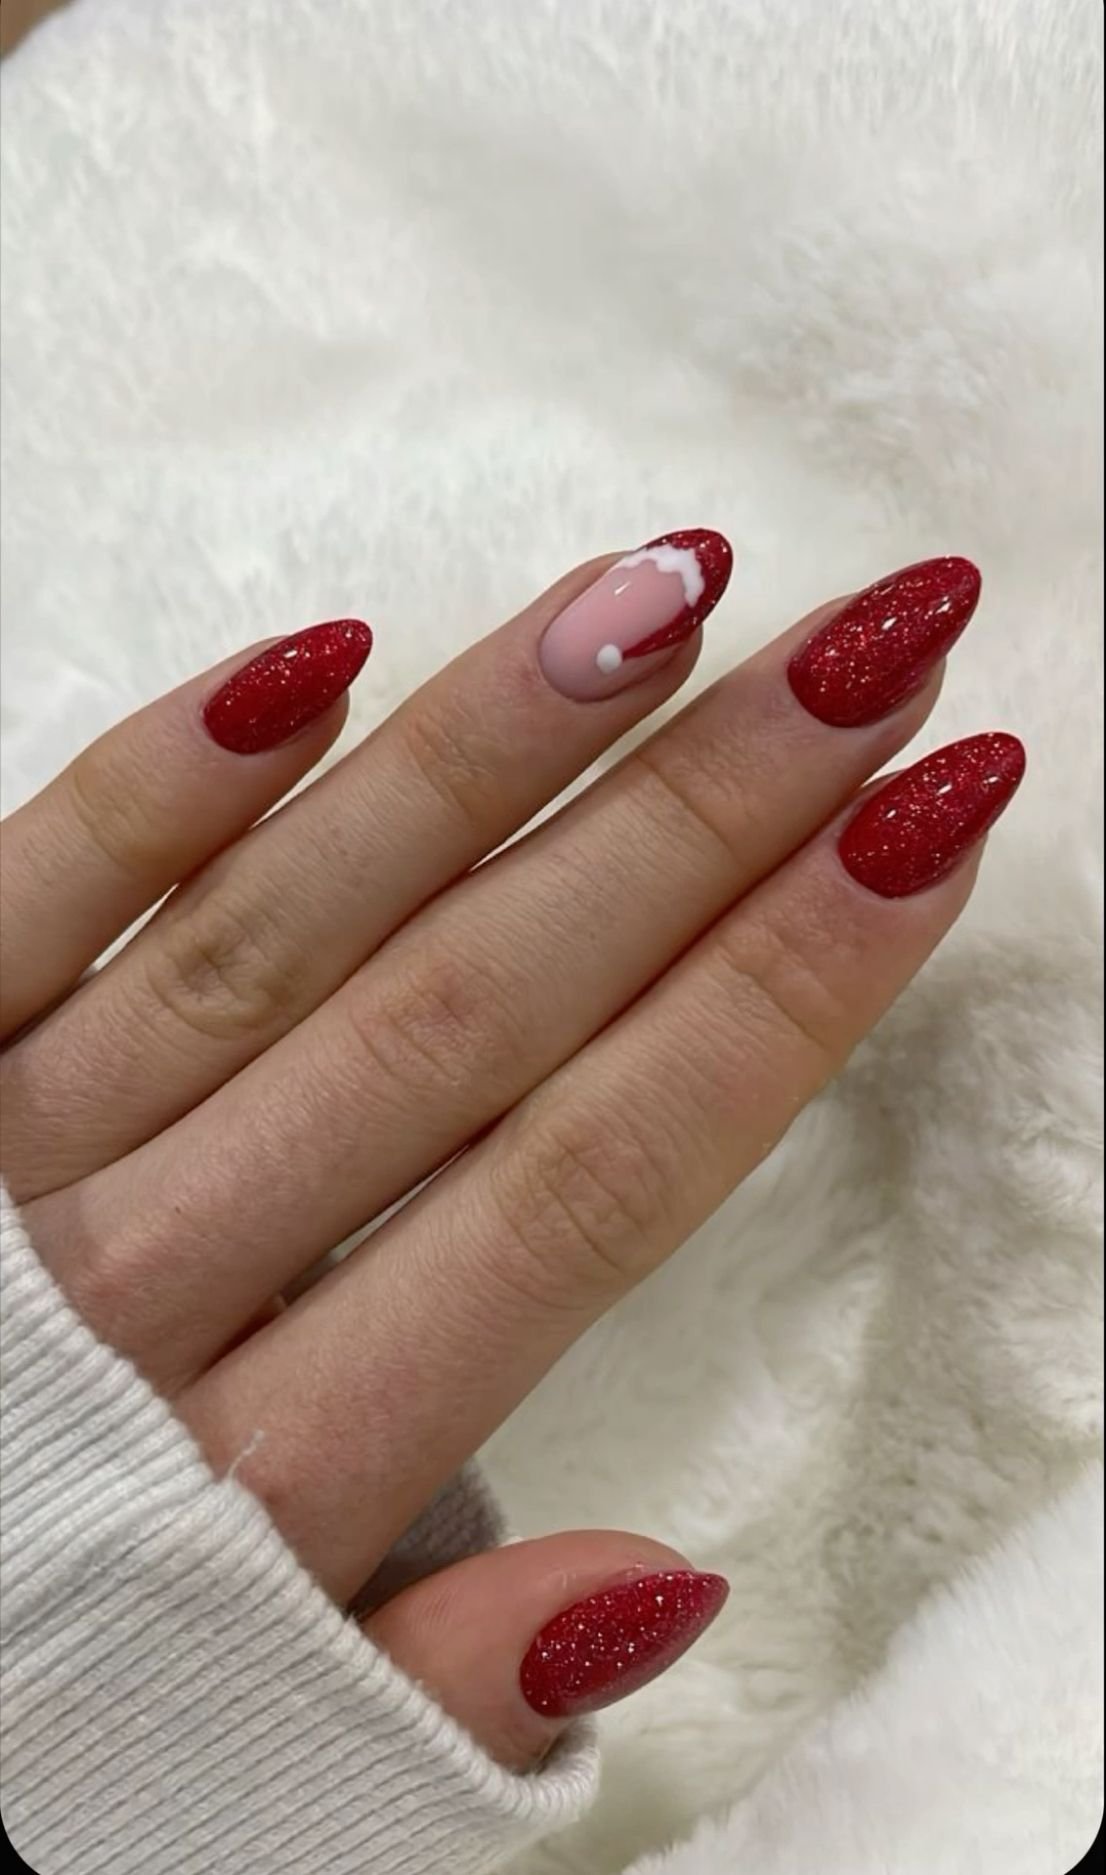
1. Sparkling Red Glitter Ombré
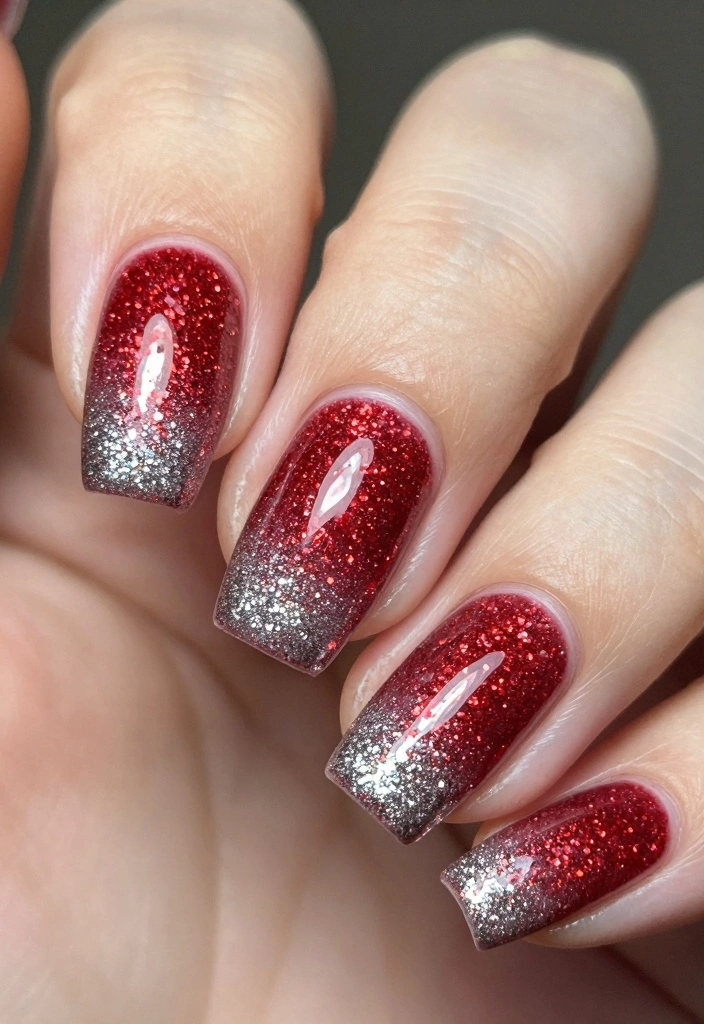
There’s no denying that a vibrant red nail design is the epitome of festive spirit, especially with a shimmering ombré effect. Starting with a rich red base that softly fades into a sparkling glitter finish, this look embodies holiday elegance while remaining playful. Whether you’re heading to a holiday party or a cozy gathering, this design shines bright in any setting.
Outfit Pieces:
– Rich red nail polish (creamy or gel)
– Silver glitter polish (fine or chunky)
– Clear glossy top coat
Styling Tips:
– Begin by prepping your nails with a base coat for protection.
– Apply two coats of red polish for a bold base.
– Use a makeup sponge to dab on glitter polish, blending it upwards for a seamless ombré effect.
– Finish with a glossy top coat to enhance the shine and extend wear.
This design is a showstopper for holiday gatherings and can easily be dressed up or down. Swap out the red for a deep burgundy for a more subtle look.
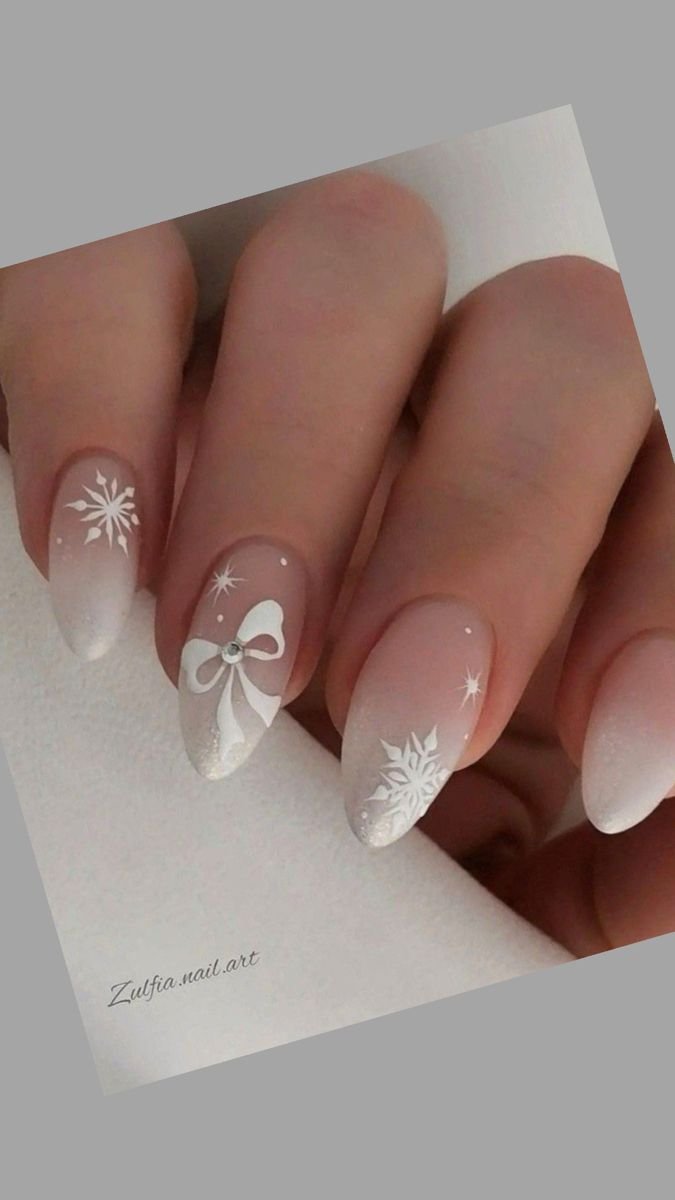
2. Frosty Snowflakes
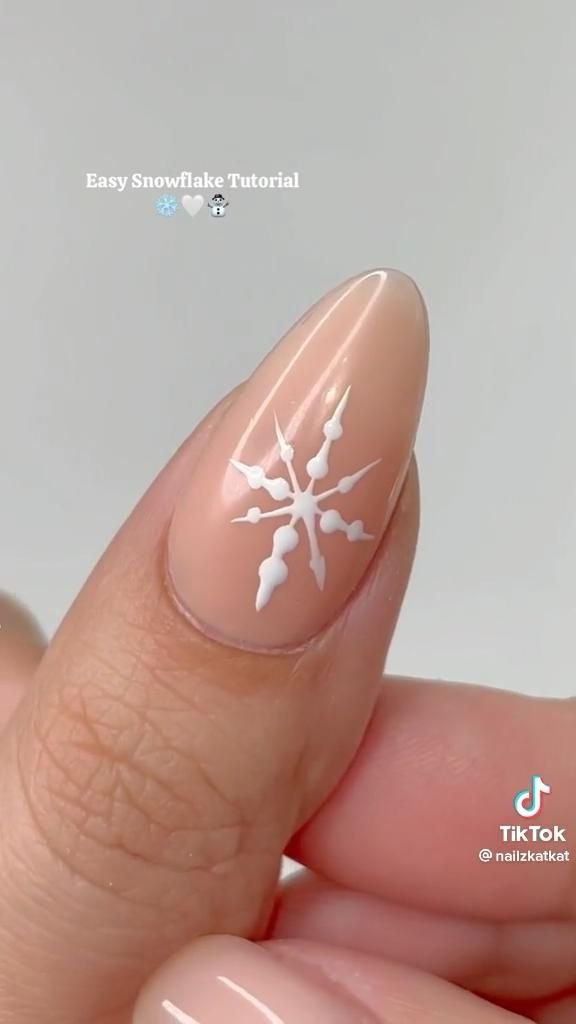
Embrace the enchantment of winter with delicate snowflake designs! This charming nail art brings a touch of whimsy to your holiday look, showcasing intricate snowflakes against a frosty backdrop. Using a light blue or white base enhances the design, making the snowflakes pop beautifully, perfect for both festive gatherings and casual outings.
Outfit Pieces:
– Light blue or white nail polish (creamy finish)
– Fine nail art brush or dotting tool
– Silver or holographic glitter polish
– Clear glossy top coat
Styling Tips:
– Apply two coats of your chosen base color for a smooth finish.
– Use a fine brush to create various snowflake designs, playing with sizes.
– Sprinkle silver glitter for added sparkle and dimension.
– Seal your design with a top coat for durability and shine.
This playful yet chic design is perfect for all occasions, bringing joy and conversation to any gathering. It’s a fun way to celebrate the holiday season!
Winter magic starts at your fingertips. For standout christmas nail designs, start with a light blue or white base, then let tiny snowflakes do the talking—practice with a fine brush and dotting tool for icy details.
Image credit: ninka on Pinterest
3. Gold and Silver Metallic Mix
Stand out this holiday season with a striking mix of gold and silver metallics! This bold nail design combines two luxurious colors, creating a look that’s both eye-catching and sophisticated. Perfect for holiday parties, this glam design pairs beautifully with any festive outfit, ensuring you shine wherever you go.
Outfit Pieces:
– Clear base coat (for protection)
– Gold nail polish (metallic finish)
– Silver nail polish (metallic finish)
– Optional: glitter or nail studs for accents
– Clear glossy top coat
Styling Tips:
– Start with a clear base coat to protect your nails.
– Paint one half of your nails with gold, allowing it to dry.
– Apply silver polish to the other half, aiming for a clean diagonal line.
– Add glitter or accent nails for extra glam.
– Finish with a glossy top coat for shine and longevity.
This nail design is perfect for festive celebrations, radiating luxury and style. Pair it with matching jewelry to complete your look!
Image credit: Louise Nielsen on Pinterest
4. Elegant Green with Gold Accents
Capture the essence of the holidays with an elegant forest green nail design accented with gold! This stunning combination evokes the beauty of Christmas trees and ornaments, blending sophistication with festive cheer. It’s a perfect choice for family gatherings or formal events, ensuring you leave a lasting impression.
Outfit Pieces:
– Forest green nail polish (creamy or matte)
– Gold nail art brush or polish
– Optional: small rhinestones or gold studs
– Clear glossy top coat
Styling Tips:
– Apply a base coat to protect your nails.
– Use two coats of deep green polish for vibrant color.
– Once dry, add gold tips or stripes on a couple of accent nails.
– Embellish with rhinestones for extra glamour.
– Seal with a glossy top coat for shine.
This design radiates holiday joy and is ideal for any festive occasion, ensuring you celebrate in style!
Image credit: Brittany Flores on Pinterest
5. Candy Cane Twist
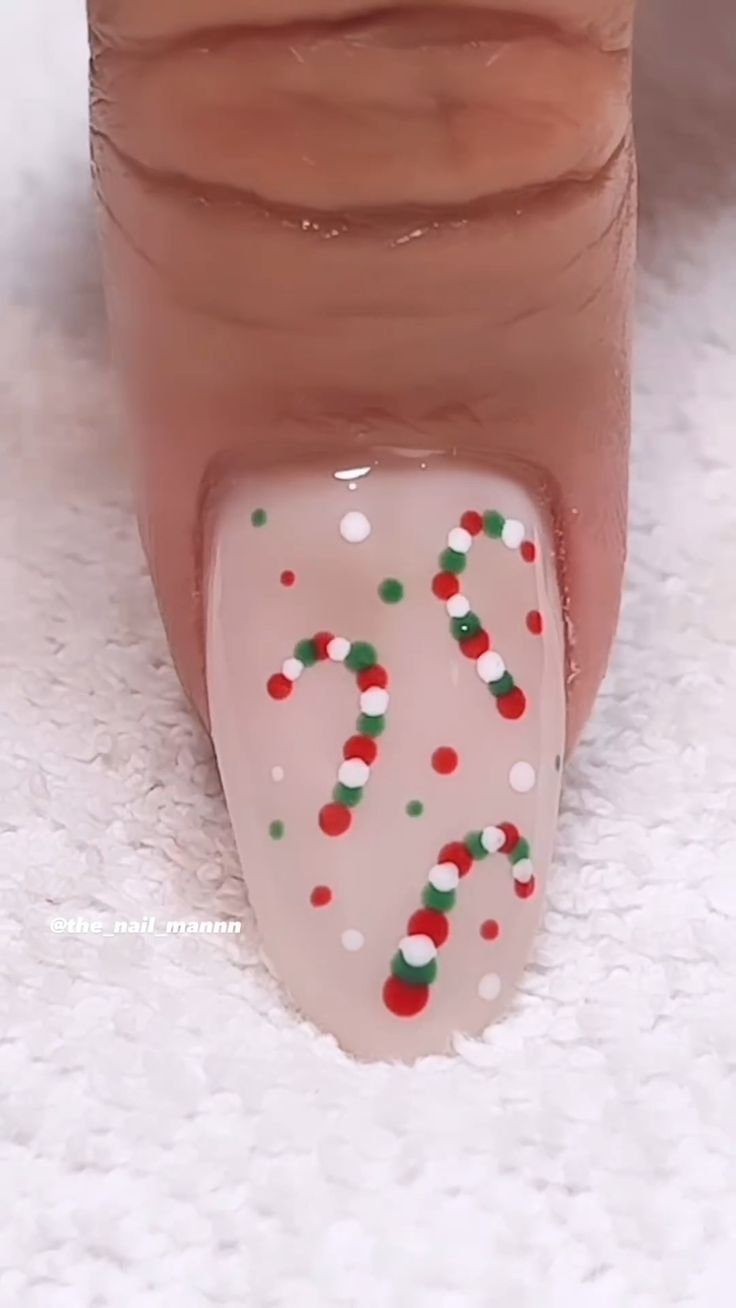
Celebrate the sweet spirit of Christmas with candy cane-inspired nail designs! Featuring cheerful red and white stripes, this playful look is perfect for the festive season. It embodies holiday joy and is sure to bring smiles and cheer to everyone you meet.
Outfit Pieces:
– Clear base coat (for protection)
– Bright white nail polish (creamy finish)
– Red nail polish (creamy finish)
– Optional: striping tape for perfect lines
– Clear glossy top coat
Styling Tips:
– Apply a base coat to protect your nails.
– Use two coats of white polish as your base.
– Add red stripes using tape or a brush for a candy cane effect.
– Finish with a top coat to keep your design fresh.
This design is a delightful way to embrace the holiday spirit, making it perfect for parties, get-togethers, or just to brighten your day!
Image credit: Health_Fit & Chic💃🍏💪 on Pinterest
📹 Related Video: How to: 5 Ways To Do Candy Canes Nails || NAIL ART 101
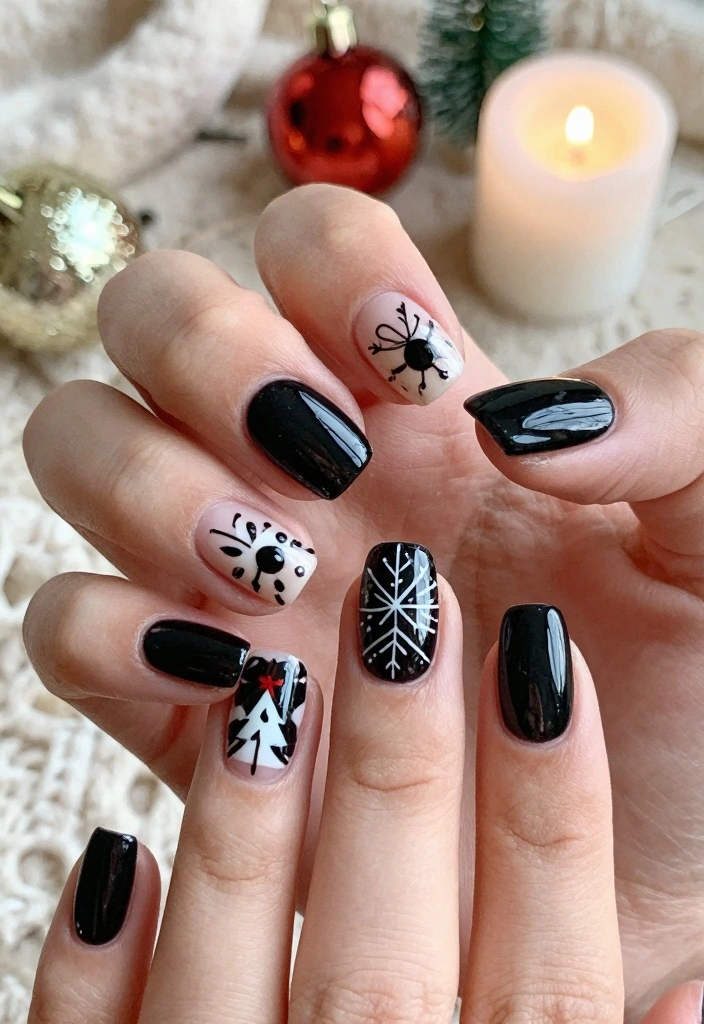
6. Chic Black and Gold
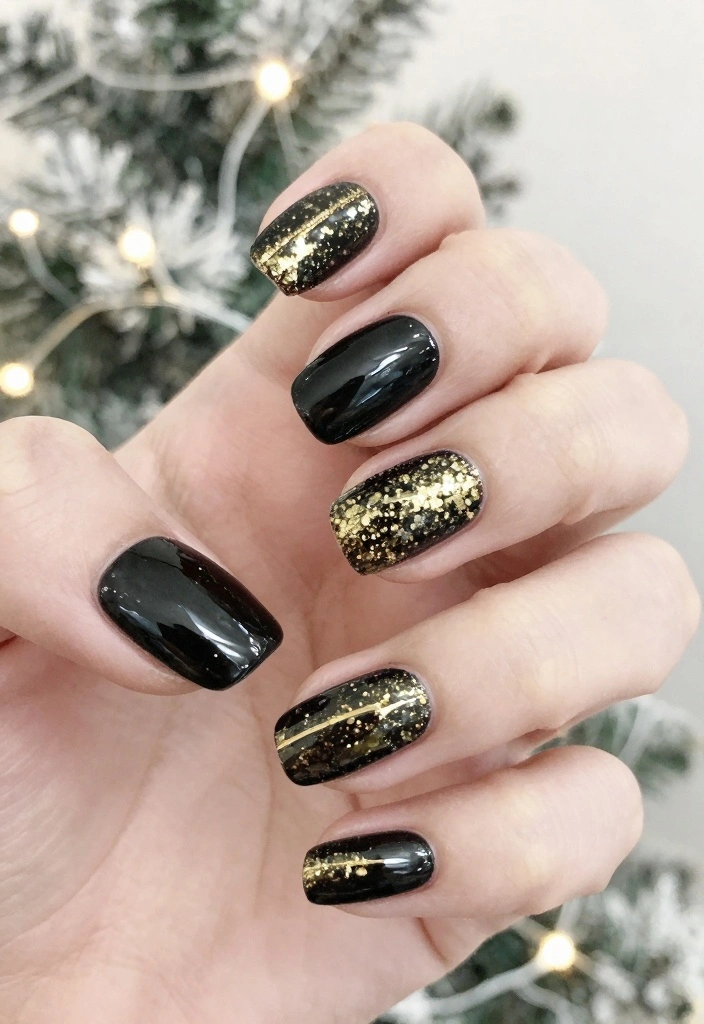
For a sophisticated touch this holiday season, opt for a chic black and gold nail design! This elegant combo brings glam to any outfit, making it an ideal choice for holiday parties. It perfectly balances boldness and class, ensuring you stand out while still looking refined.
Outfit Pieces:
– Clear base coat (for protection)
– Shiny black nail polish (creamy finish)
– Gold nail art polish or brush
– Clear glossy top coat
Styling Tips:
– Always start with a base coat for protection.
– Apply two coats of black nail polish and let it dry.
– Use a fine brush to create gold stripes, dots, or abstract designs.
– Seal with a glossy top coat for lasting shine.
This nail design exudes elegance and confidence, making it a perfect choice for formal holiday celebrations while embracing the festive spirit!
7. Whimsical Christmas Trees
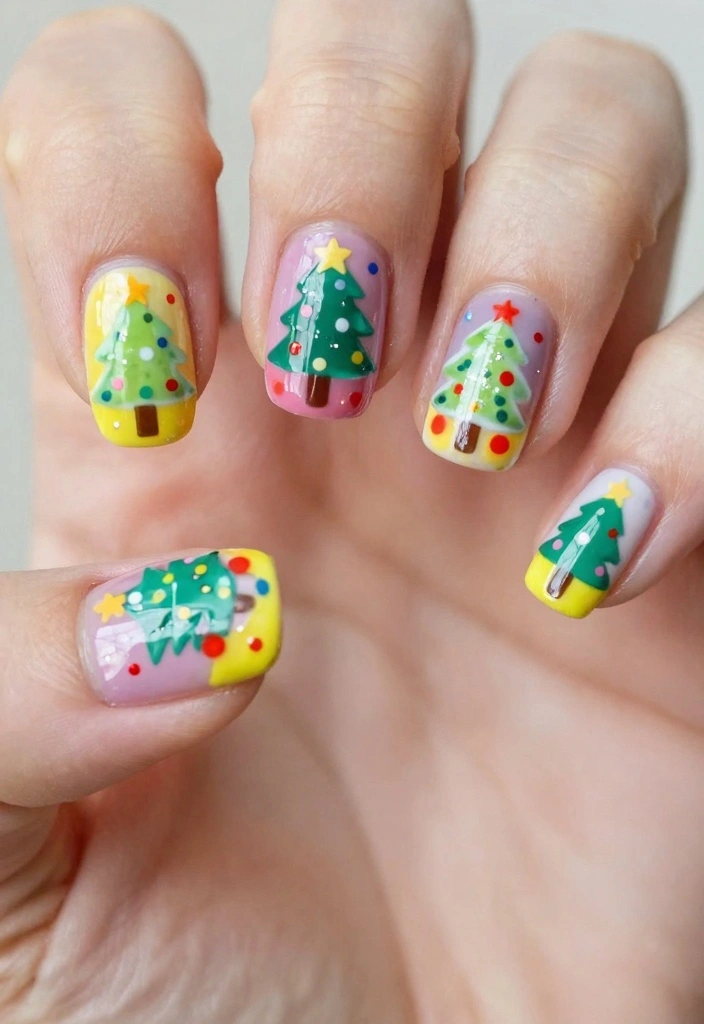
Bring the festive spirit to your nails with whimsical Christmas tree designs! This creative nail art allows you to showcase your love for holiday cheer through tiny trees on a colorful backdrop. It’s a playful option that suits all ages, perfect for family gatherings and holiday fun.
Outfit Pieces:
– Base color of your choice (light or dark)
– Fine brush for detailing
– Assorted nail polish colors for trees
– Clear glossy top coat
Styling Tips:
– Start with a base coat for protection.
– Paint your nails in a color of your choice.
– Use a fine brush to create tiny Christmas trees, decorating them with colorful dots.
– Sprinkle glitter for added sparkle while the polish is wet.
– Finish with a clear top coat for shine.
This design is a fun way to express your festive spirit, ensuring smiles all around during holiday gatherings!
Whimsical Christmas trees are not just cute — they’re tiny canvases for holiday cheer. Pro tip: start with a light base and layer mini trees in quick, confident strokes for playful Christmas nail designs that still feel polished.
8. Festive Plaid
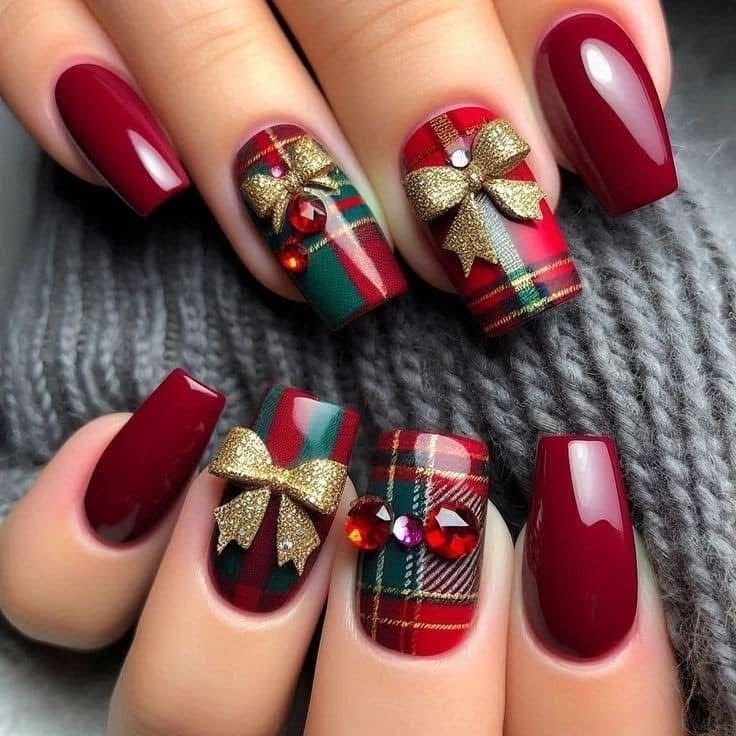
Plaid is a timeless holiday pattern that translates beautifully into nail art! This festive plaid design combines reds, greens, and whites, creating a cozy aesthetic perfect for winter gatherings. It’s a trendy look that exudes warmth and holiday cheer.
Outfit Pieces:
– Clear base coat (for protection)
– Base color of your choice (white or red)
– Thin nail art brush for plaid
– Clear glossy top coat
Styling Tips:
– Start with a clear base coat.
– Use your favorite color as the base, applying two coats for coverage.
– Once dry, create crisscross lines in contrasting colors to form the plaid pattern.
– Enhance the effect with small dots or lines.
– Seal with a glossy top coat for a polished finish.
This design is not only trendy but also perfect for holiday get-togethers, adding a cozy touch to your festive style!
Image credit: Sarah Kate on Pinterest
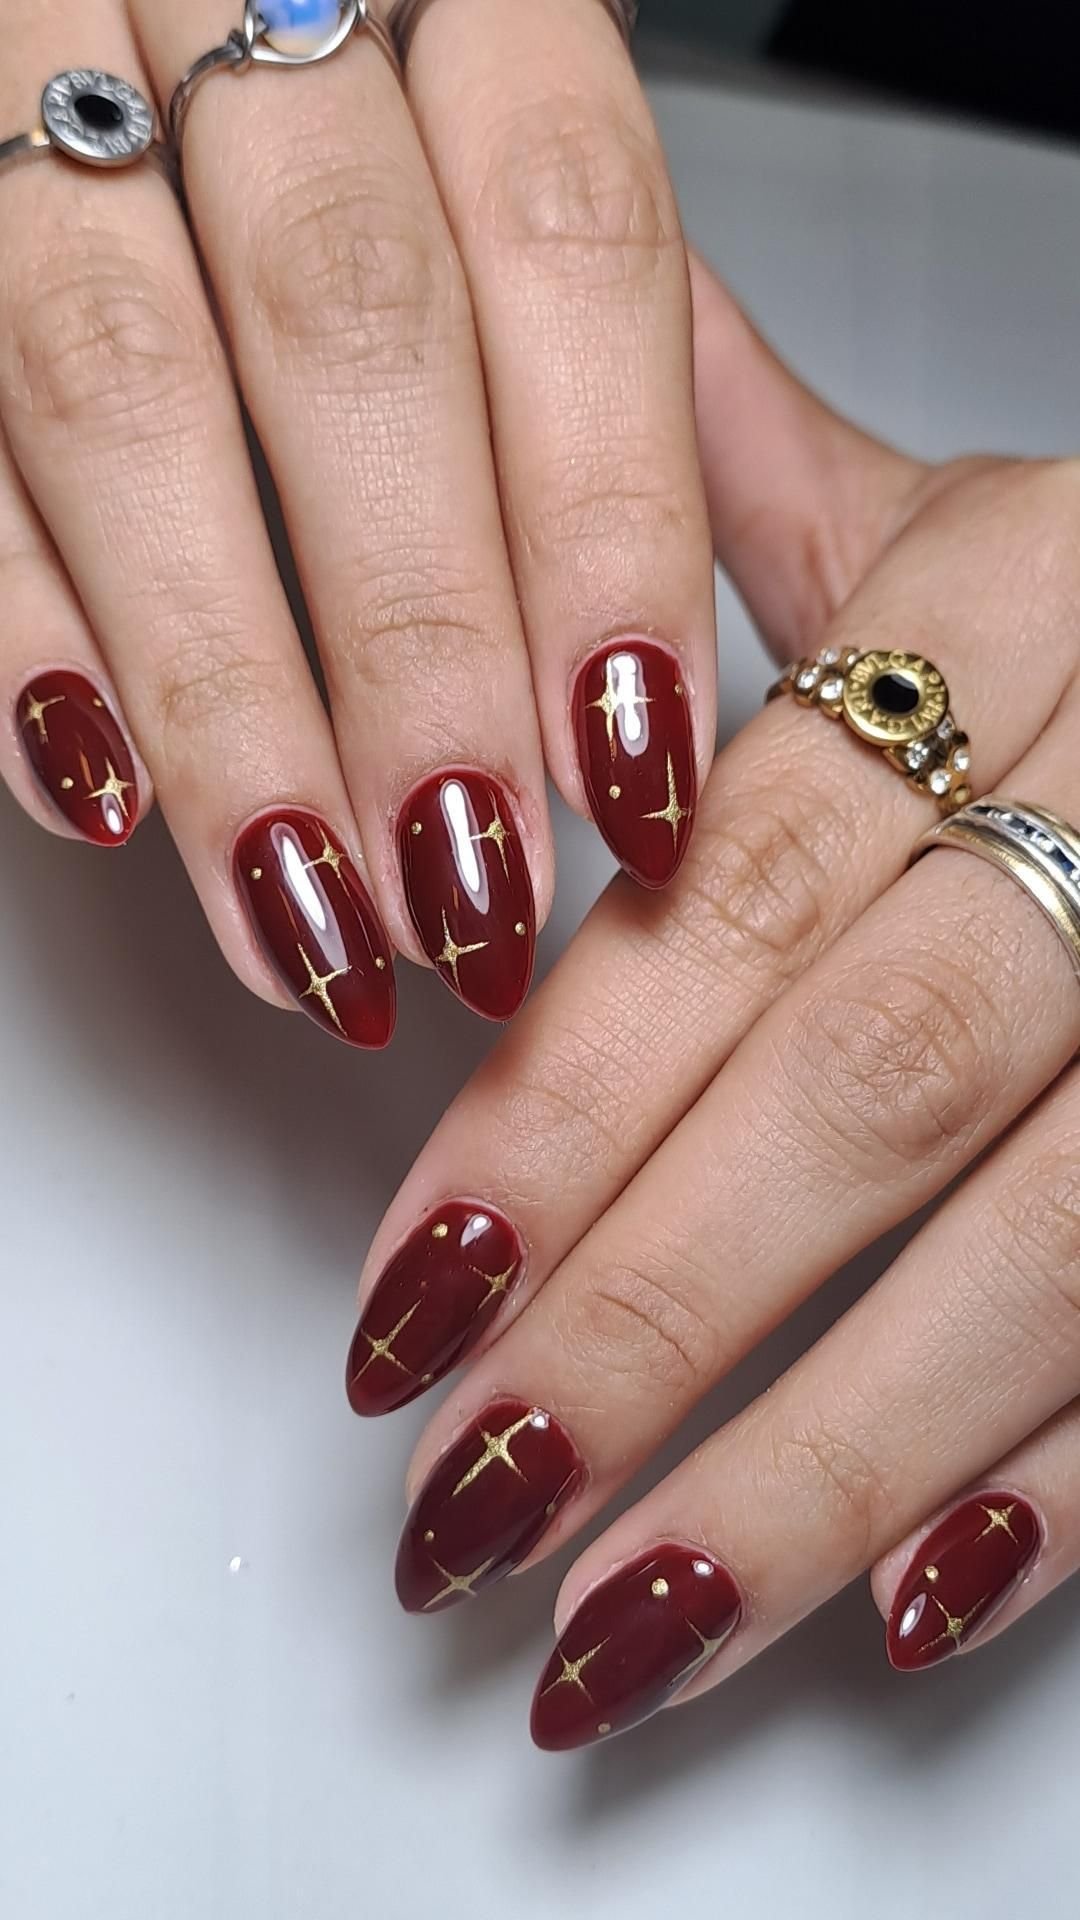
9. Glittering Stars
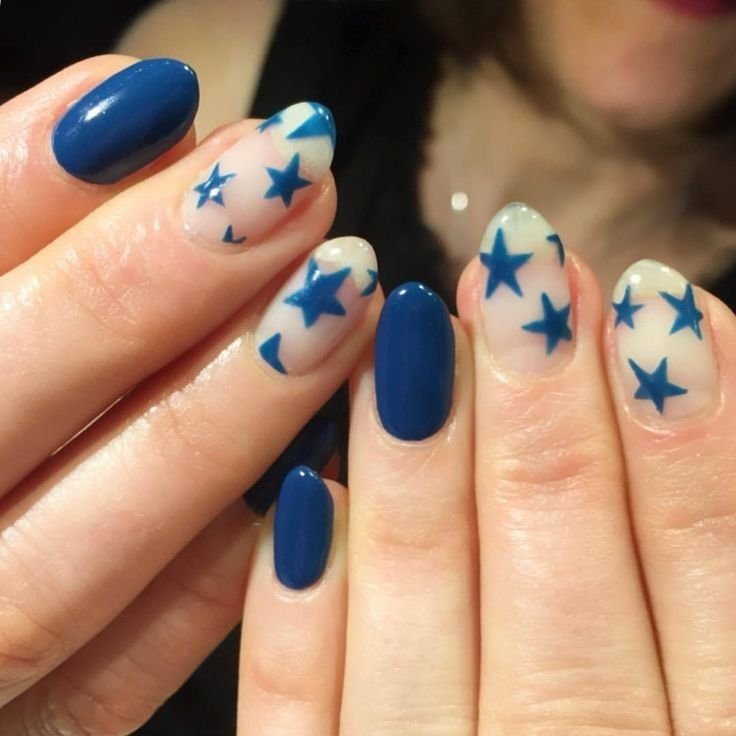
Reach for the stars this holiday season with a dazzling glittering star nail design! This enchanting look captures the magic of festive nights, making it ideal for parties or special events. With a deep navy or black background, the stars truly shine bright.
Outfit Pieces:
– Clear base coat (for protection)
– Deep navy or black nail polish (creamy finish)
– Gold or silver star nail art polish
– Fine glitter or glitter top coat
– Clear glossy top coat
Styling Tips:
– Start with a clear base coat for protection.
– Apply a deep base color, allowing it to dry.
– Use a dotting tool to add stars across your nails.
– Enhance the starry effect with fine glitter or a glitter top coat.
– Seal your design with a clear top coat for long-lasting shine.
This nail design is a statement choice for festive celebrations, letting you shine bright throughout the holiday season!
Image credit: Adrieli on Pinterest
10. Vintage Christmas Ornaments
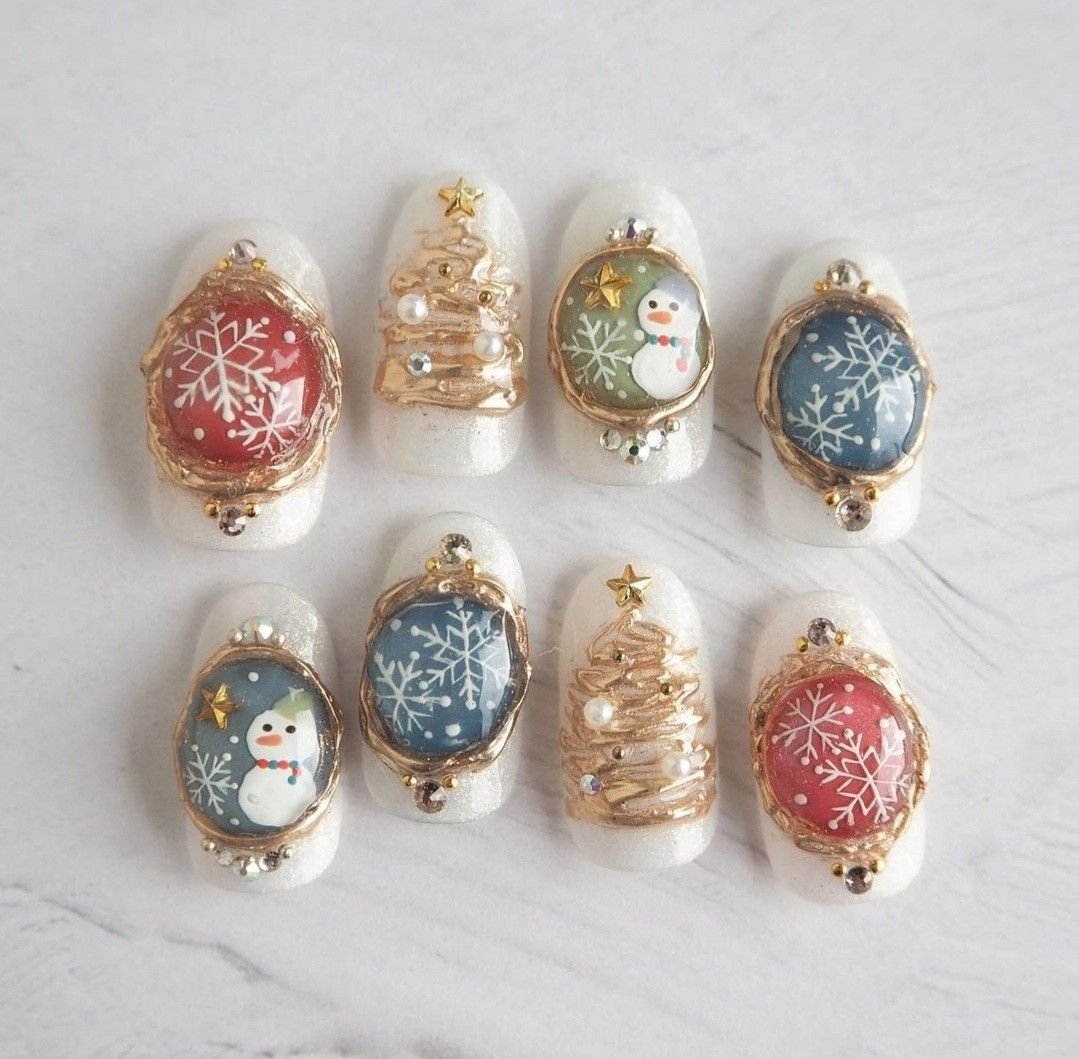
Capture the nostalgia of Christmas with a vintage ornament-inspired nail design! This charming look features intricate details reminiscent of classic holiday decorations, adding a unique flair to your festive style. It’s perfect for those who appreciate elegance with a touch of whimsy.
Outfit Pieces:
– Clear base coat (for protection)
– Soft pastel color (pink or green)
– Fine brush for ornament detailing
– Gold or silver polish for accents
– Clear glossy top coat
Styling Tips:
– Start with a base coat to protect your nails.
– Apply a soft base color, allowing it to dry.
– Paint intricate ornament shapes on a couple of accent nails, using gold or silver for detailing.
– Seal your work with a glossy top coat for shine.
This design beautifully evokes the spirit of Christmas, making it a fun way to celebrate holiday traditions in style!
Image credit: Miêu Bảo on Pinterest
You might also like


11. Joyful Reindeer Nail Art
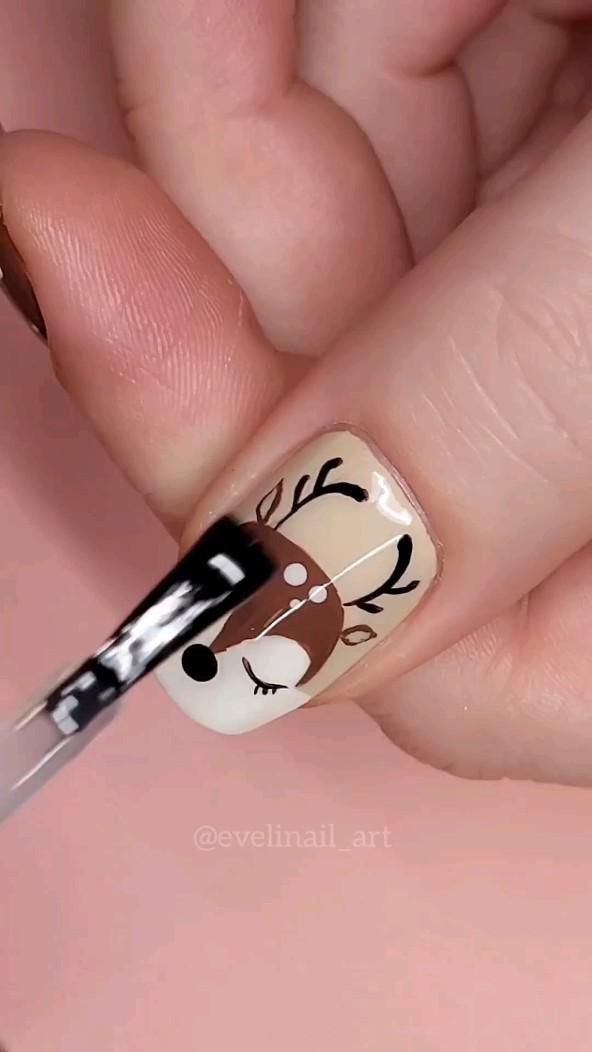
Add a playful twist to your holiday nails with joyful reindeer designs! Perfect for family gatherings or casual get-togethers, this delightful look is bound to bring smiles and festive cheer all around. It’s a fun and light-hearted choice for showcasing your holiday spirit.
Outfit Pieces:
– Clear base coat (for protection)
– Soft brown or beige polish (natural reindeer look)
– Fine brush for detailing
– Glittery red polish for accents
– Clear glossy top coat
Styling Tips:
– Start with a protective base coat.
– Use a soft brown polish as your base color.
– Paint reindeer faces with a fine brush, adding eyes, antlers, and noses.
– Use glittery red polish for the reindeer’s nose.
– Finish with a clear top coat for durability.
This design is fun and festive, perfect for spreading joy and laughter during the holiday season!
Joyful reindeer nail art isn’t just cute—it can spark conversation at your holiday gatherings and boost christmas nail designs. Start with a sheer base, a soft cocoa or beige for the reindeer, then add tiny glitter accents for festive sparkle.
Image credit: Nour Noura on Pinterest
12. Classy Metallic Blue
Stand out this season with a classy metallic blue nail design! This chic color offers a modern twist on holiday nails, making it perfect for those who want to shine with elegance. The metallic finish is striking, ideal for any festive occasion.
Outfit Pieces:
– Clear base coat (for protection)
– Metallic blue nail polish (vibrant finish)
– Optional: glitter or foil for accents
– Clear glossy top coat
Styling Tips:
– Start with a protective base coat.
– Apply metallic blue polish, ensuring an even finish.
– Choose one or two accent nails to add glitter or foil for contrast.
– Seal with a glossy top coat for shine.
This design is sophisticated and unique, perfect for parties or elegant holiday events while expressing your individual style!
Image credit: Nayeli Marin R on Pinterest
13. Sweet Gingerbread Houses
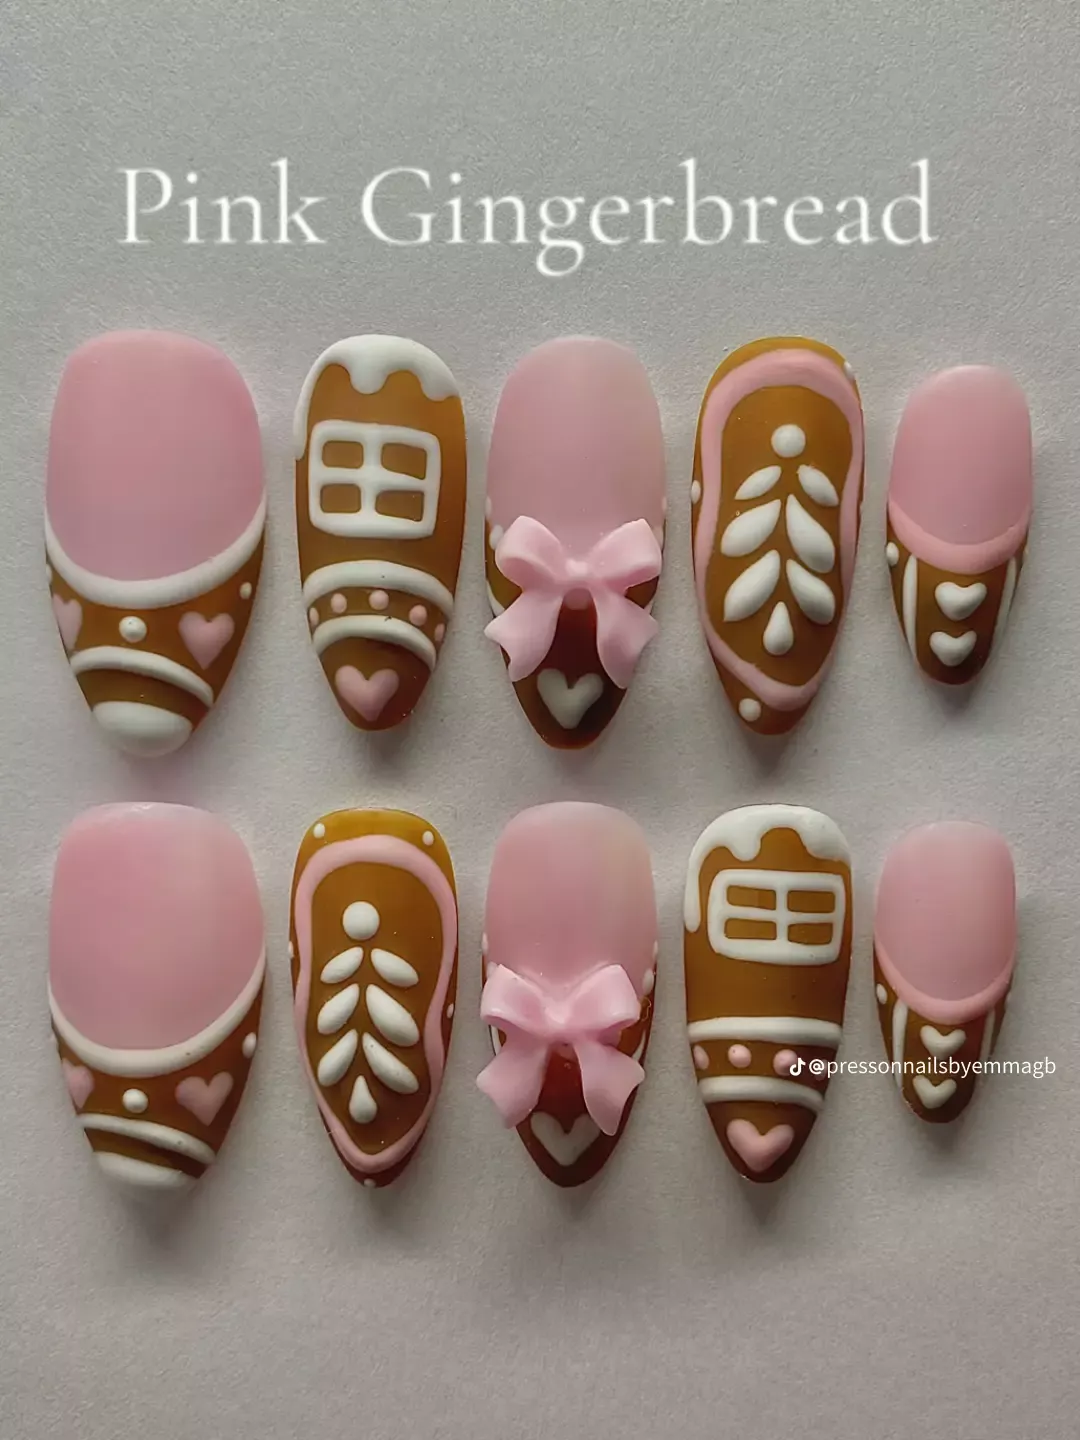
Bring sweetness to your nails with gingerbread house designs! This playful look is perfect for holiday baking parties or family gatherings, adding a festive touch to your fingertips. It’s a whimsical way to embrace the holiday spirit with creativity and charm.
Outfit Pieces:
– Clear base coat (for protection)
– Soft brown or beige polish (gingerbread effect)
– Fine brush for detailing
– Assorted colors for icing and candies
– Clear glossy top coat
Styling Tips:
– Start with a base coat for protection.
– Use soft brown as your base color.
– Paint tiny gingerbread houses, using bright colors for icing details.
– Sprinkle fine glitter for a festive sparkle.
– Finish with a clear top coat to seal the design.
This whimsical design will surely bring joy to everyone who sees your nails during the festive season!
Image credit: Naomi Z on Pinterest
14. Classic Red and Gold Stripes
Keep it timeless with a classic design featuring red and gold stripes! This elegant combination adds a festive touch, perfect for those who appreciate a traditional holiday aesthetic. It’s a simple yet chic look that wraps your nails in holiday cheer.
Outfit Pieces:
– Clear base coat (for protection)
– Bright red polish (creamy finish)
– Gold nail art polish or brush
– Clear glossy top coat
Styling Tips:
– Start with a protective base coat.
– Apply two coats of bright red polish as your base.
– Once dry, use a brush to paint diagonal or vertical gold stripes on a couple of nails.
– Seal your design with a glossy top coat for a polished finish.
This design is perfect for any occasion, from family dinners to festive parties, making it a versatile choice for the holidays!
Image credit: oxp on Pinterest
15. Snowy Winter Wonderland
Capture the serene beauty of a winter wonderland with snowy nail designs! This enchanting look evokes images of freshly fallen snow and winter landscapes, making it ideal for the season. It’s a beautiful way to embrace winter elegance during holiday gatherings.
Outfit Pieces:
– Clear base coat (for protection)
– Soft white or light blue polish (mimicking snow)
– Fine brush for snowflake detailing
– Glitter polish for added sparkle
– Clear glossy top coat
Styling Tips:
– Start with a clear base coat for protection.
– Apply a soft white or light blue base color.
– Use a fine brush to create snowflakes or dot designs on accent nails.
– Incorporate glitter for a magical touch.
– Seal with a glossy top coat for shine.
This design is not only beautiful but also perfect for any winter event, allowing you to celebrate the season in style!
Image credit: Harper Middaugh on Pinterest
16. Festive Santa Hats
Add a jolly touch to your nails with festive Santa hat designs! This cheerful look is perfect for family gatherings and holiday parties, sure to spread joy and holiday spirit all around. It’s a fun way to showcase your festive charm during the season.
Outfit Pieces:
– Clear base coat (for protection)
– Bright red polish (cheerful background)
– White and black polish for Santa hats
– Clear glossy top coat
Styling Tips:
– Start with a clear base coat.
– Use bright red polish as your base color.
– Create tiny Santa hats on accent nails using white and black polish.
– Consider adding glitter for extra sparkle.
– Finish with a clear top coat for a polished look.
This design is perfect for showcasing your festive spirit, bringing smiles to everyone around you during the holiday season!
Image credit: serenava on Pinterest
17. Bright and Bold Jewel Tones
Make a statement this Christmas with bold jewel tone nail designs! Rich colors like emerald, ruby, and sapphire create a striking yet elegant look, embodying the beauty of the season. These vibrant hues ensure your nails stand out while adding a touch of sophistication to any holiday outfit.
Outfit Pieces:
– Clear base coat (for protection)
– Jewel tone polishes (emerald green, ruby red, deep blue)
– Gold or silver polish for accents
– Clear glossy top coat
Styling Tips:
– Start with a clear base coat for protection.
– Paint each nail in a different jewel tone for variety.
– Use gold or silver polish to create simple designs or geometric shapes on a couple of accent nails.
– Seal with a glossy top coat for lasting shine.
This design provides a sophisticated yet bold look, perfect for any holiday occasion where you want to shine bright!
Image credit: ☆ on Pinterest
18. Playful Elf Nails
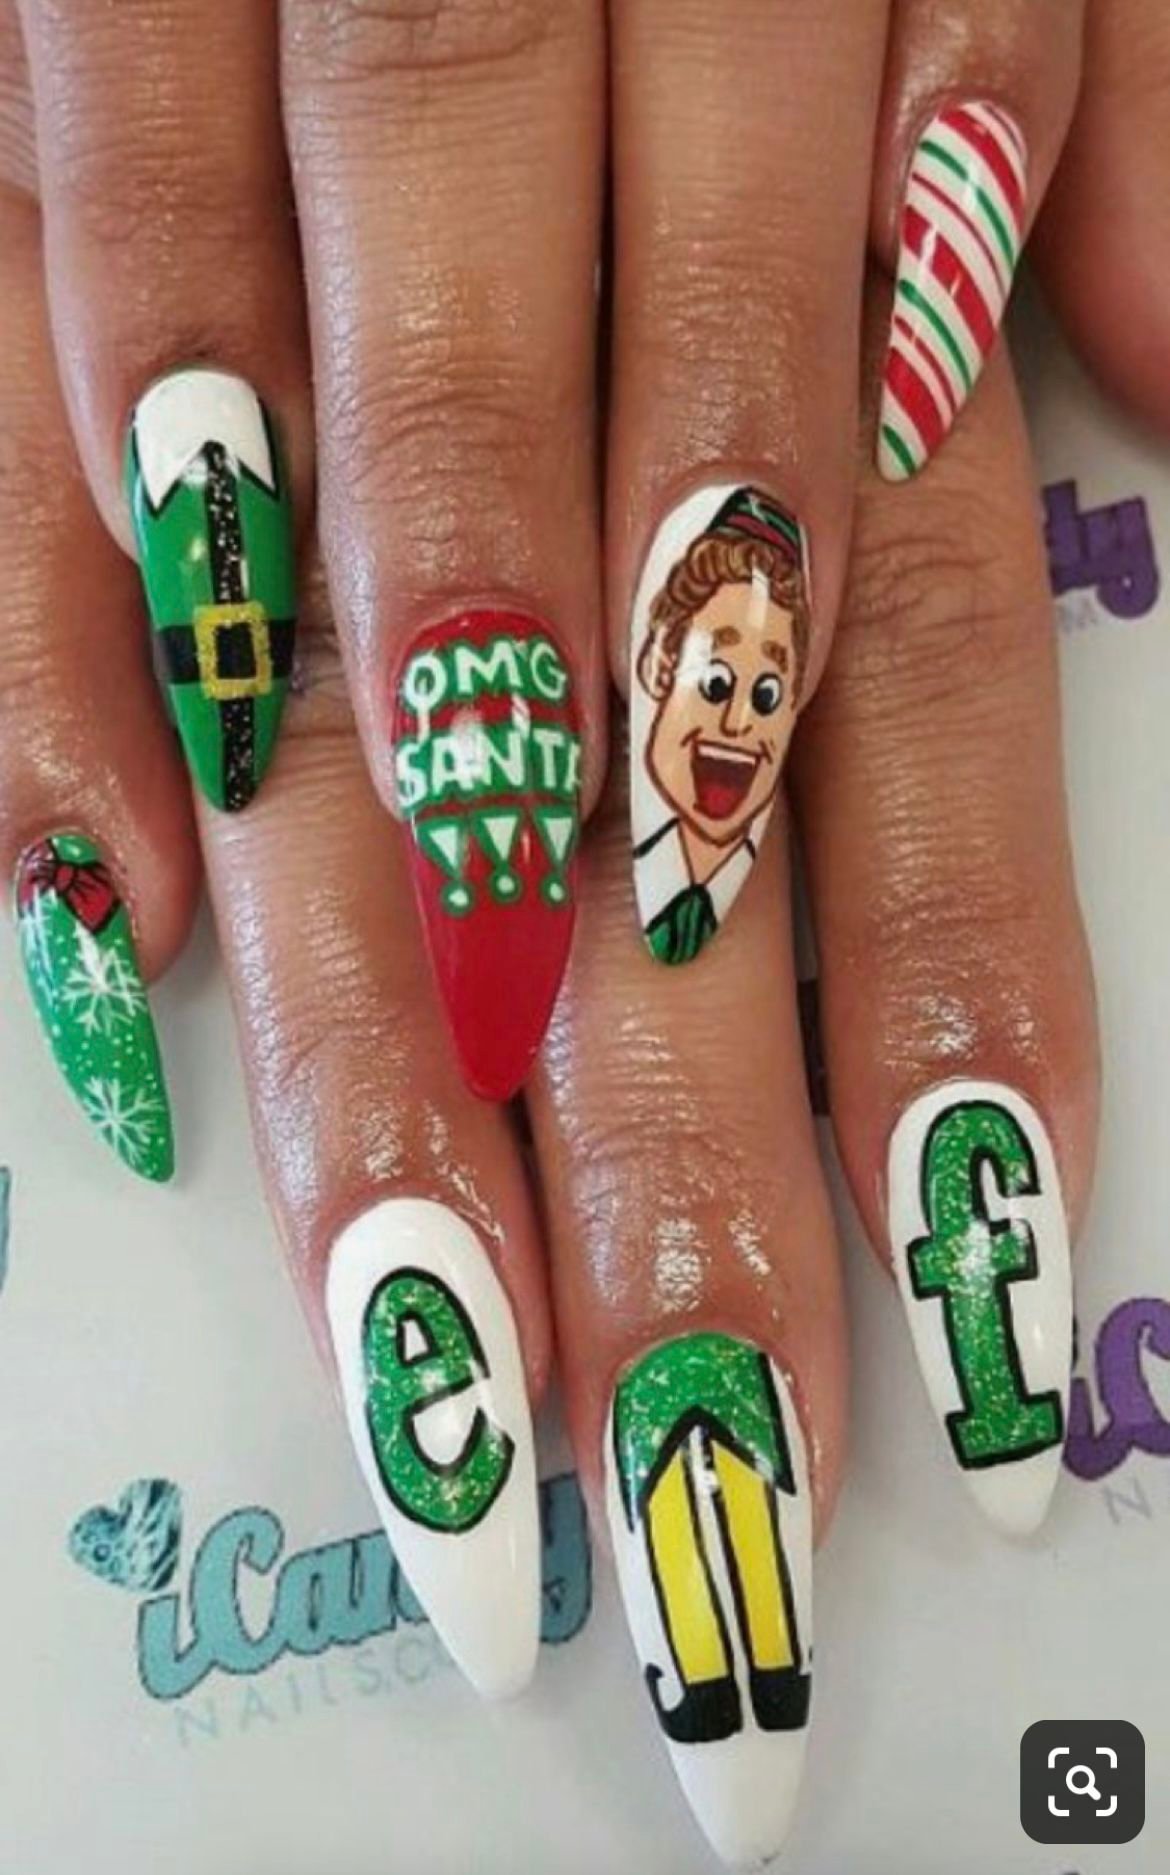
Celebrate the holiday season with playful elf-themed nails! This fun and creative design brings out your inner child, making it perfect for holiday parties or family gatherings. It’s a whimsical way to embrace the festive spirit and spread joy.
Outfit Pieces:
– Clear base coat (for protection)
– Bright green and red polishes (classic elf colors)
– Fine brush for detailing
– Rhinestones or glitter for accents
– Clear glossy top coat
Styling Tips:
– Start with a protective base coat.
– Use bright green and red polishes for your base colors.
– Paint little elf shoes or hats on accent nails using white and green polish.
– Add rhinestones or glitter for extra flair.
– Seal with a clear top coat to keep it looking fresh.
This whimsical design is sure to spread joy and laughter wherever you go during the festive season!
Image credit: Riley on Pinterest
You Might Also Like
19. Silver Snowflakes on Blue

Keep it classic yet festive with silver snowflakes on a rich blue background. This nail design captures the beauty of winter while adding a touch of glam that’s perfect for holiday celebrations. The contrast between the colors makes this look truly stand out.
Outfit Pieces:
– Clear base coat (for protection)
– Rich blue nail polish (creamy finish)
– Silver polish for snowflake designs
– Optional: shimmery polish for added sparkle
– Clear glossy top coat
Styling Tips:
– Start with a clear base coat for protection.
– Apply a rich blue base color and allow it to dry.
– Use a fine brush to paint silver snowflakes across your nails.
– Consider using a shimmery polish to enhance the snowflakes’ sparkle.
– Finish with a clear top coat for shine.
This elegant design will have you feeling like a winter queen, making it a fantastic choice for any holiday gathering!
20. Cozy Knit Sweater Nails
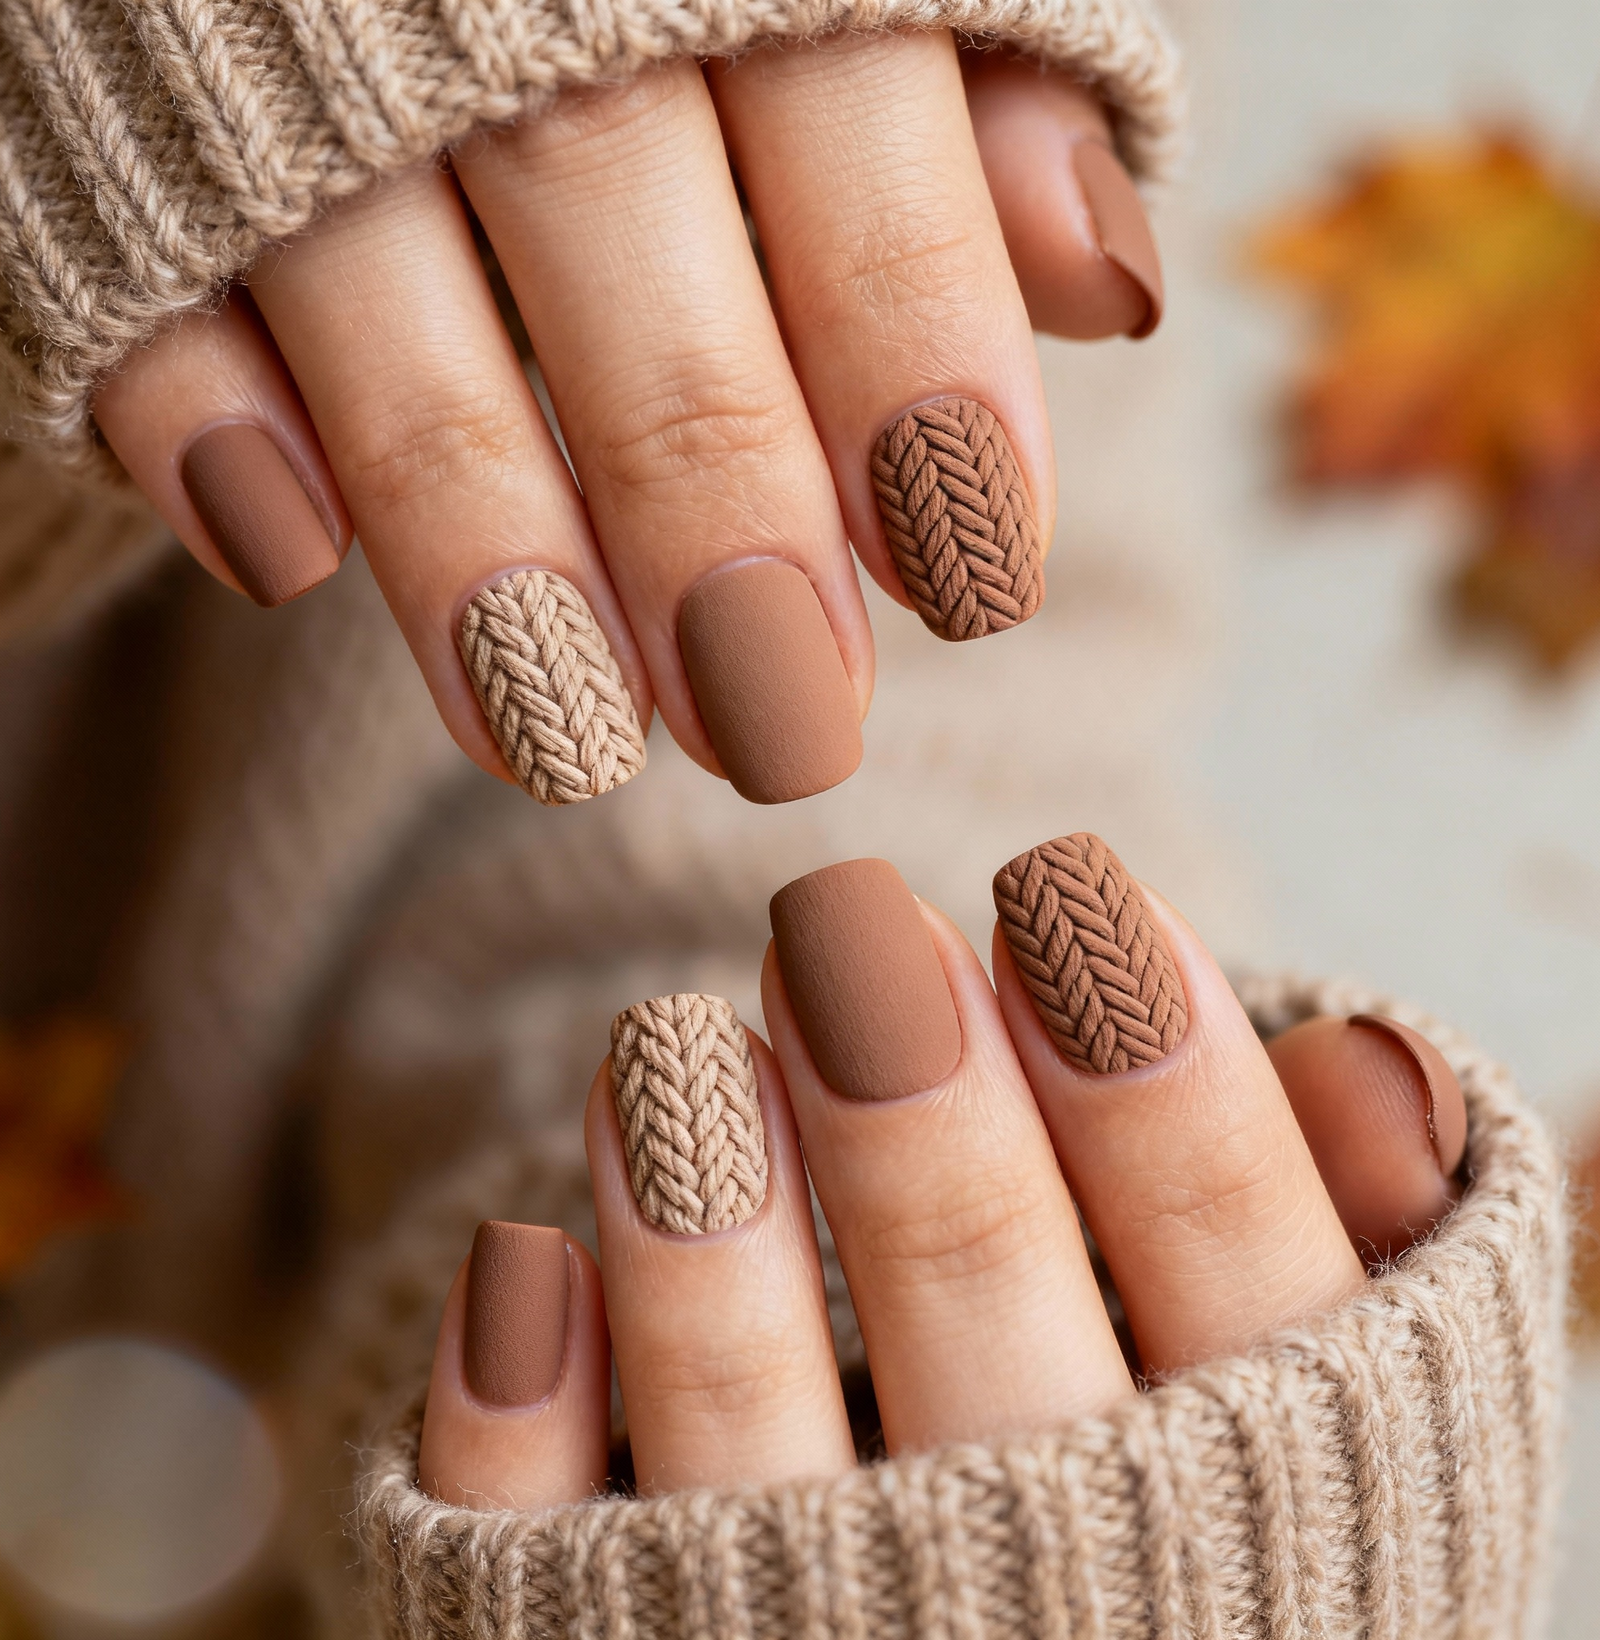
Channel the cozy vibes of a winter sweater with knit-patterned nails! This unique design adds warmth and creativity to your holiday look, making it perfect for enjoying hot cocoa by the fire. It’s a charming way to express your love for winter fashion through nail art.
Outfit Pieces:
– Clear base coat (for protection)
– Warm beige or cream polish (cozy base)
– Contrasting polish for knit pattern (red or green)
– Optional: glitter or rhinestones for accents
– Clear glossy top coat
Styling Tips:
– Start with a clear base coat for protection.
– Apply warm beige or cream polish as your base color.
– Use a fine brush to paint a knit pattern in contrasting colors.
– Add glitter or rhinestones for cozy sparkle.
– Seal with a clear top coat to finish.
This charming design is not only trendy but also invites warmth and comfort, perfect for your holiday celebrations!
Image credit: TrendyNailsOOTD on Pinterest
21. Elegant White and Gold
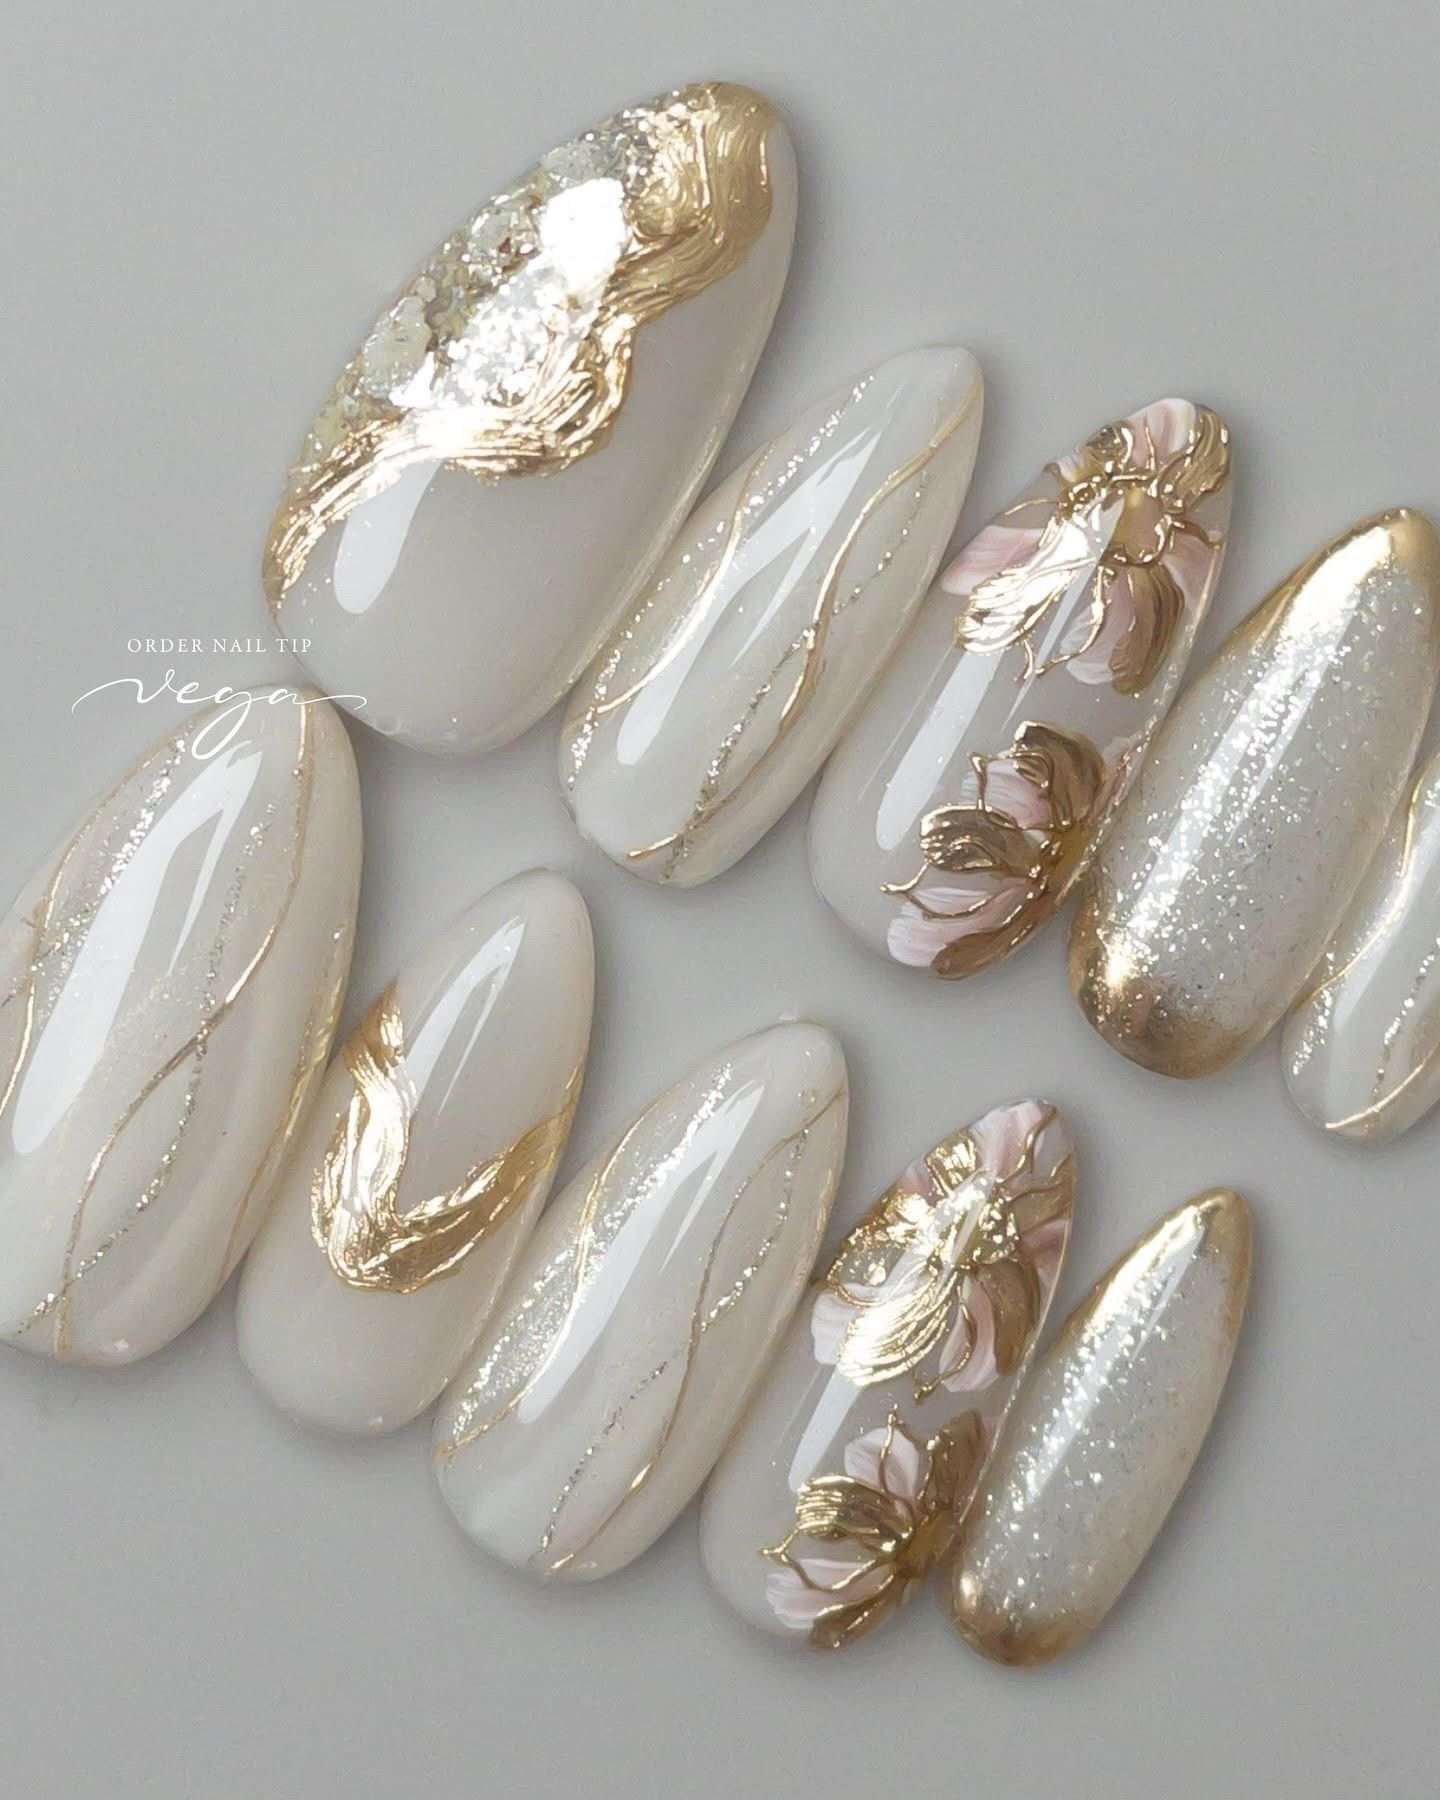
Elevate your holiday style with an elegant white and gold nail design! This classy combination is perfect for any formal gathering while maintaining a festive touch. The simplicity of white paired with gold accents exudes sophistication and charm.
Outfit Pieces:
– Clear base coat (for protection)
– Crisp white nail polish (creamy finish)
– Gold nail art polish or brush
– Clear glossy top coat
Styling Tips:
– Start with a clear base coat to protect your nails.
– Apply two coats of white polish for a classic base.
– Use a fine brush to add gold details or small dots on accent nails.
– Seal your design with a glossy top coat for long-lasting shine.
This design exudes elegance, making it suitable for all your holiday events while ensuring you stay chic and festive!
Image credit: Rey calibar on Pinterest
22. Cute Penguin Nails
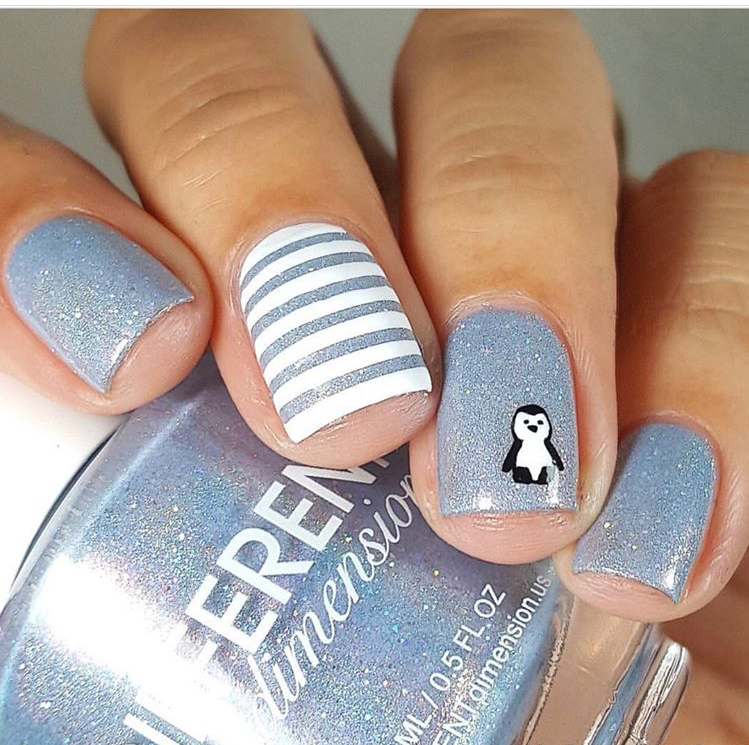
Celebrate the whimsy of winter with adorable penguin nail designs! This playful look is perfect for showcasing your fun side during the festive season, especially during family gatherings. It’s a delightful way to express your holiday cheer.
Outfit Pieces:
– Clear base coat (for protection)
– Soft blue or white polish (base color)
– Fine brush for penguin detailing
– Optional: tiny snowflakes or glitter for accents
– Clear glossy top coat
Styling Tips:
– Start with a clear base coat to protect your nails.
– Use soft blue or white as your base color.
– Paint little penguins on accent nails, complete with hats and scarves.
– Add tiny snowflakes or glitter for extra charm.
– Seal with a clear top coat to keep your design intact.
This design is sure to bring smiles and laughter, making your holiday look truly merry and bright!
Image credit: Jill Gillespie on Pinterest
23. Festive Ombre with Glitter
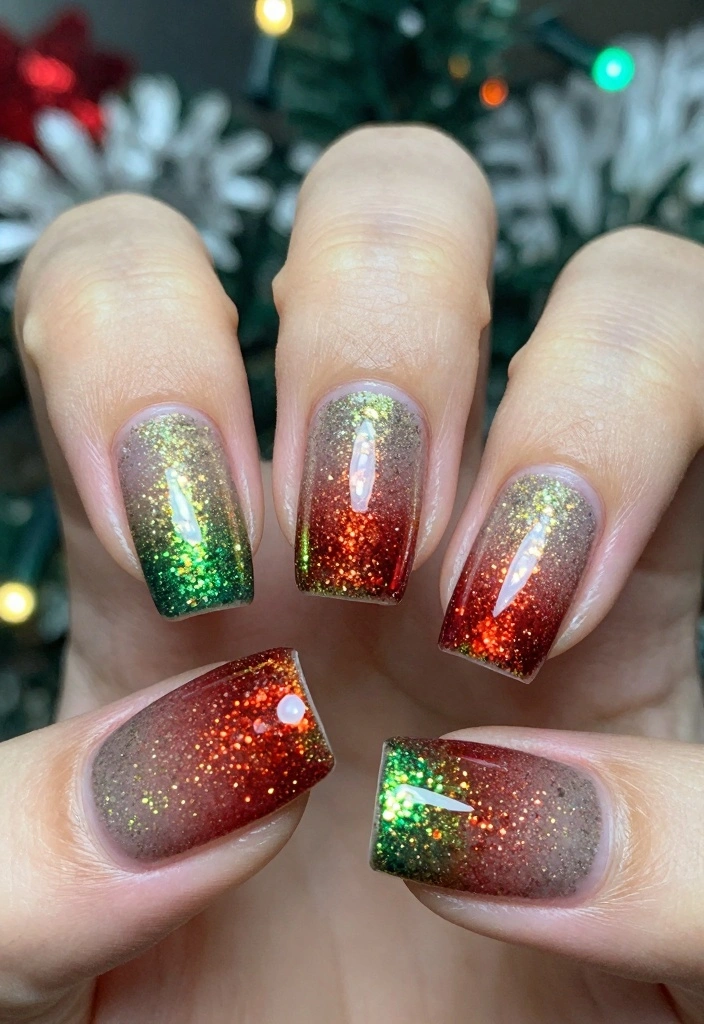
Step into the season with a festive ombre nail design featuring glitter! This transition of colors, combined with a touch of sparkle, creates a stunning effect perfect for holiday parties. It’s a fun way to incorporate multiple colors while keeping your nails stylish.
Outfit Pieces:
– Clear base coat (for protection)
– Two or three festive colors (red, green, gold)
– Glitter polish for tips
– Clear glossy top coat
Styling Tips:
– Begin with a clear base coat for protection.
– Apply two or three colors in an ombre gradient, blending them seamlessly.
– Add glitter polish at the tips for extra sparkle.
– Seal your design with a clear top coat to maintain that shine.
This nail design is eye-catching and perfect for celebrations, bringing the festive spirit to your fingertips!
24. Bright Multicolor Nails
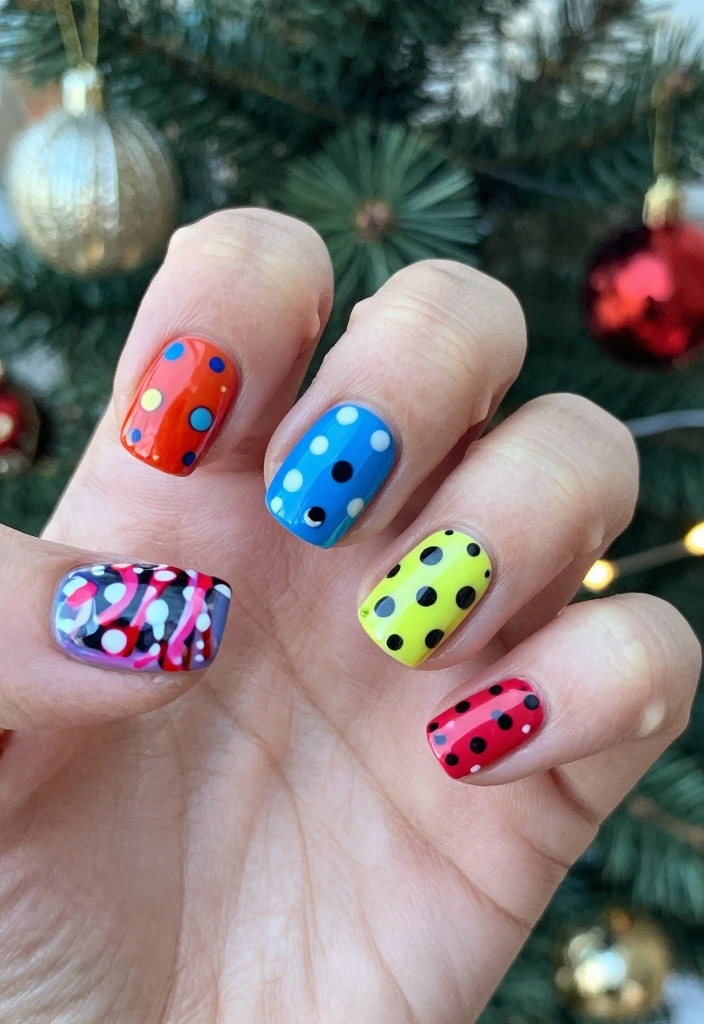
Wrap up your holiday look with bright multicolor nails! Mixing and matching colors creates a fun and lively vibe, perfect for those who love to express their playful side during the festive season. This design is all about creativity and joy, ensuring you stand out at any gathering.
Outfit Pieces:
– Clear base coat (for protection)
– Several bright colors (red, green, blue, gold)
– Various patterns (polka dots, stripes, holiday themes)
– Clear glossy top coat
Styling Tips:
– Start with a clear base coat for protection.
– Choose bright colors for each nail, applying them as desired.
– Mix different patterns on each nail for a fun look.
– Finish with a clear top coat to make your designs last.
This nail design is perfect for any holiday occasion, allowing you to spread joy and cheer with your vibrant and playful style!
Conclusion
These 24 glamorous Christmas nail designs are not just about beauty; they’re a way to express your festive spirit this season! From elegant glitters to playful patterns, each design offers a chance to showcase your style. Whatever your plans for the holidays, these nail art ideas will ensure your fingertips shine brightly throughout the season!
Remember, the best part of nail art is the creativity it offers—feel free to mix and match ideas to find your perfect festive look!
Frequently Asked Questions
What are the essential trends in christmas nail designs for this season?
From shimmering glitters to classic reds and greens, there are many christmas nail designs this season. Trend highlights include metallic foils, plaid patterns, snowflakes, negative-space art, and cozy matte finishes.
To recreate at home: choose a primary base color (red, green, or nude), pick 1–2 nail ideas for accents, and use a fine brush or stamping plate for stripes or snowflakes. Finish with a long-lasting top coat to keep the sparkle intact. For instant holiday glam, layer a thin coat of glitter on the tips or add a metallic chrome accent on an accent nail.
If you’re short on time, try a single statement nail with a bold design and keep the rest simple for a polished look that shines.
How can I incorporate nail ideas into a cohesive holiday glam manicure?
Want to weave different nail ideas into one cohesive holiday glam manicure? Start with a unifying base color family (reds, greens, or neutrals). Pick 1–2 nail ideas for accent nails (think snowflakes, candy-cane stripes, foil shards, or a glitter gradient) and repeat a chosen motif on different nails. Keep the palette limited to 2–3 shades so it reads as one look. Use the same finish (glossy or matte) across nails, and finish with a strong top coat to seal the design. This approach nails the christmas nail designs vibe while staying wearable for parties and photos.
Are there quick DIY christmas nail designs that still look wow?
Yes! Here are a few quick DIY options that still scream holiday glam: 1) Candy cane stripe: red and white with striping tape; 2) Snowflake accent: paint a tiny snowflake with a fine brush on a single nail plus clear glitter; 3) Frosty gradient: sponge on white at the tip fading to clear/base; 4) Metallic foil tips: apply gold or silver foil on tips over a sheer base. Tools: striping tape, dotting tool, nail art brush, sponge, tweezers. Finish with a top coat for shine. These fit christmas nail designs and deliver nail ideas quickly.
What should I tell my nail tech to nail the holiday glam look?
Share a clear brief: color palette (e.g., deep red, forest green, ivory), length and shape (short square, almond), pattern plan (one accent nail with snowflake, or a plaid feature), preferred finish (glossy vs matte), and any extras (foil, rhinestones). Bring inspo images and ask for stamping or freehand accents. Request proper base and top coats for durability so your nails stay flawless through holiday parties. Embrace the holiday glam vibe.
Which colors and finishes pair best for traditional vs modern christmas nail designs?
Traditional christmas nail designs lean on classic reds, greens, and crisp whites, often with gold or silver accents. Pair these with a glossy finish for a timeless look, or mix in a matte base with shiny details for contrast. Modern takes favor deeper shades (burgundy, forest, navy), black-and-white combos, chrome or holographic foils, and clean lines. To pull this off: pick a base color, reserve one nail for an accent (foil edge or geometric stripe), and finish with either all-gloss or a coordinated matte to keep the vibe cohesive.
Related Topics
christmas nail designs
holiday glam
festive nail art
glitter nails
easy nail designs
winter nail trends
beginner friendly
nail art tutorial
red and green nails
sparkling manicure
nail design ideas
seasonal nail art


")

")
")
I love these nail designs! They really get me in the holiday spirit. Which one do you think is the easiest to try at home?
These designs are so cute! I once tried to do a glitter nail look, but ended up looking like a disco ball. At least I was the life of the party!
Did you know that Christmas-themed nails have been around since the 1980s? It’s crazy how trends come back around! My grandma had some wild designs back then!
I remember one Christmas when I tried to do my nails with my cat on my lap. Let’s just say I ended up with glitter everywhere, including on the cat! It was a sparkly holiday for sure.