
Nail art is more than just a beauty trend; it’s a fun way to express yourself. I created this post because I know many of you are eager to try your hand at nail art but might feel intimidated by complex designs. Whether you’re preparing for a special event or just want to add a splash of creativity to your everyday look, the right nail art can elevate your style in an instant.
If you’re a beginner looking to dive into the world of nail design, this guide is perfect for you. You don’t need to be an expert or have a salon’s worth of tools to create stunning nail art. You just need a little bit of creativity and a desire to experiment with colors and patterns. This post is made for those who want to enhance their beauty routine with simple, yet eye-catching designs.
In this article, you’ll find 20 stunning nail art ideas that are not only beautiful but also incredibly easy to recreate. From classic polka dots to galaxy glitter, these designs are perfect for both everyday wear and special occasions. You’ll discover tips and tricks that will help you achieve these looks in no time, even if you’re just starting out. Each design is beginner-friendly and requires minimal supplies, making it accessible for everyone.
So grab your favorite nail polish, and let’s get creative! With these easy nail art ideas, you’ll be turning heads and showing off your unique style in no time. Ready to dive in? Let’s explore these fantastic designs that are waiting for you to try!
Key Takeaways
– Discover 20 easy nail art designs that are perfect for beginners, like classic polka dots and striped patterns.
– Learn about the minimal supplies needed for each design, making it easy to get started without breaking the bank.
– Get tips on color combinations and techniques to elevate your nail art game without the stress of complex methods.
– Find quick and engaging ways to express your personal style through fun and trendy designs.
– Each design can be adapted for any occasion, ensuring your nails always look fabulous, whether casual or formal.
Contents
- 1. Classic Polka Dots
- 2. Striped Delight
- 3. Floral Fantasy
- 4. Marble Magic
- 5. Galaxy Glitter
- 6. Ombre Effect
- 7. Minimalist Lines
- 8. Sparkly Tips
- 9. Neon Splashes
- 10. Color Blocking
- 11. Fast Feathered Tips
- 12. Fun Fruit Accents
- 13. Twinkling Stars
- 14. Sweet Candy Stripes
- 15. Textured Velvet
- 16. Mixed Patterns
- 17. Retro Vibes
- 18. Simple Chevrons
- 19. Easy Animal Prints
- 20. Sweet Pastel Waves
1. Classic Polka Dots
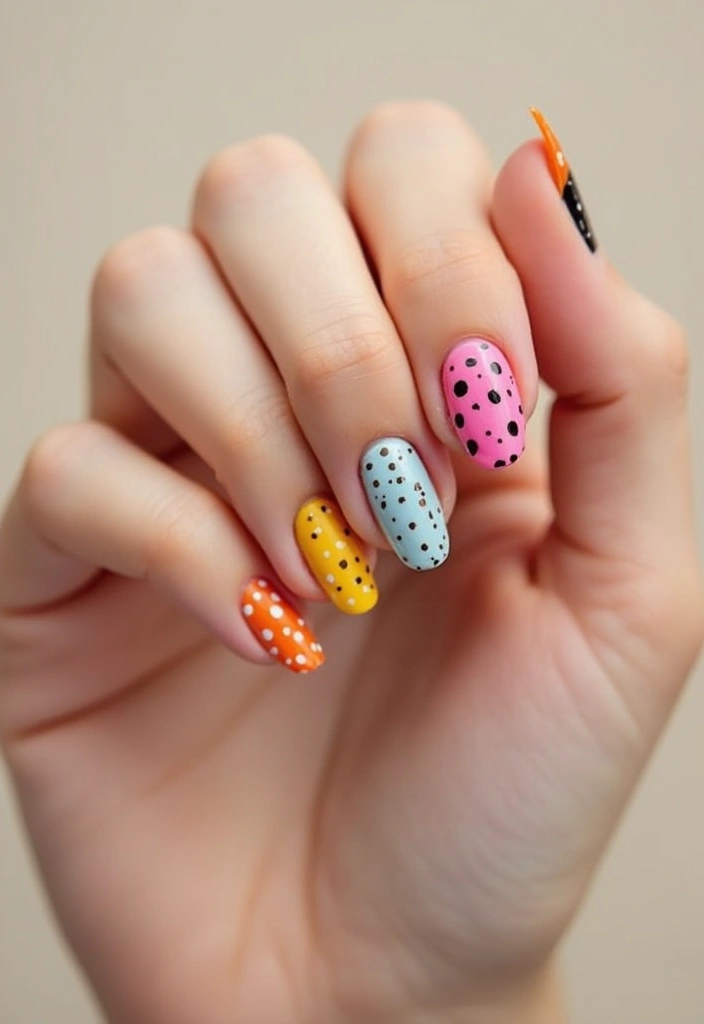
Polka dots add a timeless charm to your nails! This playful design is easy to create, needing only a dotting tool or even a bobby pin. Choose a soft base color like pale pink or crisp white for a fresh start. Once that’s dry, grab a bold color like bright red or navy for the dots, and space them out evenly across your nails. Pinterest showcases countless variations of this fun design, making it a sought-after trend.
To achieve the perfect polka dot look, consider using a clear topcoat to protect your art and make it last longer. For a twist, try different colors on each nail or alternate between two base shades. This design is versatile and perfect for every occasion, allowing you to express your personal style effortlessly.
• Choose a light base color for a fresh canvas.
• Use a bold color for eye-catching dots.
• Experiment with dot sizes for added character.
• Apply a topcoat for durability and shine.
Your nails will look cheerful and stylish with this classic polka dot design!
Classic Polka Dots
Editor’s Choice

5 pc 2 Way Dotting Pen Tool Nail Art Tip Dot Paint Manicure kit (5PC)

Morovan 15 Bright Color 0.27oz Air Quick Dry Nail Polish Gift Set for Women

Sally Hansen Double Duty™, Base and Top Coat, Quick Dry, Long Lasting, S…
2. Striped Delight
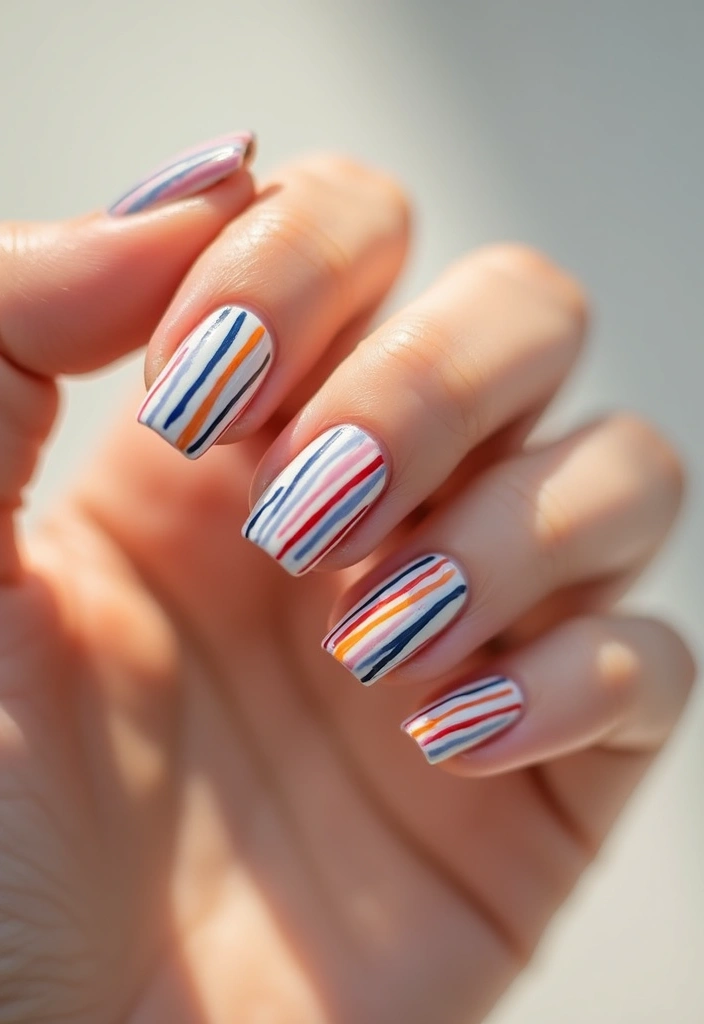
Stripes can elevate your nail game easily! This chic design makes a striking statement with minimal effort. Start by picking two complementary colors, like soft teal for the base and bright coral for the stripes. Once your base coat dries, use thin striping tape or a fine brush to create neat lines. You can even get creative with diagonal or vertical stripes to add flair, as seen in many trendy nail art showcases.
Make sure to let each layer dry completely to avoid any smudging. You can also play with the width of your stripes for a unique touch. For something fun, add a layer of glitter polish to your stripes for extra sparkle. This design fits well for both casual outings and formal events, making it a versatile choice.
• Select complementary colors to enhance your design.
• Use striping tape for clean lines.
• Try different stripe widths for variety.
• Add glitter polish for a fun twist.
With these tips, your striped nails will look effortlessly chic!
Striped Delight
Editor’s Choice

Nail Art Striping Tape Lines Kit 36 pcs 1mm 2mm 3mm Nail Tape Strips for…

Artdone 31pcs Nail Art Brushes, Nail Art Tool Set, Dotting Tools, Dust B…
L.A. COLORS Color Craze Nail Polish, Glitter Bomb CNP543
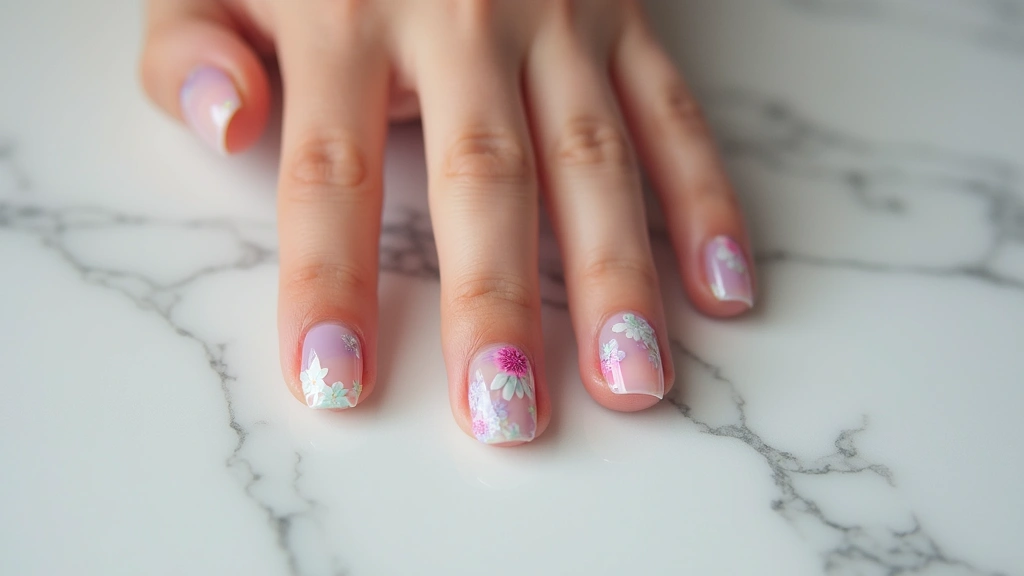
3. Floral Fantasy
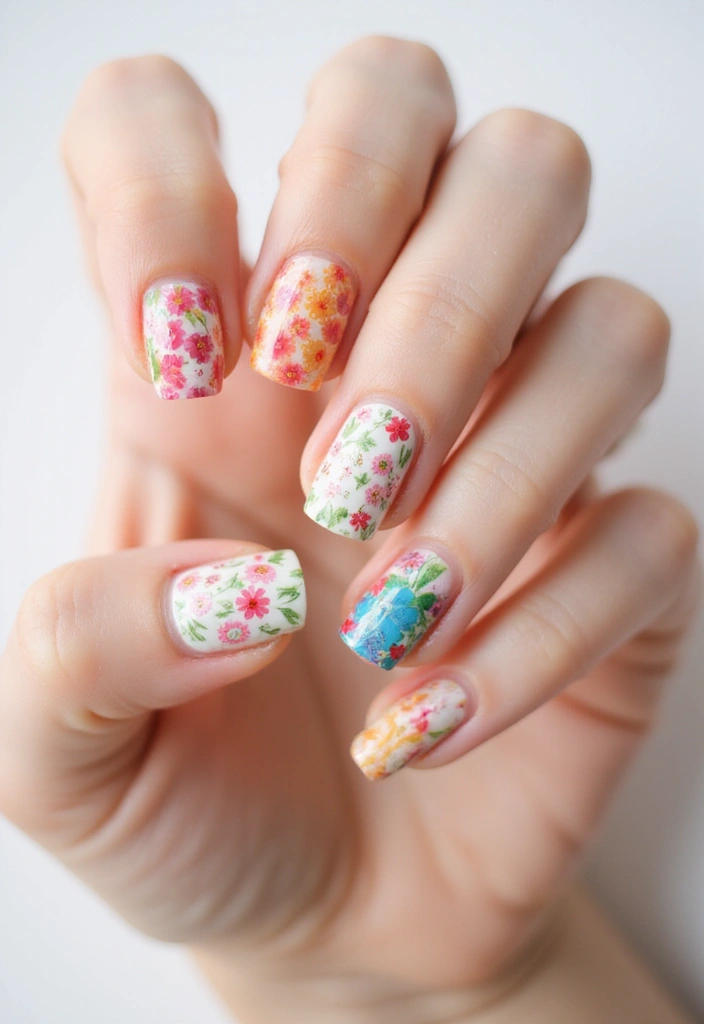
Floral designs bring a lovely touch to your nails! These easy-to-create flowers add a feminine flair with just a few brush strokes. Start with a soft base color like lavender, and using a thin brush or nail art pen, paint simple flower shapes. Create a circle for the center and add petals around it. Bright colors like pink and yellow make the flowers pop, while soft pastels create a more subtle look. Floral nail art is a favorite during spring and summer, and you’ll find many inspiring designs online.
Before painting on your nails, practice the flower shapes on paper to gain confidence. Layering different colors can give depth to your flowers, making them more vibrant. For a cute finishing touch, use a dotting tool for the flower centers. This charming design is perfect for adding a cheerful vibe to your look.
• Start with a light base color for a fresh background.
• Use a thin brush to create flower shapes.
• Layer colors for depth in your flowers.
• Practice on paper before applying to nails.
Your nails will bloom beautifully with this floral fantasy design!
Floral Fantasy
Editor’s Choice
Artdone 31pcs Nail Art Brushes, Nail Art Tool Set, Dotting Tools, Dust B…
5 pc 2 Way Dotting Pen Tool Nail Art Tip Dot Paint Manicure kit (5PC)
Morovan 15 Bright Color 0.27oz Air Quick Dry Nail Polish Gift Set for Women
4. Marble Magic
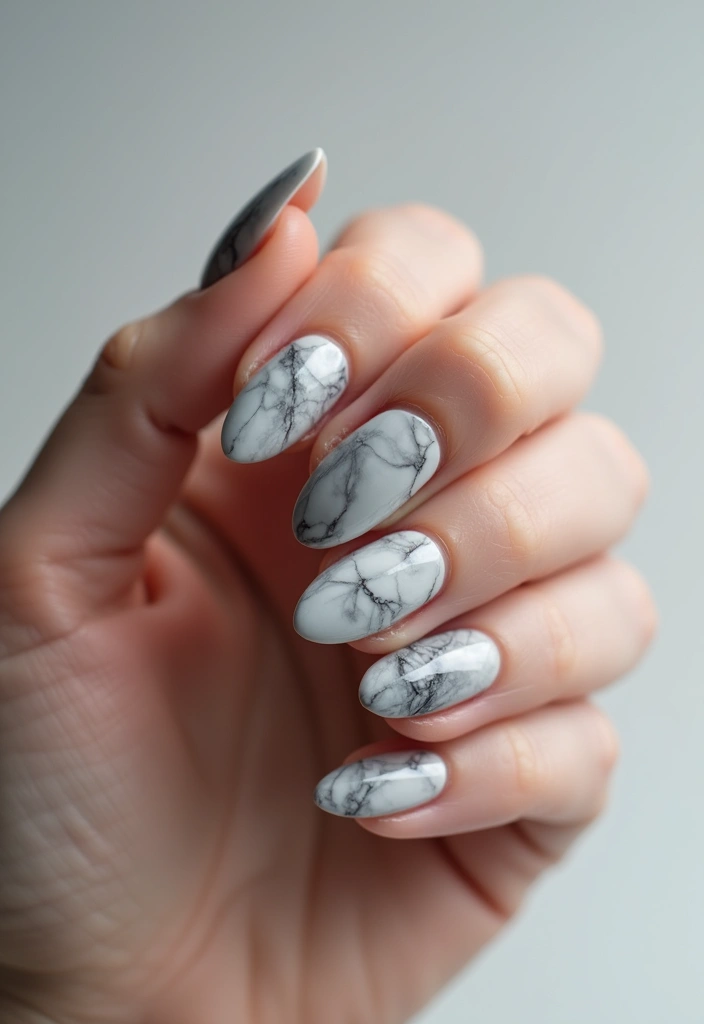
Marble nails offer a classy and sophisticated look! This design might seem complicated, but it’s actually quite simple. Begin with a white or light base coat to set the stage. Using a small sponge, dab on contrasting colors like gray and black, blending them gently to mimic a marble effect. Once satisfied, apply a topcoat for a glossy finish that enhances the look. Many nail art enthusiasts are embracing this trendy style!
For the best results, let each layer dry completely before adding more colors. A makeup sponge helps create a cool texture, giving depth to your marble. If you’re feeling fancy, opt for metallic shades to add a glam twist. This design is perfect for a classy night out or any elegant occasion.
• Start with a light base coat for a clean canvas.
• Use a makeup sponge for blending colors.
• Let each layer dry before proceeding.
• Try metallic shades for a glamorous effect.
With these tips, you’ll create stunning marble nails that impress!
Marble Magic
Editor’s Choice
Sally Hansen Double Duty™, Base and Top Coat, Quick Dry, Long Lasting, S…
Amazon Basics Cosmetic Foam Wedges For Makeup, 32 Count

Morovan Fingernail Nail Polish Set: Holographic Metallic Lacquer Air Dry…
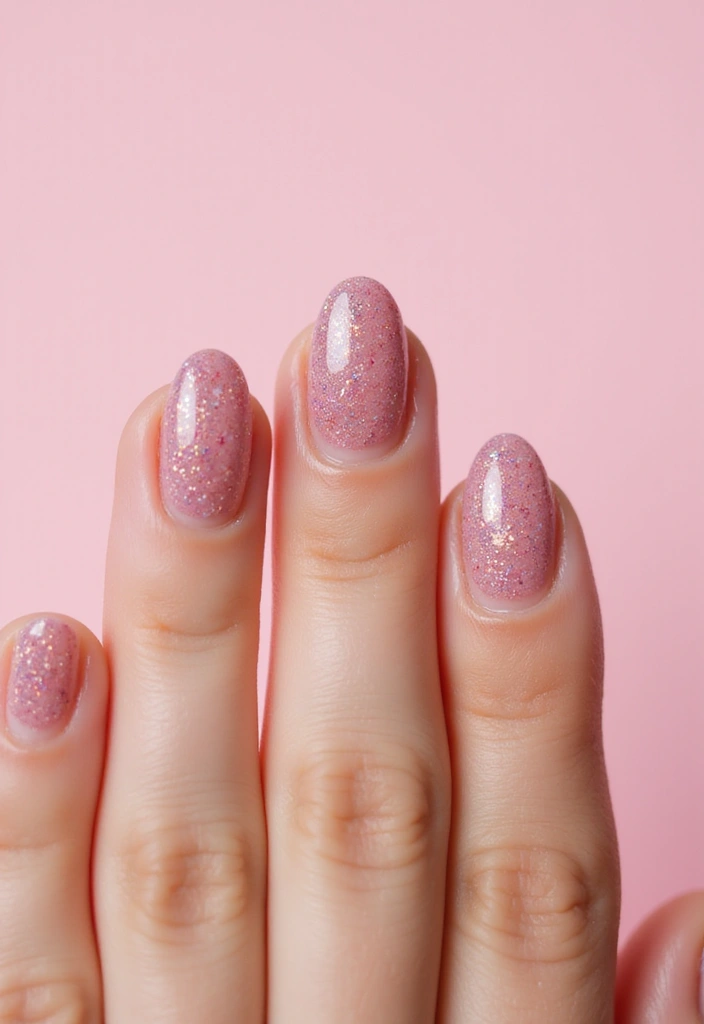
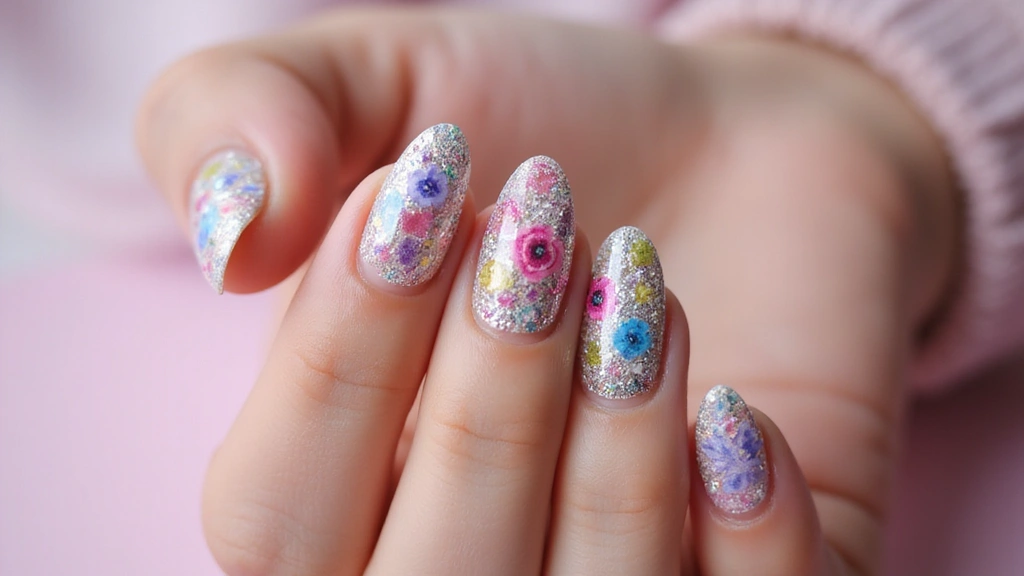
5. Galaxy Glitter
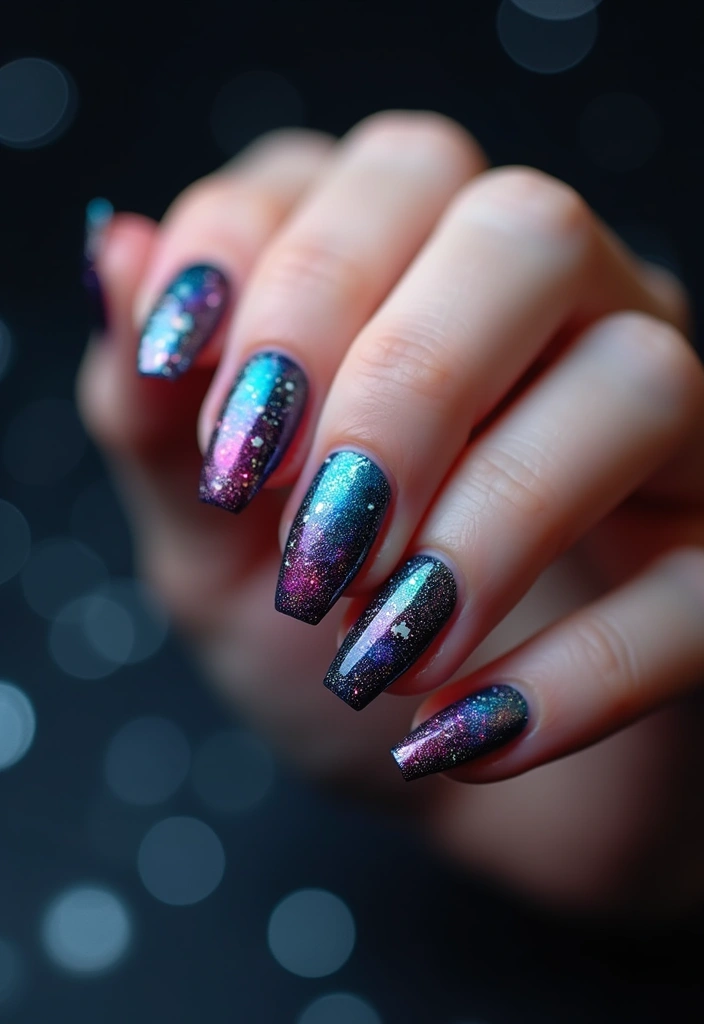
Reach for the stars with galaxy-inspired nails! This design captures the beauty of the cosmos and is a fun way to express your creativity. Start with a dark base, like deep navy or black, to set the mood. Then, use a makeup sponge to layer on lighter colors like purple, blue, and pink to create a nebula effect. Finish by adding glitter at the tips for extra sparkle and seal it with a topcoat. This look is a hit for parties and nights out!
To add stars, use a tiny brush to dot white polish across your nails. Layer the colors gradually to achieve a blended effect, and don’t shy away from mixing bright hues for a vibrant galaxy. This design is perfect for those who love a cosmic touch at their fingertips.
• Start with a dark base for a cosmic backdrop.
• Layer lighter colors using a sponge for effect.
• Add white dots for stars and sparkle.
• Mix bright colors for a vibrant galaxy.
Your nails will shine bright with this galaxy glitter design!
Galaxy Glitter
Editor’s Choice
Artdone 31pcs Nail Art Brushes, Nail Art Tool Set, Dotting Tools, Dust B…

modelones Chameleon Nail Polish Set 6 Colors, Green Glitter Pink Blue Pu…

modelones Glitter Gel Top Coat, Iridescent Silver Mix Glitter Gel Polish…
6. Ombre Effect
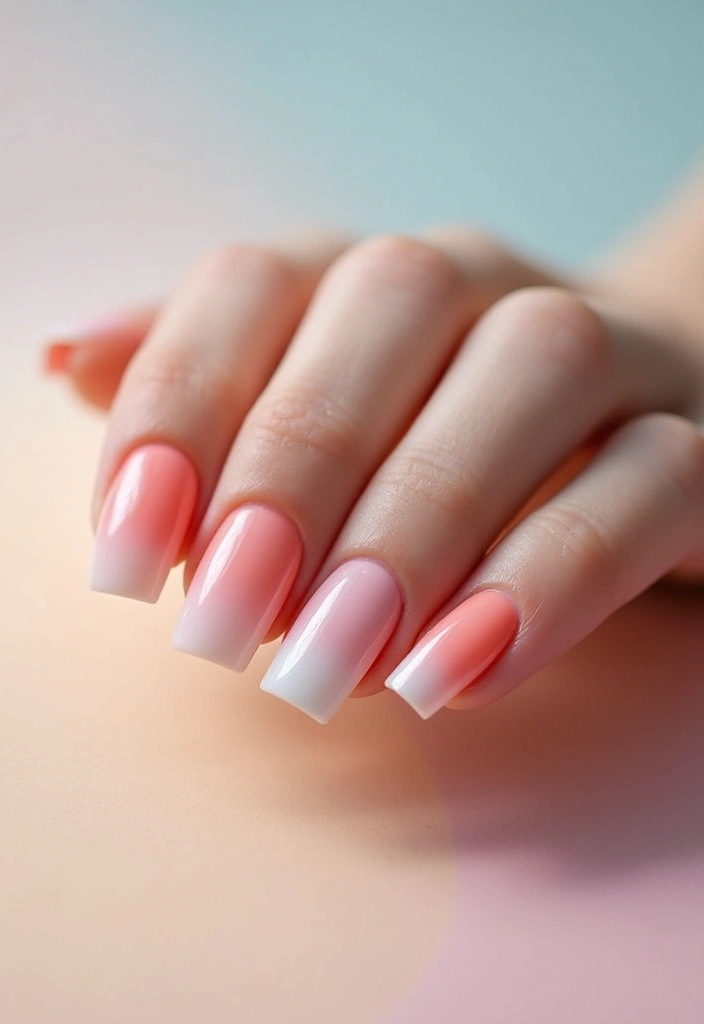
Ombre nails create a beautiful gradient that’s easy to achieve! This design allows you to blend any colors you love. Start with a light base coat, and select two or three colors that flow well together. Use a makeup sponge to blend the colors from the tips down to the base for a seamless transition. A topcoat smooths everything out, giving it a polished look. This trendy style is perfect for any occasion!
Before applying to your nails, practice blending on a piece of paper to get the hang of it. Go slow and build up the color gradually for the best gradient. A fan brush can help create a softer blend if you want a more delicate appearance. Ombre nails add a modern touch that complements any outfit.
• Use a light base coat for a smooth start.
• Blend colors gradually with a sponge.
• Practice on paper for better results.
• Use a fan brush for a softer blend.
Your nails will sport a stunning ombre effect that everyone will admire!
Ombre Effect
Editor’s Choice

Soft Sponges with Grabbing Pen for Ombre and Aura Nail Art with Brush, P…

Fan-Shaped Nail Brush for Dusting, Flat Head Pen With Gradient Varnish, …

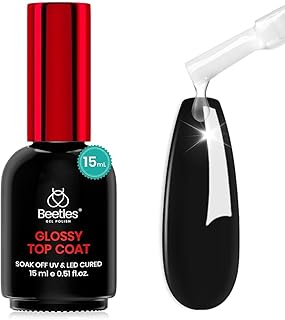
Beetles 2 Pcs 15ml No Wipe Gel Top Coat and Base Coat Set – Shine Finish…
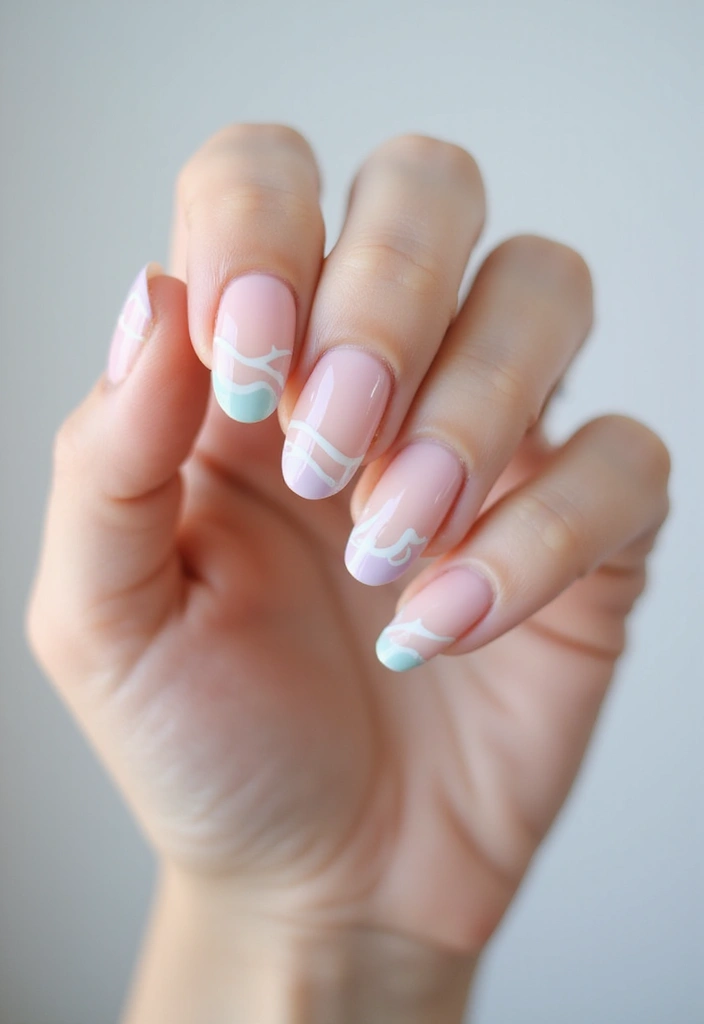
7. Minimalist Lines
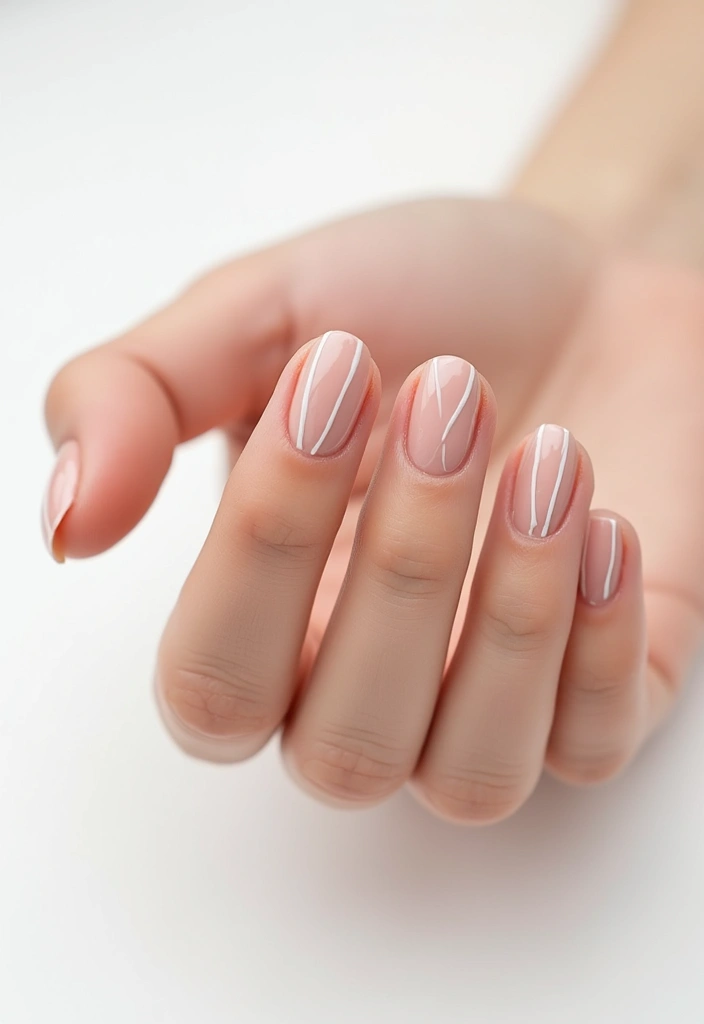
Minimalist nail art is all about simplicity and elegance! With just a few lines, you can create a chic look that stands out. Start with a nude or soft-colored base coat, ensuring it dries completely. Using a thin brush, draw delicate lines or simple shapes on your nails, keeping it straightforward for that minimalist style. This trend is popular among those who appreciate clean designs.
For perfectly straight lines, use tape to guide your brush. Stick to one color or varying shades of the same color for a cohesive look. You can also play with negative space to create an interesting visual effect. This design is perfect for those who want stylish nails without a lot of fuss.
• Choose a nude base coat for a clean look.
• Use tape for straight lines.
• Stick to one color for simplicity.
• Experiment with negative space for interest.
With these tips, your minimalist lines will look effortlessly chic!
Minimalist Lines
Editor’s Choice

Sally Hansen Insta-Dri Nail Polish | Quick Dry, Long Lasting, Streak-Fre…

JINBING 6Rolls Washi Masking Tape for DIY Nail Arts Drawing Pattern Maki…

5Pcs Nail Art Liner Brushes,Liner Brush For Nails Gel,Thin Liner Nail Br…
8. Sparkly Tips
If you love a little glam, sparkly tips are the perfect choice! This design takes the classic French manicure and adds a fun twist. Start with a nude or light-colored base and apply glitter polish to the tips. You can choose fine glitter for a subtle sparkle or chunky glitter for a bold look. This design is wonderful for special occasions or when you want to feel fabulous!
Make sure your base coat is fully dry before applying glitter to avoid any mess. A clear topcoat helps seal your design and adds extra shine. For a playful touch, try pairing contrasting colors for the tips. This design transforms a simple manicure into something glamorous!
• Start with a nude base for a classic look.
• Apply glitter polish to the tips.
• Use a clear topcoat to seal it.
• Pair with contrasting colors for fun.
Your nails will shine bright with these sparkly tips!
Fun fact: 9 out of 10 beginners report faster mastery with sparkly tips and a nude base. Start with a nude base, apply fine glitter to the tips, and seal with a clear topcoat for lasting shine.
Sparkly Tips
Editor’s Choice
Sally Hansen Insta-Dri Nail Polish | Quick Dry, Long Lasting, Streak-Fre…
L.A. COLORS Color Craze Nail Polish, Glitter Bomb CNP543
Sally Hansen Double Duty™, Base and Top Coat, Quick Dry, Long Lasting, S…
You might also like
9. Neon Splashes
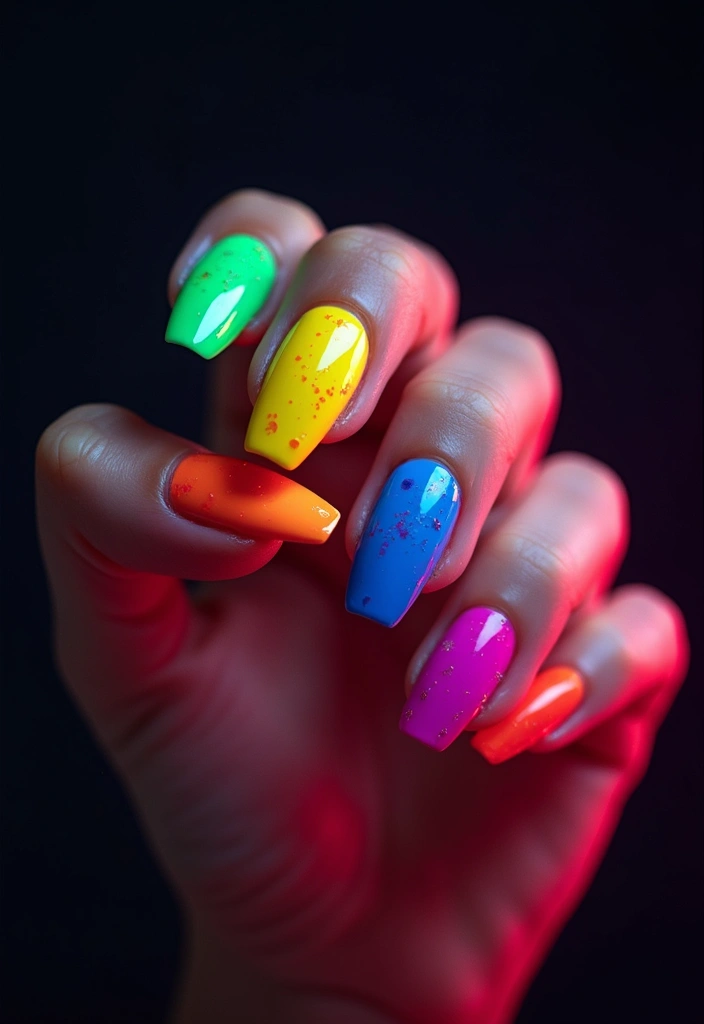
Brighten your look with neon splashes! This design is perfect for summer or any fun event. Start with a white or light base coat to make the colors pop. Then, use a sponge or brush to randomly apply neon shades, creating a playful splatter effect. Finish everything off with a glossy topcoat to keep it fresh. This vibrant style is sure to catch attention!
Mix different neon colors to create a lively effect that stands out. You can even opt for a matte topcoat for a unique finish. Pair your neon nails with neutral outfits to let them shine. This playful design is all about having fun and spreading positive vibes!
• Start with a light base coat for brightness.
• Apply neon shades with a sponge for fun.
• Try a matte topcoat for a twist.
• Pair with neutral outfits to showcase your nails.
Your neon splashes will bring a smile to your face and everyone around you!
Neon Splashes
Editor’s Choice
Morovan 15 Bright Color 0.27oz Air Quick Dry Nail Polish Gift Set for Women
Amazon Basics Cosmetic Foam Wedges For Makeup, 32 Count
Beetles Gel Top Coat – Extra Glossy Top Coat Gel Polish 15ml, Shine Fini…
10. Color Blocking
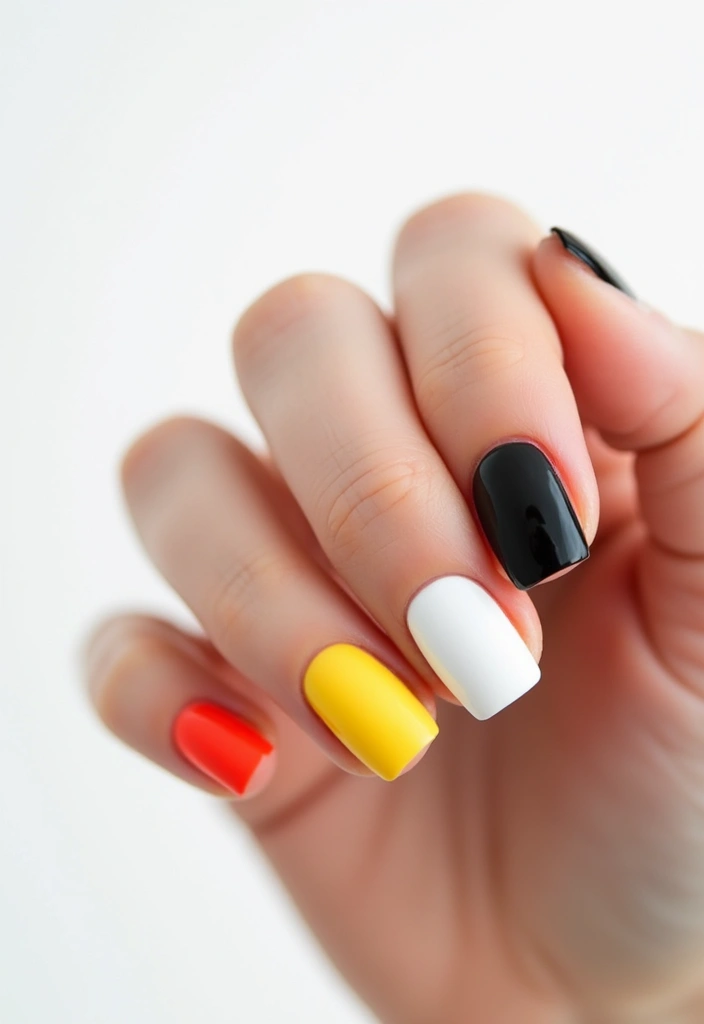
Color blocking is all about bold patterns and fun contrasts! This design lets you mix and match your favorite nail polish shades. Start with a base coat and select two or more colors that complement each other. Use tape to section off parts of your nails, painting each section a different color. This technique creates a unique and eye-catching look that stands out!
To ensure success, allow each color to dry completely before applying tape. You can also try various shapes to keep things interesting. Using contrasting colors will add even more impact to your design. Color blocking is a perfect way to make a statement with ease!
• Use a base coat for a smooth start.
• Tape sections for clean lines.
• Let each color dry completely.
• Try various shapes for creativity.
Your color-blocked nails will make a bold statement wherever you go!
Color Blocking
Editor’s Choice
Sally Hansen Double Duty™, Base and Top Coat, Quick Dry, Long Lasting, S…
JINBING 6Rolls Washi Masking Tape for DIY Nail Arts Drawing Pattern Maki…
Morovan 15 Bright Color 0.27oz Air Quick Dry Nail Polish Gift Set for Women
11. Fast Feathered Tips
Feathered tips bring a soft and dreamy vibe to your nails! This enchanting design is easy to achieve with a little brushwork. Start with a nude base and add white or pastel colors at the tips. Using a thin brush, sweep the colors gently to create a feather-like effect. Finish with a topcoat to keep everything fresh. This look is perfect for those who love whimsical nail art!
Try different feather patterns to create variety in your design. For an ethereal touch, use iridescent polish. You can also experiment with colors that blend well together for a charming effect. Feathered tips are delightful for any occasion!
• Start with a nude base for elegance.
• Use a thin brush for feather strokes.
• Try iridescent polish for a dreamy effect.
• Experiment with blending colors smoothly.
Your feathered tips will add a magical touch to your nails!
Fun fact: In just 15 minutes, you can master feathered tips with 3 simple brush strokes. Start with a nude base, then sweep white or pastel at the tips to craft the feathered look, and finish with topcoat for lasting shine.
Fast Feathered Tips
Editor’s Choice
OPI Nail Lacquer Nail Polish | Opaque Dark Nude Crème Chip Resistant Nai…

AIBEE Nail Art Brushes, 5pcs Double-Ended Acrylic Nail Brush Set with 5/…

essie Nail Art Studio Special Effects Polish, Shimmer, Vegan, Purple Nai…
12. Fun Fruit Accents

Fruit-themed nails are fresh and playful! Whether you love strawberries, pineapples, or cherries, this design is perfect for summer. Start with a bright base color like sunny yellow, and paint simple fruit shapes on one or two accent nails. Use a dotting tool for fun details like seeds or leaves. Keep the other nails a solid color to let your fruits shine!
For your fruit designs, use green for leaves and add tiny dots for texture. You can also match the base color with the fruits for a cohesive look. This fruity nail art is sure to bring a smile and is fabulous for sunny days!
• Start with a bright base color for a cheerful look.
• Paint simple fruit shapes for accents.
• Use a dotting tool for extra details.
• Match base colors to fruits for cohesiveness.
Your fruity nails will be a delightful treat for everyone!
Fun Fruit Accents
Editor’s Choice
5 pc 2 Way Dotting Pen Tool Nail Art Tip Dot Paint Manicure kit (5PC)
Morovan 15 Bright Color 0.27oz Air Quick Dry Nail Polish Gift Set for Women
Artdone 31pcs Nail Art Brushes, Nail Art Tool Set, Dotting Tools, Dust B…
13. Twinkling Stars
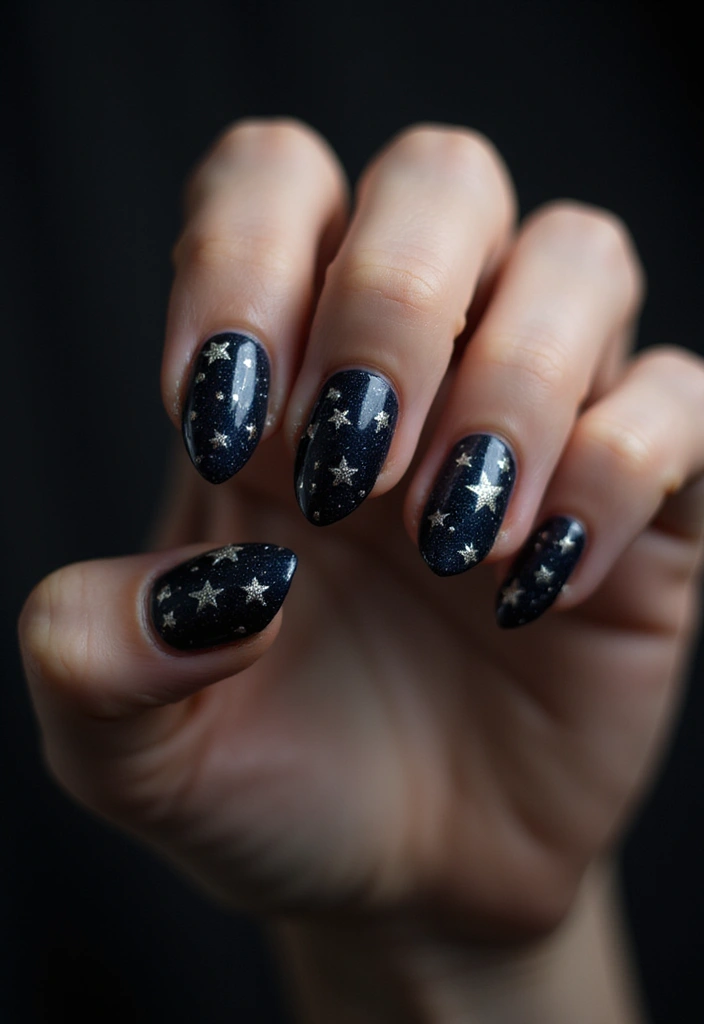
Starry nails bring a celestial touch to your style! This design is easy and adds a bit of sparkle to your look. Start with a dark base coat like deep blue or black. Once it’s dry, use a tiny brush or dotting tool to create star shapes with white or metallic polish. You can also sprinkle in some gold or silver dots for extra twinkle. Finish with a glossy topcoat to seal in the shine!
For more impact, use glitter polish to enhance the starry vibe. Mixing different star sizes will add diversity to your design. Keep other nails simple to let your starry ones shine the brightest. This design is perfect for a night out or special celebrations!
• Start with a dark base coat for depth.
• Use a tiny brush for star shapes.
• Add glitter polish for sparkle.
• Keep other nails simple for contrast.
Your twinkling stars will light up your look beautifully!
Twinkling Stars
Editor’s Choice

GELLEN Dark Red Nail Polish & Base Top Coat, Deep Burgundy Cherry Wine B…
5 pc 2 Way Dotting Pen Tool Nail Art Tip Dot Paint Manicure kit (5PC)

14. Sweet Candy Stripes
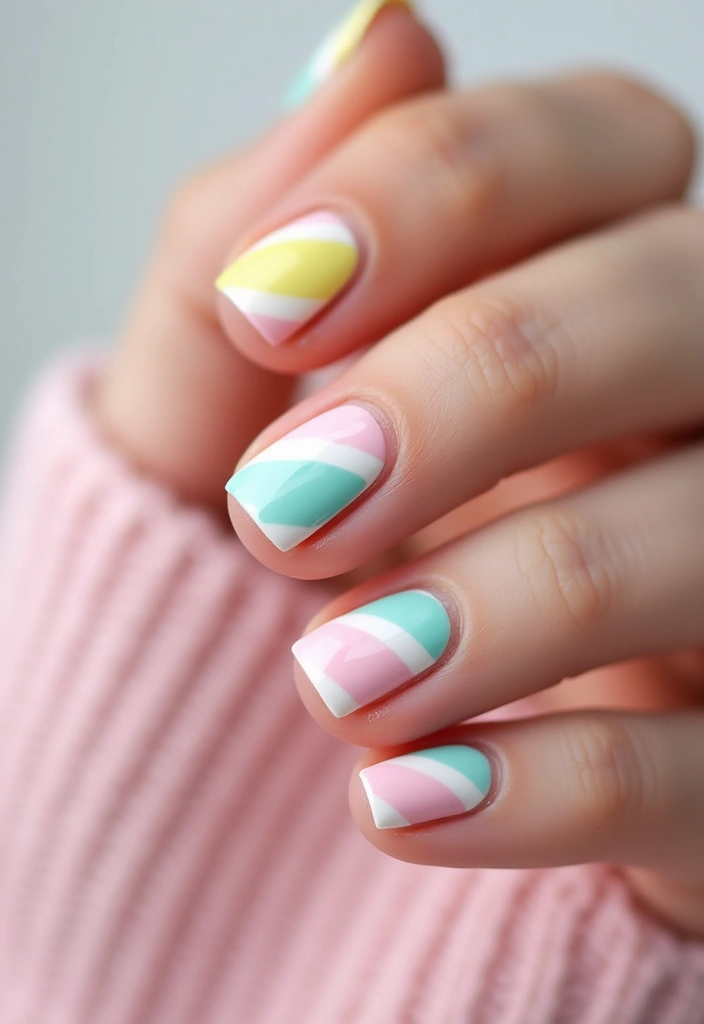
Candy-inspired nails are a delightful and cheerful choice! With vibrant colors and playful designs, this look suits any occasion. Start with a pastel base like baby blue, then use a thin brush to draw stripes in fun colors like pink, yellow, and mint green. You can mix straight and wavy lines to make it even cuter. Finish with a glossy topcoat for that sweet shine!
For perfect stripes, use tape to guide your brush. Experiment with different color combinations to create a unique look. Pair your candy-striped nails with fun accessories for a complete theme. This design is sure to bring out your playful side!
• Start with a pastel base for a sweet look.
• Use a thin brush for fun stripes.
• Experiment with color combinations for uniqueness.
• Pair with fun accessories for a complete outfit.
Your candy stripes will make your nails a treat for all to see!
Sweet candy stripes prove that easy nail art for beginners can be playful and chic—start with a pastel base, then tape and paint pink, yellow, and mint stripes. Use steady strokes for clean lines and finish with a glossy topcoat for lasting shine. It’s quick, fun, and totally shareable!
Sweet Candy Stripes
Editor’s Choice

Beetles Pastel Nail Polish Set -6 Colors Pink Blue Yellow Nude Pink Purp…
Nail Art Striping Tape Lines Kit 36 pcs 1mm 2mm 3mm Nail Tape Strips for…

Artdone Metallic Nail Art Pens, Liner Brushes Set, 5PCS Black Color Nail…
15. Textured Velvet
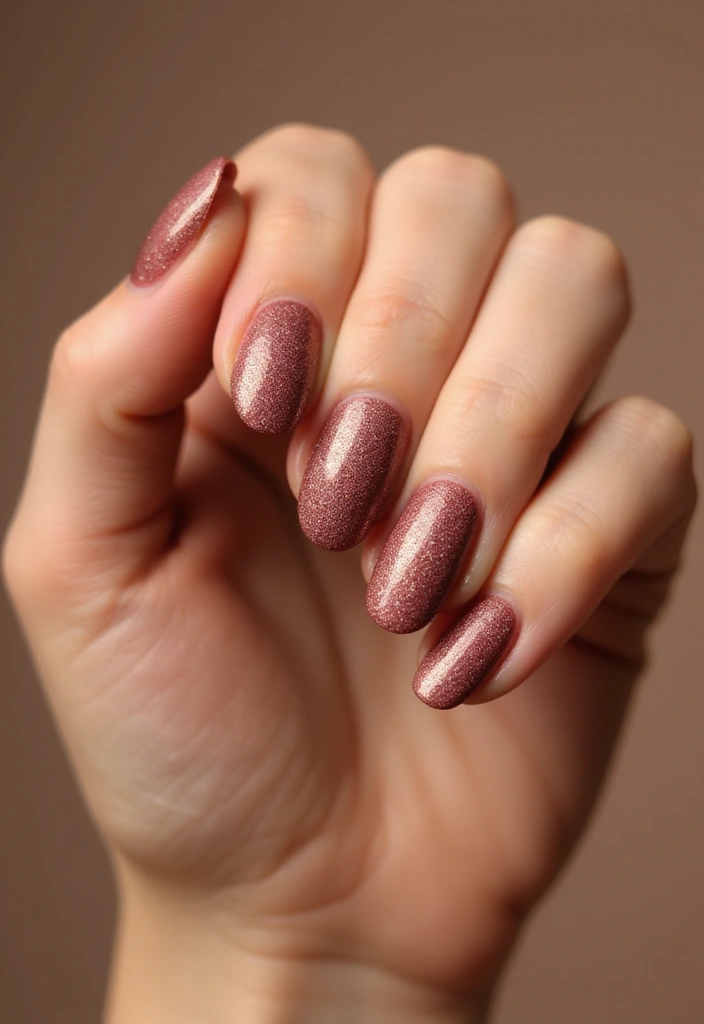
Textured velvet nails offer a luxurious and soft appearance! This design is a bit different and uses velvet powder for a chic touch. Start with a base coat and apply a layer of your chosen color. While the polish is still wet, sprinkle velvet powder over your nails, gently pressing it to adhere. Finish with a clear topcoat for durability and shine. This look is perfect for fancy events!
To achieve this plush look, ensure each layer dries before moving on to the next. Choose colors that complement each other to create a classy effect. Use a soft brush to remove any excess powder before sealing. These nails are ideal for making a stylish statement!
• Start with a base coat for a strong foundation.
• Sprinkle velvet powder while wet for texture.
• Use a soft brush to remove excess powder.
• Choose complementary colors for elegance.
Your textured velvet nails will leave a lasting impression!
Textured Velvet
Editor’s Choice
Sally Hansen Double Duty™, Base and Top Coat, Quick Dry, Long Lasting, S…
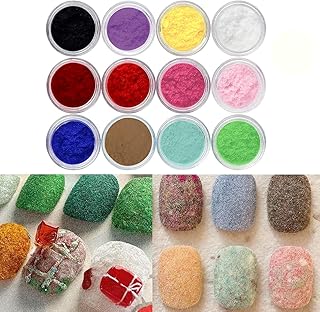
12 Jars Nail Glitter for Nail Art Velvet Powder DIY Manicure Plush Powde…

6 Pcs Handle Grip Nail Brush, Nail Cleaning Brushes for Toes and Fingernail
You Might Also Like
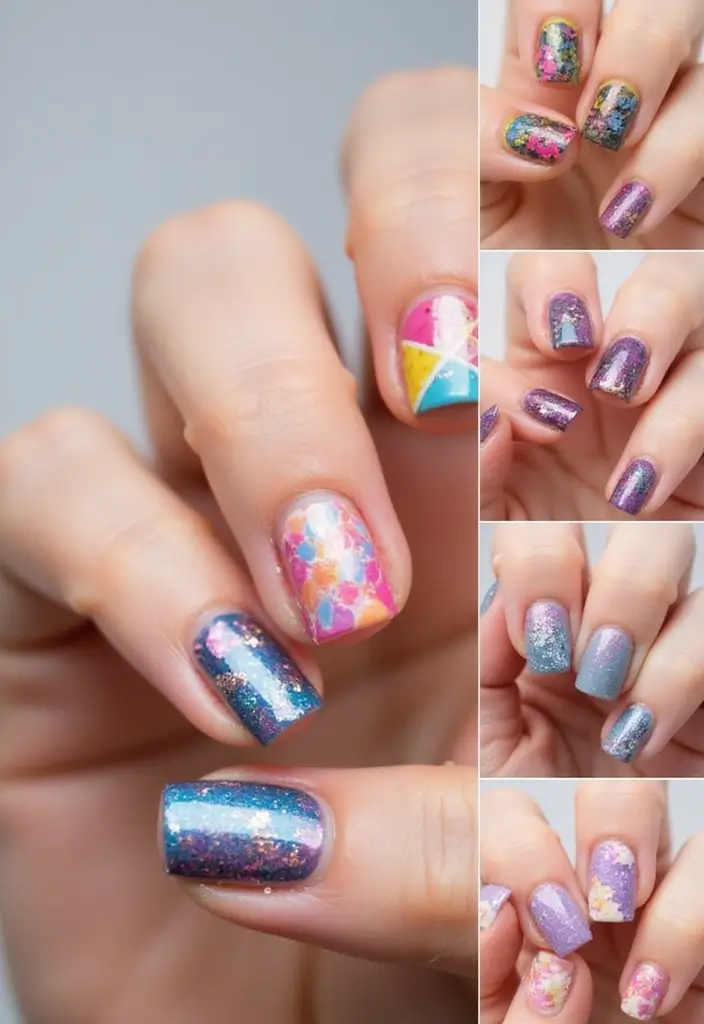
16. Mixed Patterns
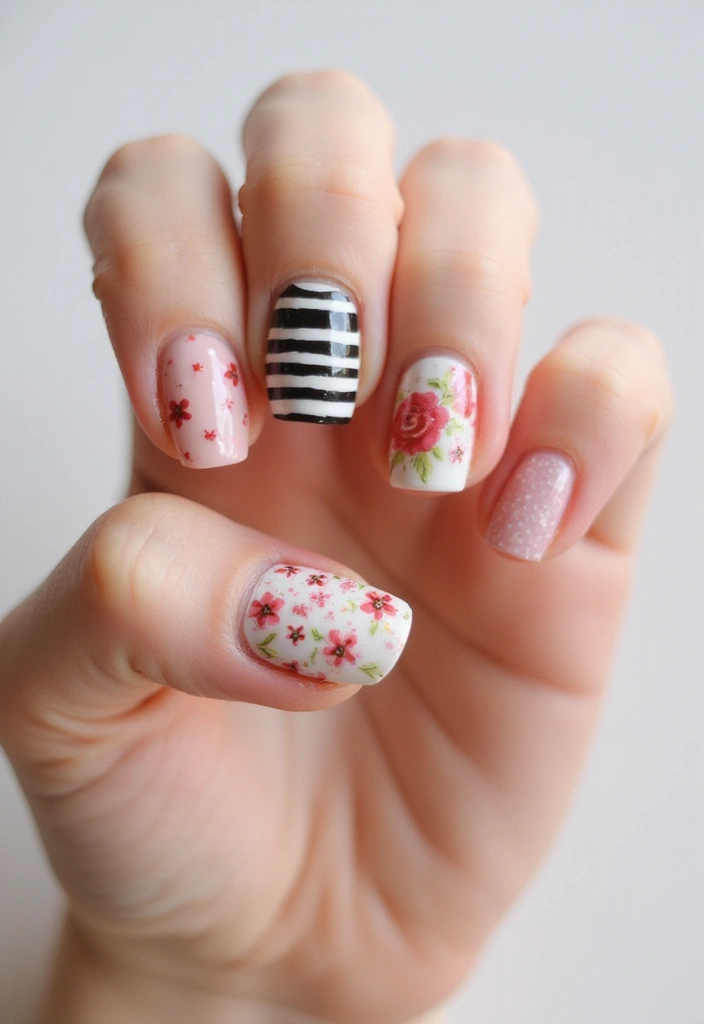
Mixing patterns can lead to amazing and creative nail designs! This fun and artistic approach lets you express your style by combining different nail art techniques. Start with a few colors that you love and choose designs that resonate with you. For example, try polka dots on one nail, stripes on another, and floral on yet another. This playful mismatch creates a unique and eye-catching look!
To keep everything harmonious, stick to a cohesive color palette. Keep one design simple to balance out the more complex ones. A neutral base can also help your patterns stand out. This design is perfect for showcasing your unique personality!
• Choose a cohesive color palette for harmony.
• Keep one design simple for balance.
• Use a neutral base to let patterns shine.
• Mix and match styles for creativity.
Your mixed patterns will surely showcase your artistic flair!
Mixed Patterns
Editor’s Choice
Artdone 31pcs Nail Art Brushes, Nail Art Tool Set, Dotting Tools, Dust B…
Morovan 15 Bright Color 0.27oz Air Quick Dry Nail Polish Gift Set for Women
5 pc 2 Way Dotting Pen Tool Nail Art Tip Dot Paint Manicure kit (5PC)
17. Retro Vibes

Bring some retro flair to your nails with fun designs! Think bright colors and funky shapes that reflect a nostalgic vibe. Start with a base coat and add retro patterns like swirls or geometric shapes using contrasting colors. A nail art brush works well to create these bold designs. Finish with a topcoat to polish your look!
To capture that retro feel, choose colors reminiscent of the ‘70s or ‘80s. Play around with different shapes like circles and zigzags to keep it interesting. Pair your retro nails with vintage-themed outfits for a complete look! This design is a playful way to express your love for all things vintage!
• Start with a base coat for smooth application.
• Use contrasting colors for bold patterns.
• Experiment with shapes for variety.
• Pair with vintage outfits for style.
Your retro vibes will surely turn heads!
Retro Vibes
Editor’s Choice
Artdone 31pcs Nail Art Brushes, Nail Art Tool Set, Dotting Tools, Dust B…
Morovan 15 Bright Color 0.27oz Air Quick Dry Nail Polish Gift Set for Women

Sally Hansen Insta-Dri®, Clear Top Coat, Quick Dry, Long Lasting, Streak…
18. Simple Chevrons
Chevron patterns add a modern and chic touch to your nails! This design is easy and elevates any look. Start with a base coat and use striping tape to create a chevron pattern on your nails. Paint over it with a contrasting color, and then carefully remove the tape to reveal those sharp lines. Finish with a topcoat to add shine!
To nail this design, ensure your base coat dries completely before taping. A small brush can help you achieve the best results. You can also incorporate different colors for a playful twist. This design fits both casual and professional settings!
• Use a base coat for a smooth canvas.
• Apply striping tape for clean lines.
• Ensure the base coat is dry before taping.
• Try different colors for fun.
Your simple chevrons will add a contemporary flair to your nails!
Simple Chevrons
Editor’s Choice
Sally Hansen Double Duty™, Base and Top Coat, Quick Dry, Long Lasting, S…
Nail Art Striping Tape Lines Kit 36 pcs 1mm 2mm 3mm Nail Tape Strips for…
Artdone 31pcs Nail Art Brushes, Nail Art Tool Set, Dotting Tools, Dust B…
19. Easy Animal Prints
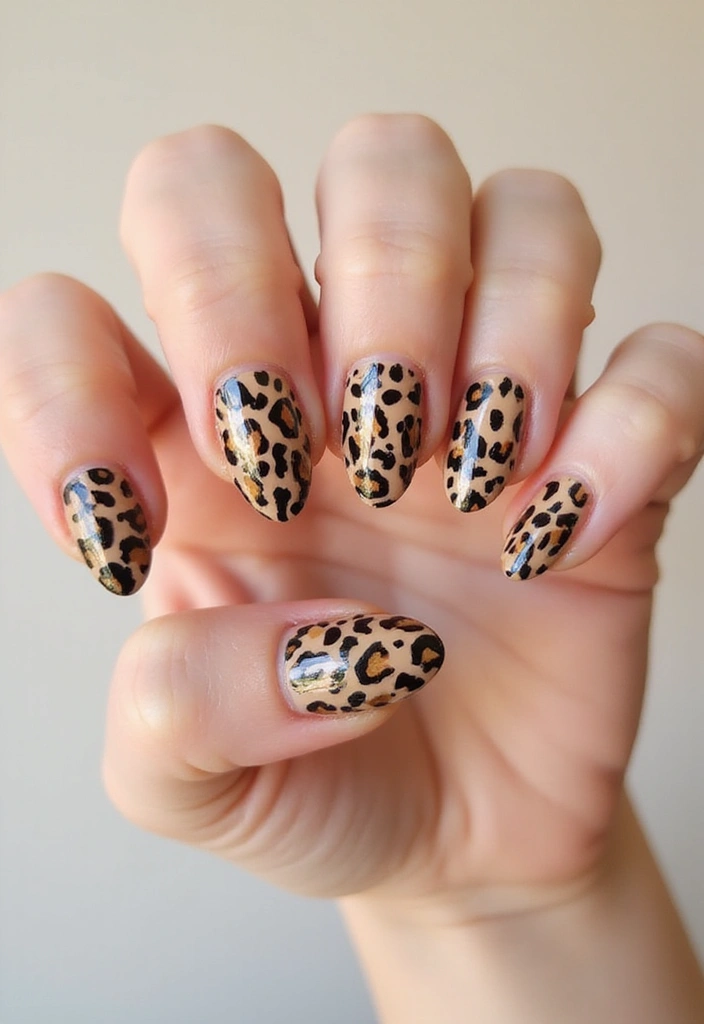
Animal prints are always in fashion and can add a wild touch to your nails! They can range from bold and fierce to soft and subtle, depending on your style. Start with a neutral base and use a thin brush to create simple patterns like leopard spots or zebra stripes. You can choose colors that match your base for a chic look or opt for bold colors to make a statement. Finish with a glossy topcoat for durability.
To get the designs right, use a dotting tool for perfect spots. Keeping the patterns simple will create an effortless look. Feel free to experiment with colors and shapes to customize your animal prints. This design is fantastic for those who want to show off their adventurous side!
• Start with a neutral base for a stylish foundation.
• Use a thin brush for animal patterns.
• Keep designs simple for ease.
• Experiment with colors for creativity.
Your animal prints will let your wild side shine!
Easy Animal Prints
Editor’s Choice
5 pc 2 Way Dotting Pen Tool Nail Art Tip Dot Paint Manicure kit (5PC)
Artdone Metallic Nail Art Pens, Liner Brushes Set, 5PCS Black Color Nail…

Top Coat Nail Polish Clear: Quick Dry Nail Polish No Chip High Shine Lon…
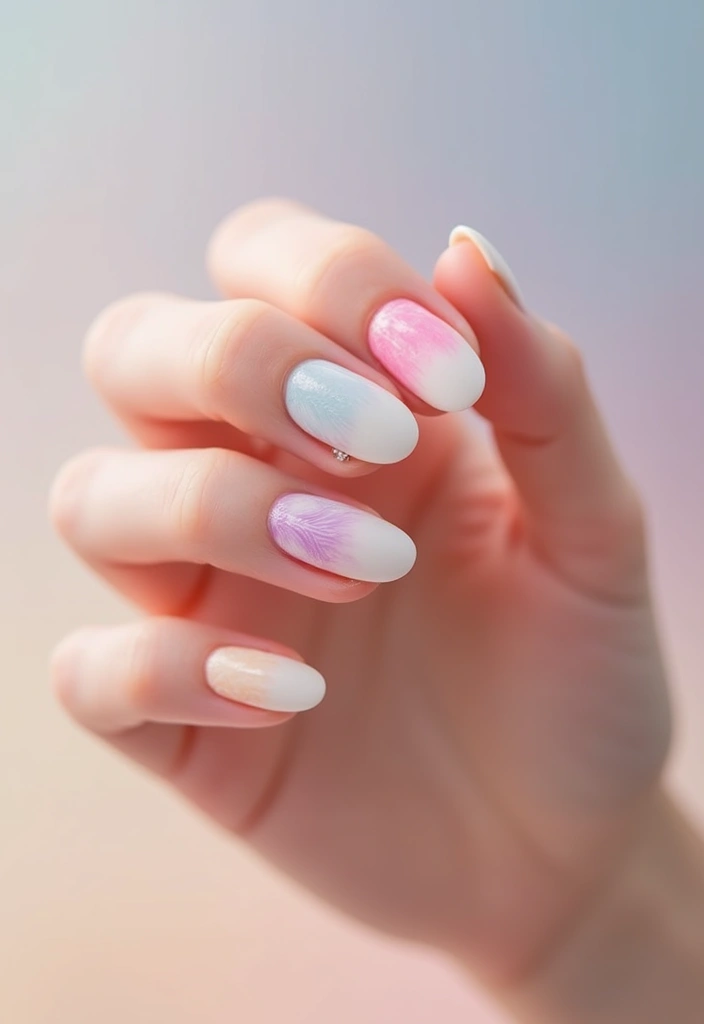
20. Sweet Pastel Waves
Pastel waves create a calm and adorable look on your nails! This design is easy to pull off and perfect for a fresh vibe. Start with a light base coat, then use a thin brush to create wavy lines across your nails using sweet pastel colors like mint green, baby pink, and lavender. Finish with a glossy topcoat to protect your design. This delightful look is lovely for spring!
Keep the lines fluid and gentle for a smooth wave effect. You can also use a dotting tool for fun accents along the waves. Pair your pastel nails with matching outfits for a cute and coordinated look. This design is sure to bring a smile to your face!
• Start with a light base coat for a soft look.
• Use a thin brush for wavy lines.
• Add dotting tool accents for fun.
• Pair with matching outfits for style.
Your pastel waves will add a sweet touch to your nails!
Sweet Pastel Waves
Editor’s Choice
Beetles 2 Pcs 15ml No Wipe Gel Top Coat and Base Coat Set – Shine Finish…
AIBEE Nail Art Brushes, 5pcs Double-Ended Acrylic Nail Brush Set with 5/…
5 pc 2 Way Dotting Pen Tool Nail Art Tip Dot Paint Manicure kit (5PC)
Conclusion
Nail art doesn’t have to be intimidating, especially with these easy designs that even beginners can master!
Whether you’re feeling playful with fruity accents or aiming for a chic marble look, there’s something here for everyone. I hope these ideas spark your creativity and inspire you to try something new.
So grab your nail polish, unleash your inner artist, and show off those beautiful nails!
Note: We aim to provide accurate product links, but some may occasionally expire or become unavailable. If this happens, please search directly on Amazon for the product or a suitable alternative.
This post contains Amazon affiliate links, meaning we may earn a small commission if you purchase through our links, at no extra cost to you.
Frequently Asked Questions
What Are Some Easy Nail Art Designs That Beginners Can Try?
If you’re just starting out, you’ll love how simple and fun easy nail art designs can be! Think about trying classic looks like polka dots, stripes, or even a simple gradient.
You can use tools like dotting pens or tape to create those designs effortlessly. Remember, practice makes perfect, and before long, you’ll be impressing everyone with your beautiful nails!
What Supplies Do I Need for Easy Nail Art as a Beginner?
Getting started with easy nail art for beginners doesn’t require a ton of expensive supplies. Basic items like nail polish, a clear top coat, a base coat, and some simple tools like dotting tools or nail brushes are enough to kick off your nail art journey.
Don’t forget to grab some nail tape and a few sponges for those gradient effects! You’ll be amazed at what you can create with just these essentials.
How Do I Maintain My Nail Art Designs for Longer Wear?
To keep your easy nail art designs looking fresh for as long as possible, start with a good base coat. This helps your polish adhere better and prevents chipping.
After applying your designs, seal everything with a quality top coat, and consider reapplying it every few days for added protection. Remember to avoid hot water and harsh chemicals to prolong your stunning nail art!
Can I Use Nail Art Tools Even If I’m Not a Professional?
Absolutely! You don’t need to be a pro to use nail art tools. In fact, tools like dotting pens or striping brushes can make it easier for beginners to achieve beautiful designs.
Start with simple techniques, and as you get more comfortable, you can explore more complex designs. The key is to have fun and experiment—nail art is all about expressing your creativity!
Are There Any Common Mistakes Beginners Should Avoid in Nail Art?
Yes, there are a few common pitfalls to watch out for! One of the biggest mistakes is applying too thick a layer of polish, which can lead to smudging or uneven drying.
Another tip is to avoid rushing your designs; give each layer time to dry before adding more. Lastly, don’t forget to clean your tools regularly to ensure your easy nail art for beginners looks crisp and flawless every time!
Related Topics
easy nail art
beginner friendly
nail designs
simple techniques
trendy nail art
DIY manicures
quick nail ideas
seasonal nail trends
colorful patterns
minimalist nail art
creative nail tips
5-minute nail art


")
I love these nail art ideas! I tried the polka dots last weekend and ended up with more dots on my skin than on my nails. Have you ever had a nail art mishap like that?
These designs are so cute! I attempted a floral design once, and let’s just say it looked more like a garden gone wild. Why did the nail polish break up with the top coat? Because it found someone more ‘glossy’!