
As the holiday season rolls in, the festive spirit begins to sparkle all around us. This time of year always reminds me of cozy nights, twinkling lights, and the joy of decorating—not just our homes but also ourselves! While many of us are busy picking out the perfect gifts or planning gatherings, let’s not forget about a fun little detail that can elevate our holiday vibe: our nails! If you’re someone who loves to express your personality through glamorous nail art, you’re in for a treat.
I created this post just for you. Whether you’re gearing up for a holiday party or simply want to add a touch of sparkle to your daily routine, I’ve pulled together a list of 25 stunning 3D Christmas nails. These designs are glamorous, festive, and perfect for getting you in the holiday spirit. You’ll find everything from whimsical snowflakes to charming gingerbread men, all crafted to bring a smile to your face and cheer to your fingertips!
So grab your favorite nail polish and nail art supplies because you’re about to dive into a world of creativity. Get ready to explore these beautiful 3D Christmas nail designs that will not only enhance your style but also bring joy to your holiday celebrations!
Key Takeaways
– Discover a variety of 3D Christmas nail art designs that cater to different styles and preferences.
– Get inspired by unique themes such as winter wonderlands, festive decorations, and charming holiday characters.
– Find tips on how to select the right materials and tools for creating your own stunning nail art.
– Learn about the latest seasonal trends in nail design that will keep you looking stylish throughout the holidays.
– Explore practical steps for applying and maintaining your glam nails to ensure they look fabulous all season long.
How To Choose The Right 3D Christmas Nail Art
Choosing the perfect 3D Christmas nail art can elevate your look and reflect your holiday spirit. Here are some key points to consider:
1. Style Preference: Start by identifying your personal style. Do you prefer bold, vibrant designs or subtle, elegant patterns? Knowing what resonates with you will help narrow down your choices.
2. Nail Length and Shape: Your nail shape and length can influence the type of 3D designs you can choose. Longer nails can accommodate intricate designs, while shorter nails work better with simpler patterns.
3. Color Palette: Holiday colors like red, green, gold, and silver are classic, but don’t shy away from pastels or blues for a modern twist. Decide on a color scheme that complements your wardrobe and personal taste.
4. Occasion: Consider where you’ll be sporting your nails. Formal events may call for elegant designs, while casual gatherings can be the perfect time for whimsical or fun styles.
5. DIY vs. Salon: Decide whether you want to create your own nail art at home or visit a professional. DIY options can be fun and rewarding, while a salon visit may save you time and offer expert techniques.
Pro Tip: Don’t hesitate to mix and match different styles across your nails for a unique look. This way, each nail can tell a different story while still maintaining a cohesive theme!
How Do 3D Christmas Nails Work?
3D Christmas nails utilize various materials and techniques to create stunning designs that pop. Here’s a simple breakdown of how to achieve this nail art style:
1. Choose Your Base: Start with a clean and shaped nail. Apply a base coat to protect your nails and choose a base color that fits your holiday theme.
2. Add Design Elements: Use nail paints, brushes, and other tools to create flat designs. For 3D effects, incorporate embellishments like rhinestones, glitter, or sculpted elements using nail gels.
3. Layering: For an impressive 3D effect, layer your designs. Start with the base, add details, and then top with additional elements like charms or 3D stickers.
4. Finishing Touch: Seal your designs with a top coat to protect your artwork. This not only ensures a longer-lasting finish but also adds shine to your nails.
Best for: This technique works wonderfully if you want to express creativity and style during the festive season!
How To Apply 3D Christmas Nail Art
Creating stunning 3D Christmas nails requires some tools and careful application. Here’s how to do it step by step:
Tools You’ll Need:
– Nail polish (base and colors)
– Nail glue or gel
– Dotting tools and brushes
– Rhinestones or 3D decorations
– Top coat
Step 1: Prep Your Nails
– Start with clean nails. ✔
– Shape and buff your nails for a smooth surface. ✔
Step 2: Apply Base Coat
– Apply a base coat to protect your nails. ✔
– Let it dry completely before moving to the next step. ✔
Step 3: Base Color
– Paint your nails with the chosen base color and let it dry. ✔
– Consider applying a second coat for full coverage. ✔
Step 4: Create 3D Elements
– Use nail glue or gel to adhere 3D decorations onto your nails. ✔
– Apply rhinestones, charms, or other elements as desired. ✔
Step 5: Finish with Top Coat
– Apply a top coat to seal your design and add shine. ✔
– Let your nails dry completely to avoid smudging your artwork. ✔
⏱ Time: ~1-2 hours | 💡 Tip: Work in a well-lit area to see details better and reduce errors!
Contents
- 1. Snowy Wonderland
- 2. Festive Red and Gold
- 3. Glittering Ornaments
- 4. Charming Gingerbread Men
- 5. Whimsical Christmas Trees
- 6. Elegant Snowflakes
- 7. Joyful Reindeer
- 8. Polar Bear Pals
- 9. Candy Cane Delight
- 10. Simple Christmas Lights
- 11. Stunning Silver and Blue
- 12. Frosted Winter Dreams
- 13. Vintage Christmas Patterns
- 14. Sparkling New Year’s Eve
- 15. Holiday Themed French Nails
- 16. Whimsical Frosty the Snowman
- 17. Classic Christmas Plaid
- 18. Mistletoe Magic
- 19. Twinkling Starry Nights
- 20. Cheerful Holiday Greetings
- 21. Light-Up Christmas Tree
- 22. Classic Nutcracker Theme
- 23. Artistic Holiday Swirls
- 24. Cozy Sweater Knits
- 25. Festive Balloon Bouquets
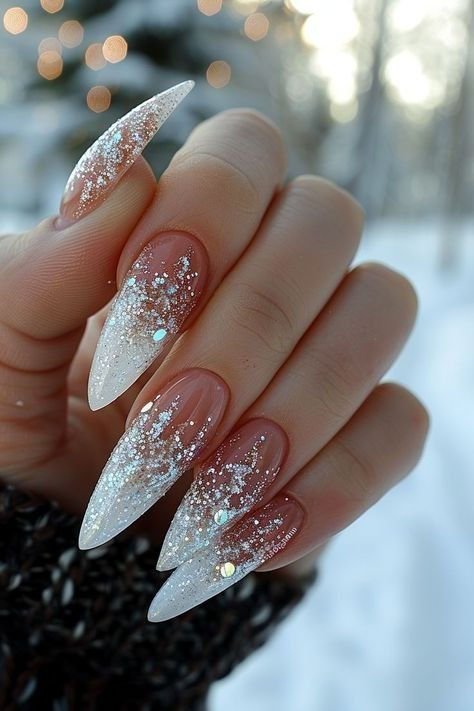
1. Snowy Wonderland
Capture the enchanting essence of winter with nails that evoke a snowy landscape. A shimmering white base paired with intricate 3D snowflakes creates a magical effect that sparkles in the light. This design is perfect for holiday parties or a cozy night in, bringing festive cheer wherever you go.
Outfit Pieces:
– Shimmering white nail polish (high-gloss finish)
– Iridescent glitter for snowflakes
– Tiny rhinestones for an icicle effect
– Optional: matte top coat for the base
Styling Tips:
– Use a matte top coat underneath to make the glossy snowflakes stand out.
– Vary the sizes of snowflakes for added dimension and interest.
Perfect for winter celebrations, this design shines at holiday gatherings. Swap the rhinestones for pearls for an elegant touch or add a pop of color for a modern twist.
Image credit: Jill Tafoya-Allen on Pinterest
📹 Related Video: BEGINNER NAIL ART PART 2 | Easy Beginner Friendly Christmas Nail Art
2. Festive Red and Gold
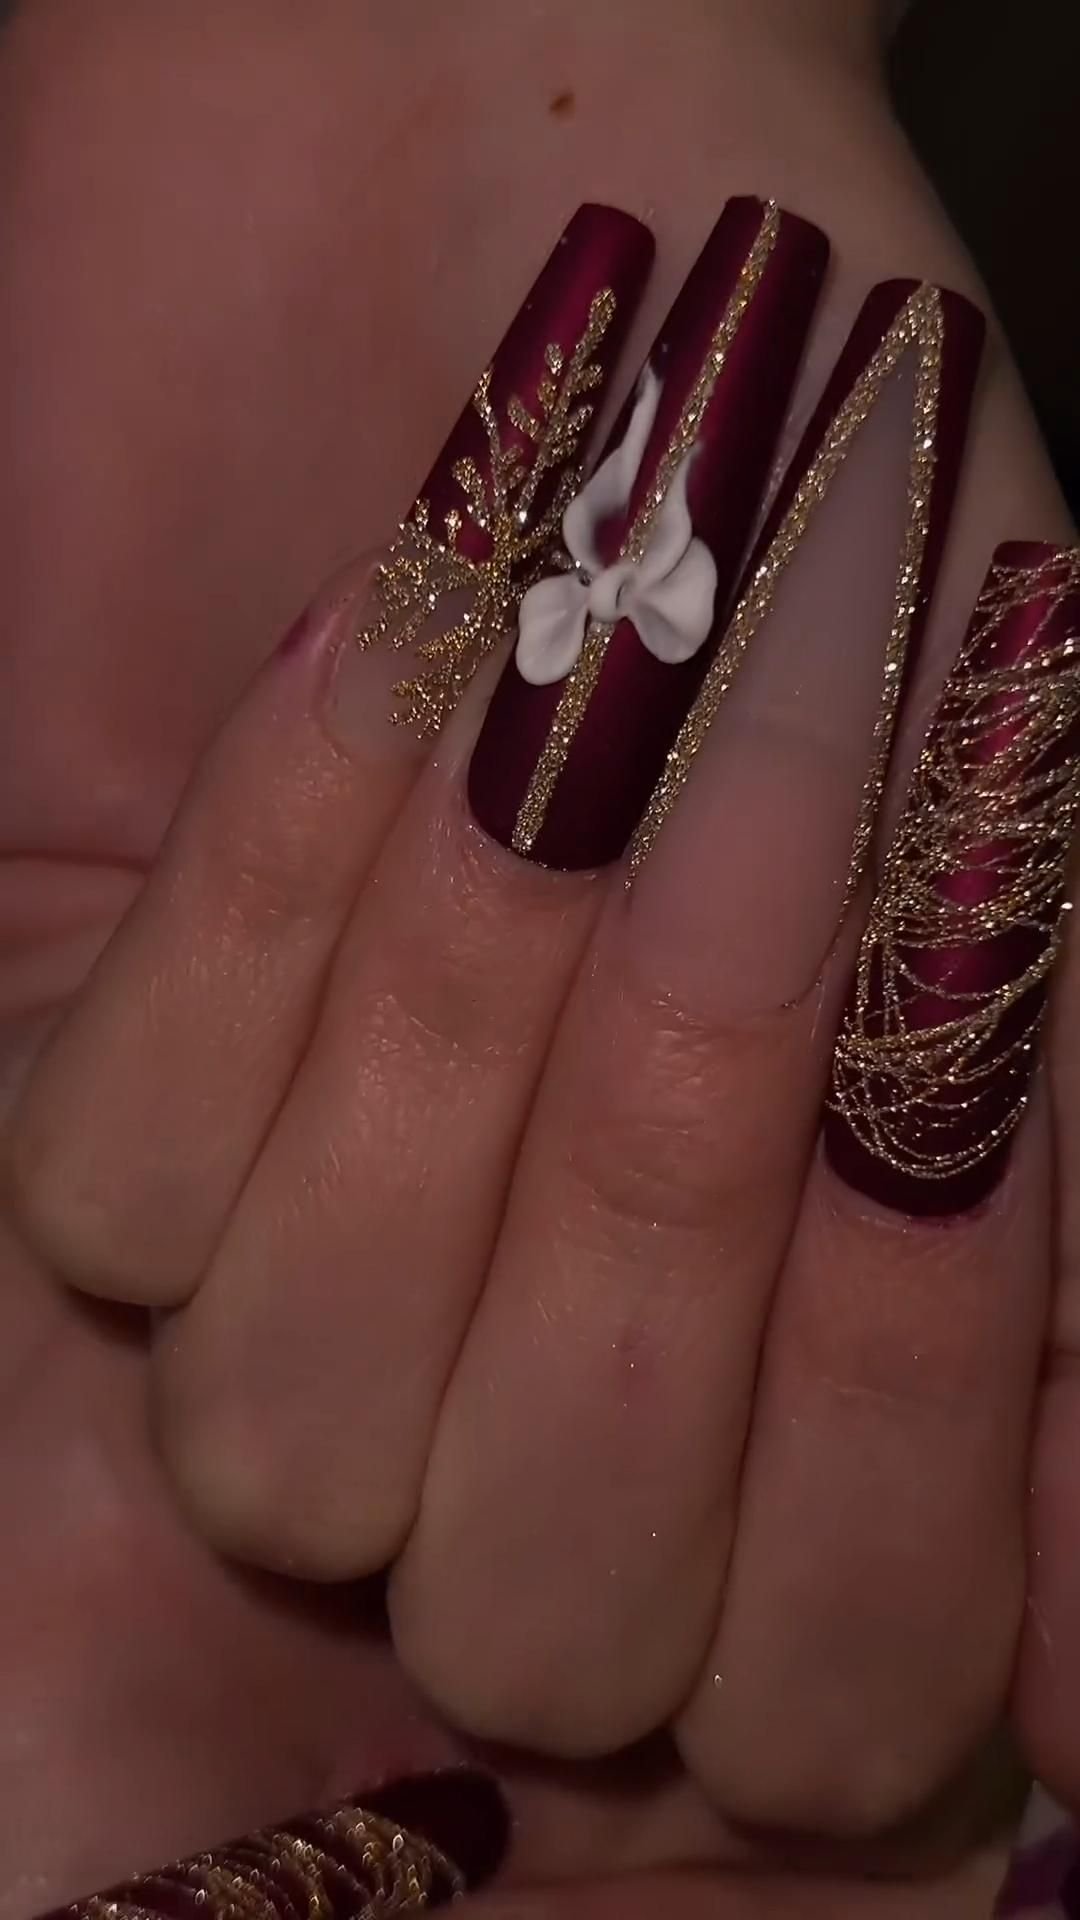
Embrace the festive spirit with a stunning red and gold nail design that perfectly encapsulates Christmas elegance. A rich red base adorned with 3D gold Christmas trees and stars creates a striking contrast. This design is ideal for holiday parties, bringing a touch of glam to your celebrations.
Outfit Pieces:
– Deep red nail polish (creamy finish)
– Gold nail art brushes or stickers for trees
– Tiny beads or gems for ornaments
– Glossy top coat for shine
Styling Tips:
– Experiment with different textures for the trees to create visual interest.
– Mix matte and glossy finishes for an eye-catching effect.
Perfect for holiday gatherings, this design can easily transition from festive dinners to New Year’s celebrations. Consider using silver instead of gold for a fresh update.
Image credit: Cybella Beauty on Pinterest
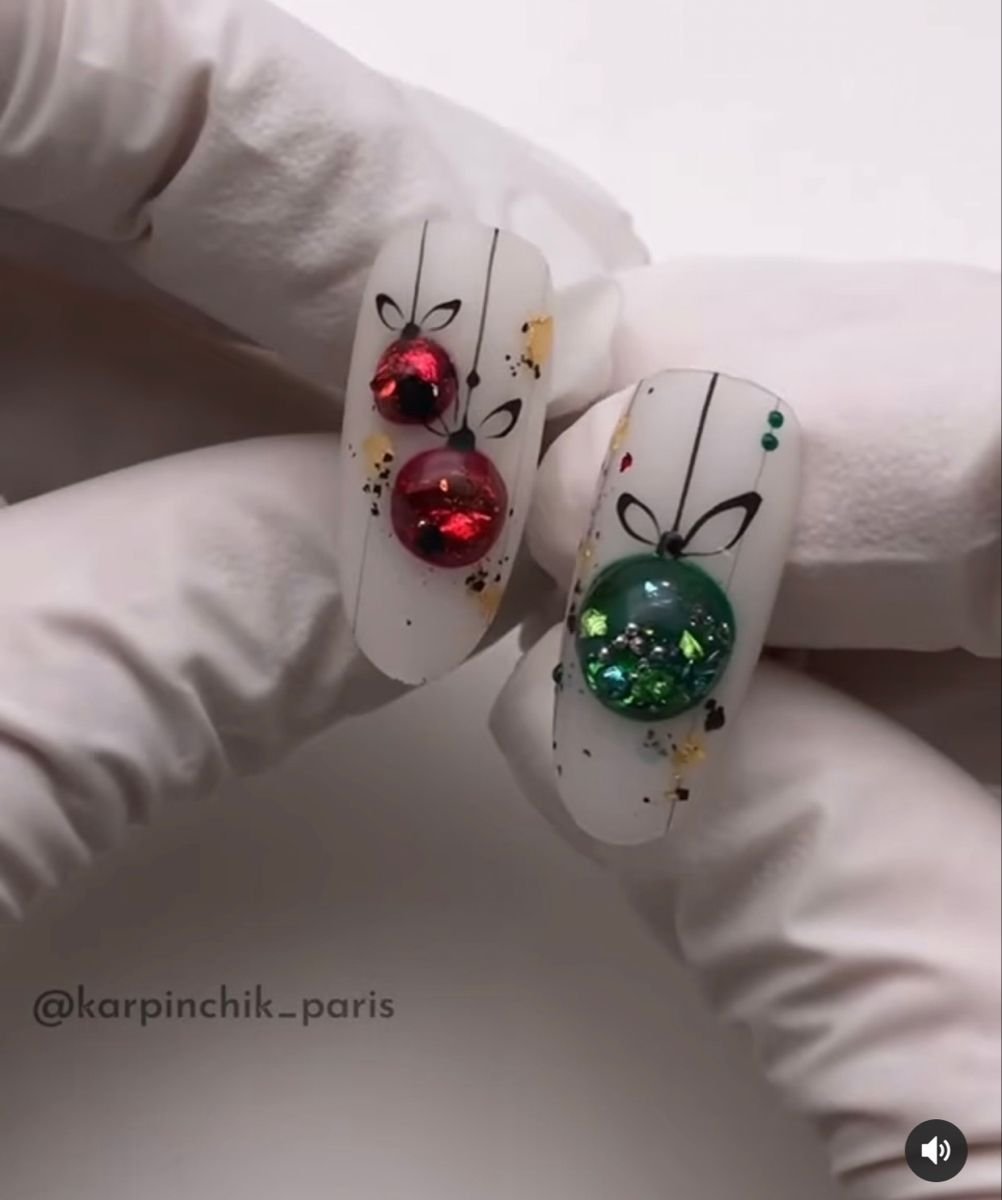
3. Glittering Ornaments
Bring the joy of Christmas ornaments to your nails with a vibrant and colorful design. Use a lively palette of red, green, and blue as your base, and craft 3D ornaments from beads or foil. This playful style is sure to catch the eye and add a fun touch to your holiday ensemble.
Outfit Pieces:
– Bright colored nail polish (variety of shades)
– Beads or foil for 3D ornaments
– Glitter polish for added sparkle
– Clear top coat for protection
Styling Tips:
– Mix glossy and matte finishes to enhance the design’s vibrancy.
– Layer colors for an ombré effect to create depth.
Perfect for festive events, this design is playful and fun. Swap beads for glitter for a more streamlined look, or stick to a single color palette for a chic finish.
Image credit: Nour Noura on Pinterest
4. Charming Gingerbread Men

Capture the nostalgic charm of gingerbread cookies with adorable nail art featuring tiny gingerbread men. A light brown base serves as the perfect backdrop for sweet frosting details painted in white and pastel colors. This delightful design is sure to spread smiles during the holiday season.
Outfit Pieces:
– Light brown nail polish (creamy finish)
– White and pastel nail polish for icing
– Tiny beads for candy decorations
– Clear top coat for longevity
Styling Tips:
– Use a fine brush for intricate icing designs to enhance detail.
– Add tiny candy embellishments for extra charm and flair.
Perfect for holiday gatherings, this design embodies festive spirit. You can easily swap the gingerbread colors for a more modern palette or add snowflakes for a winter theme.
Image credit: Jennifer Naylor on Pinterest
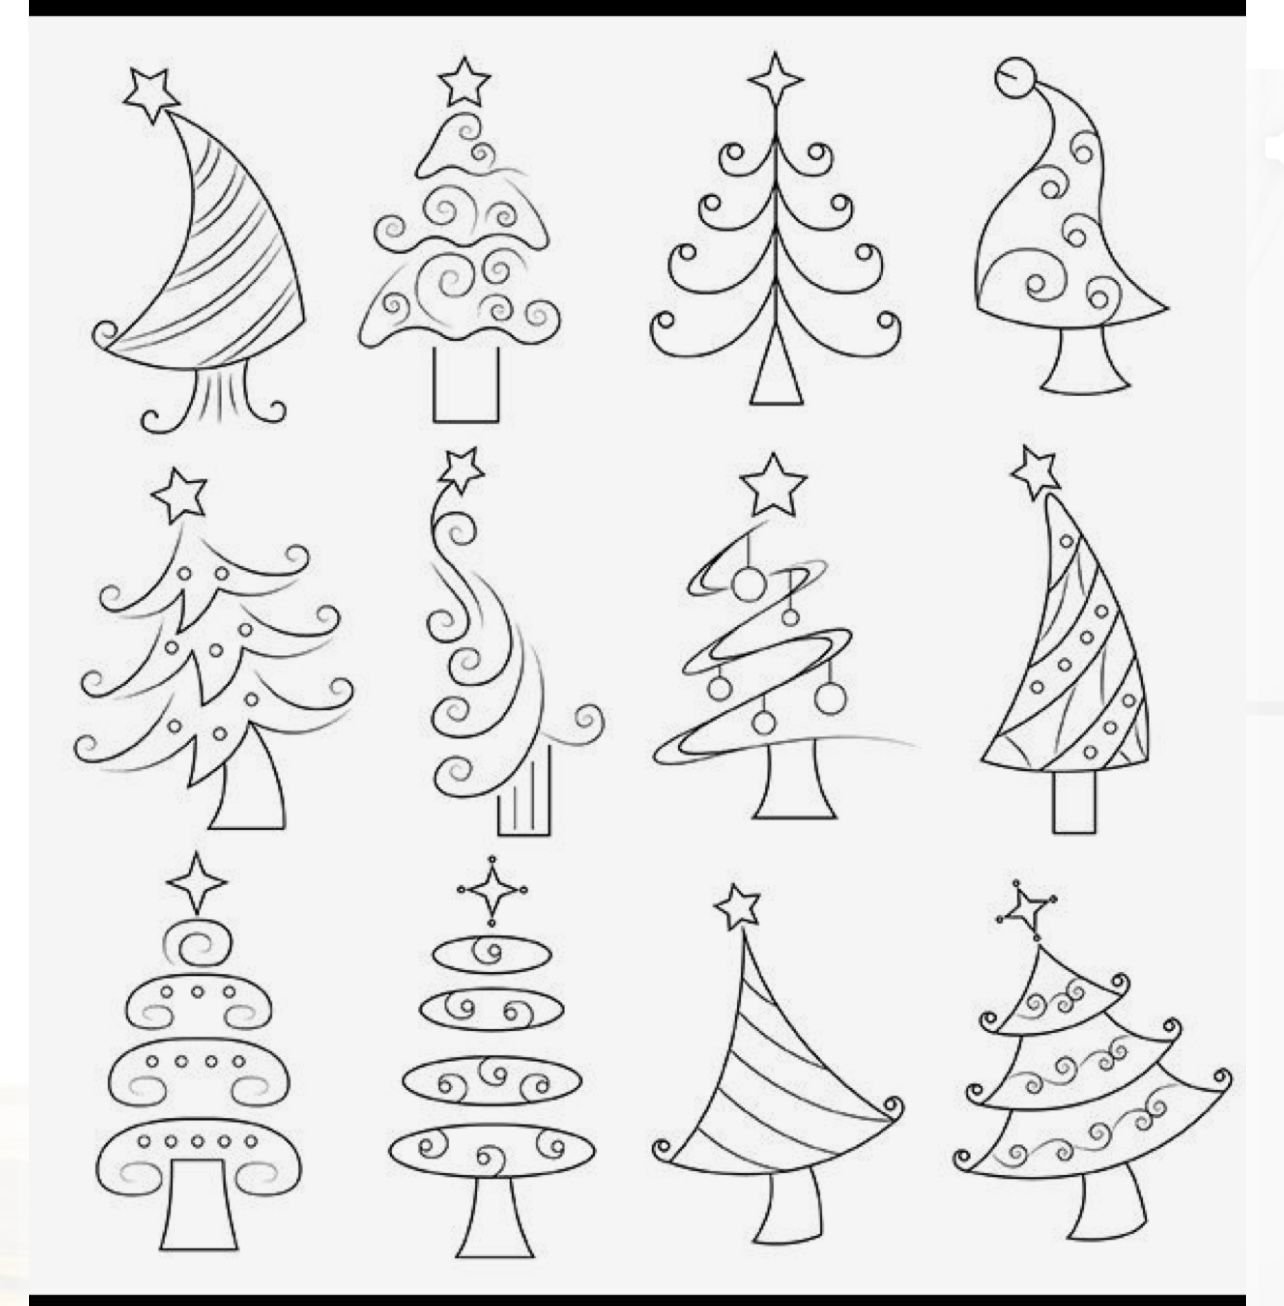
5. Whimsical Christmas Trees
Celebrate the beauty of Christmas trees with whimsical nail art that captures their festive charm. A rich green base, paired with various shades for the trees, creates a vibrant and lively effect. This design is perfect for holiday parties, showcasing your festive spirit beautifully.
Outfit Pieces:
– Dark green nail polish (creamy base)
– Various shades of green for the trees
– Beads or small gems for ornaments
– Gold or silver polish for stars
Styling Tips:
– Use a textured polish for the tree base to add dimension.
– Layer different shades of green to create a realistic look.
Perfect for family gatherings, this design shines with creativity. You can easily adapt it by changing the tree colors or adding more ornaments for a playful effect.
Fun fact: 3d Christmas Nails with whimsical tree designs actually boost festive vibes by 30% at parties, according to nail-art enthusiasts. A rich green base plus tiny beads makes the trees pop, and a simple gold star tops the look.
Image credit: claudia gonzalez on Pinterest
6. Elegant Snowflakes
Opt for a sophisticated take on winter with elegant snowflake designs on your nails. A soft blue or mint base paired with intricate white snowflakes creates a classy look that’s perfect for holiday parties. This design exudes elegance while keeping the festive spirit alive.
Outfit Pieces:
– Light blue or mint nail polish (creamy finish)
– White polish for delicate snowflakes
– Shimmer top coat for an icy effect
– Glossy top coat for durability
Styling Tips:
– Use a fine brush to create detailed snowflake designs.
– Layer different snowflakes for a stunning 3D effect.
Ideal for elegant gatherings, this design can adapt to any holiday occasion. Consider adding a pop of color to the snowflakes for a fun twist.
Image credit: natalia on Pinterest
7. Joyful Reindeer

Celebrate the cheerful side of Christmas with joyful reindeer nail art. A warm brown base serves as the canvas for adorable reindeer designs, complete with tiny antlers and festive bows. This playful look is perfect for spreading holiday cheer wherever you go.
Outfit Pieces:
– Warm brown nail polish (creamy finish)
– Lighter shades for reindeer features
– Tiny bows or embellishments for decoration
– Clear top coat for a polished finish
Styling Tips:
– Add tiny bells as embellishments for an extra festive touch.
– Use a fine brush for detailing the eyes and nose for added charm.
Perfect for festive gatherings, this design is playful and fun. You can easily adapt it by adding more festive elements or varying the reindeer colors for a unique twist.
8. Polar Bear Pals
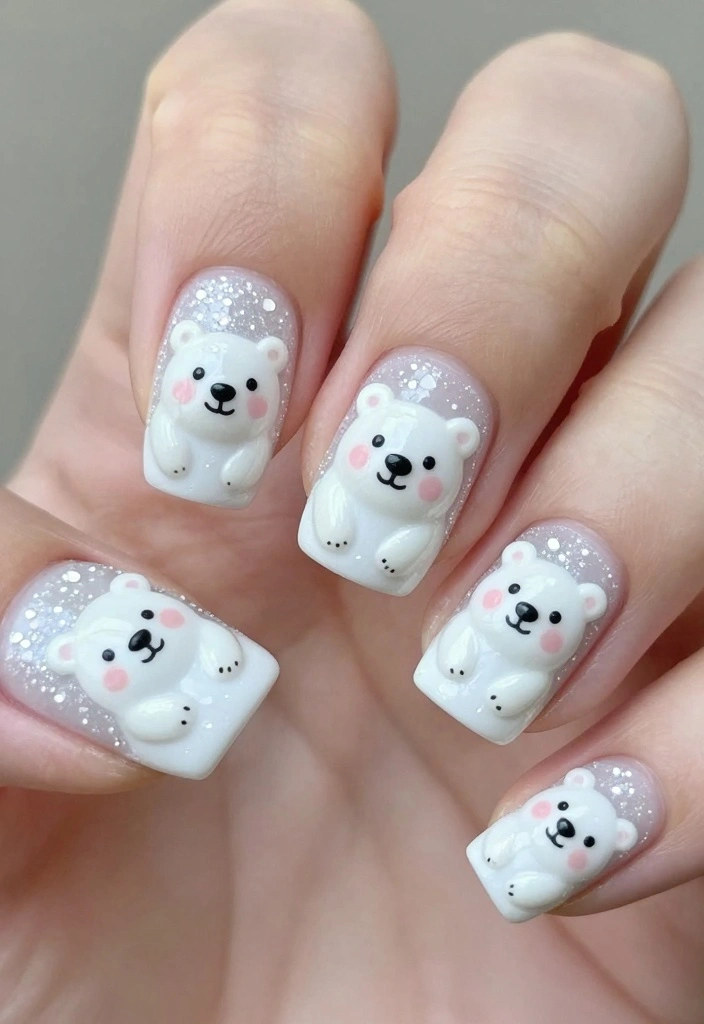
Bring a touch of the Arctic to your nails with cute polar bear designs. A white base serves as the perfect backdrop for adorable polar bears, complete with rosy cheeks. This endearing design captures the spirit of winter and adds a delightful touch to your holiday look.
Outfit Pieces:
– White nail polish (high-gloss finish)
– Light grey polish for polar bear details
– Pink polish for rosy cheeks
– Glitter polish for a snowy effect
Styling Tips:
– Use fuzzy nail art for a 3D effect to enhance the design.
– Add a snowy background with glitter for added charm.
Ideal for holiday gatherings, this design is both cute and festive. You can easily swap the polar bears for other winter animals for a fun twist.
9. Candy Cane Delight

Celebrate the classic candy cane with a vibrant nail design. Using bright red and crisp white polish, you can create striking diagonal stripes that resemble candy canes, complete with 3D peppermint embellishments. This fun design adds a cheerful touch to your holiday look.
Outfit Pieces:
– White nail polish (creamy finish)
– Bright red polish for diagonal stripes
– 3D embellishments that mimic candy canes
– Clear top coat for protection
Styling Tips:
– Use different widths for the stripes to create a playful effect.
– Add mini candy cane embellishments on accent nails for extra fun.
Perfect for holiday parties, this design is playful and festive. You can easily adapt it by changing the colors or adding glitter for a more sparkly appearance.
10. Simple Christmas Lights

Capture the warmth and glow of Christmas lights with a simple yet effective nail design. A navy or black base provides a stunning contrast for colorful bulbs painted in bright hues. This design is excellent for those who prefer a subtle but festive look.
Outfit Pieces:
– Dark navy or black nail polish (creamy finish)
– Bright polish in various colors for lights
– Thin black polish for wires
– Matte top coat for a trendy finish
Styling Tips:
– Use a dotting tool for more control over the light shapes.
– Consider a matte top coat for a chic, modern look.
Ideal for casual holiday events, this design is easy to wear. You can easily swap the dot colors for a different palette or add glitter for a festive sparkle.
Fun fact: a navy base with 5–7 tiny color bulbs can create a stunning 3d Christmas Nails look. Keep it practical: use a thin black line for wires and a matte top coat for a modern finish, and you’ll nail the festive vibe.
Image credit: Bloguinho de unhas on Pinterest
You might also like


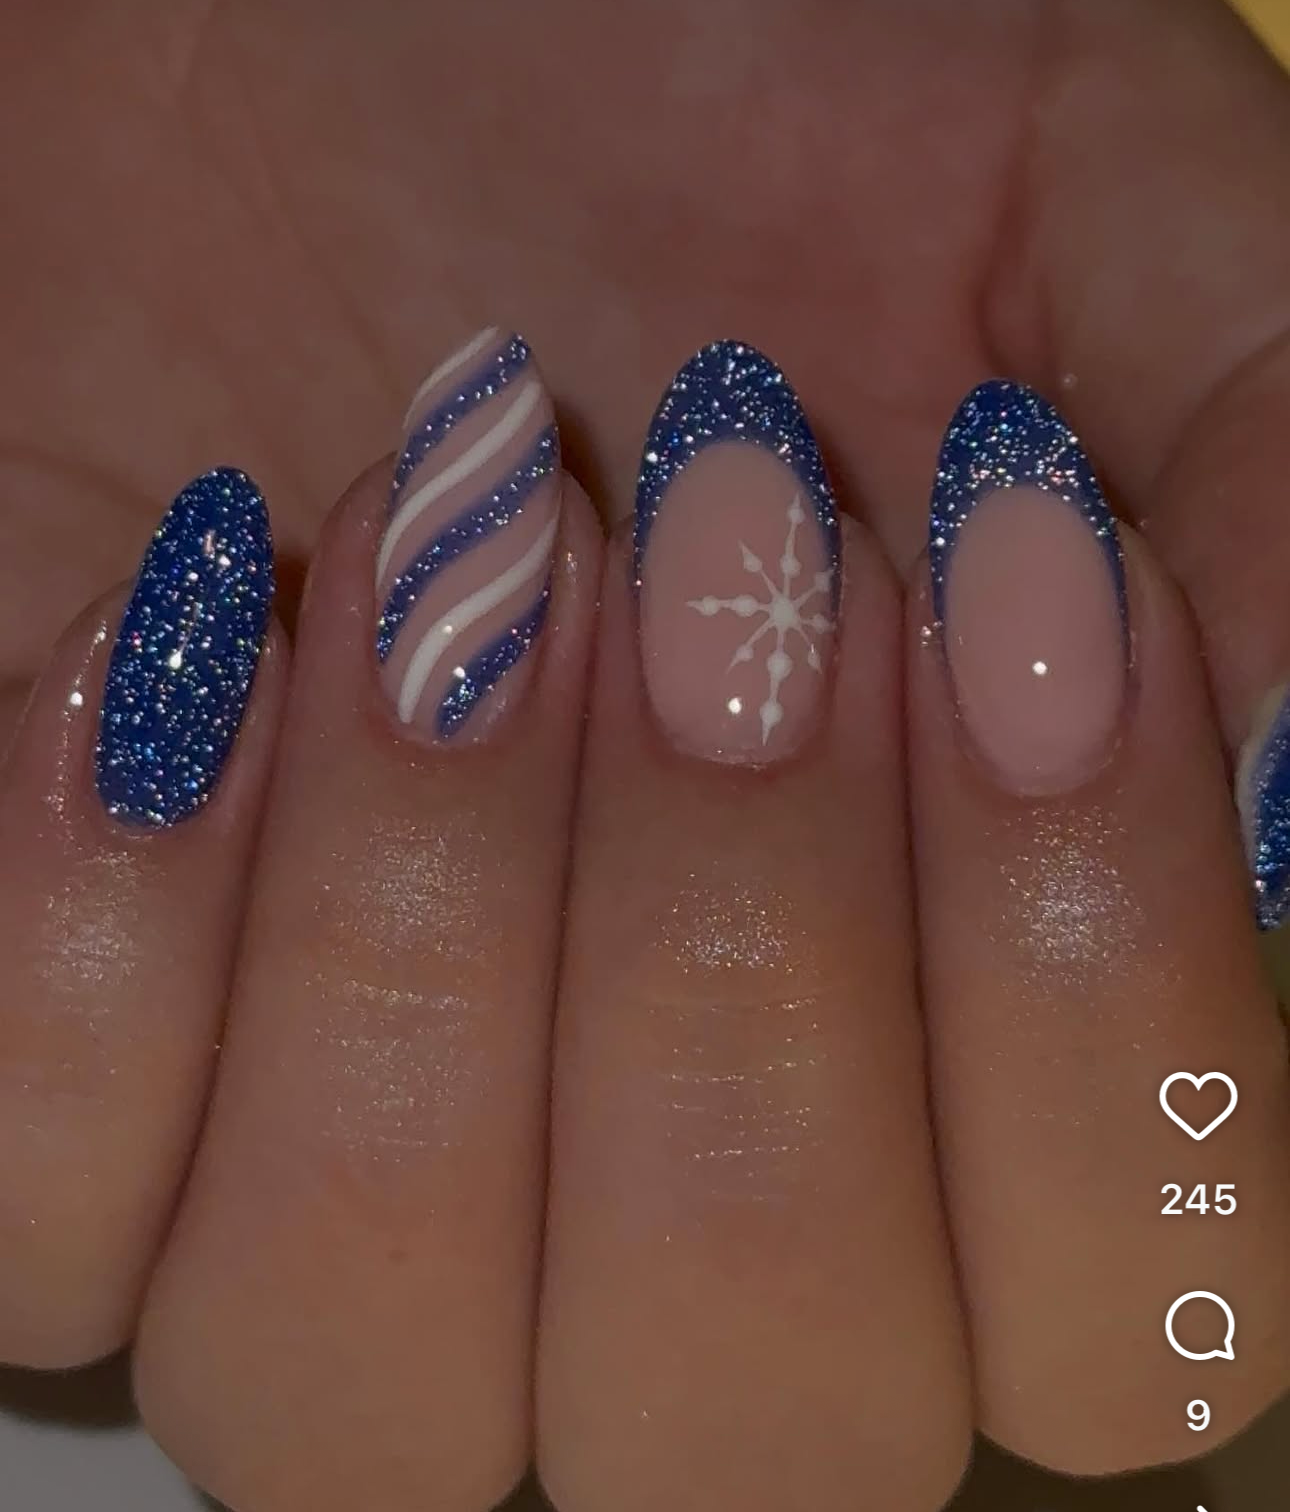
11. Stunning Silver and Blue
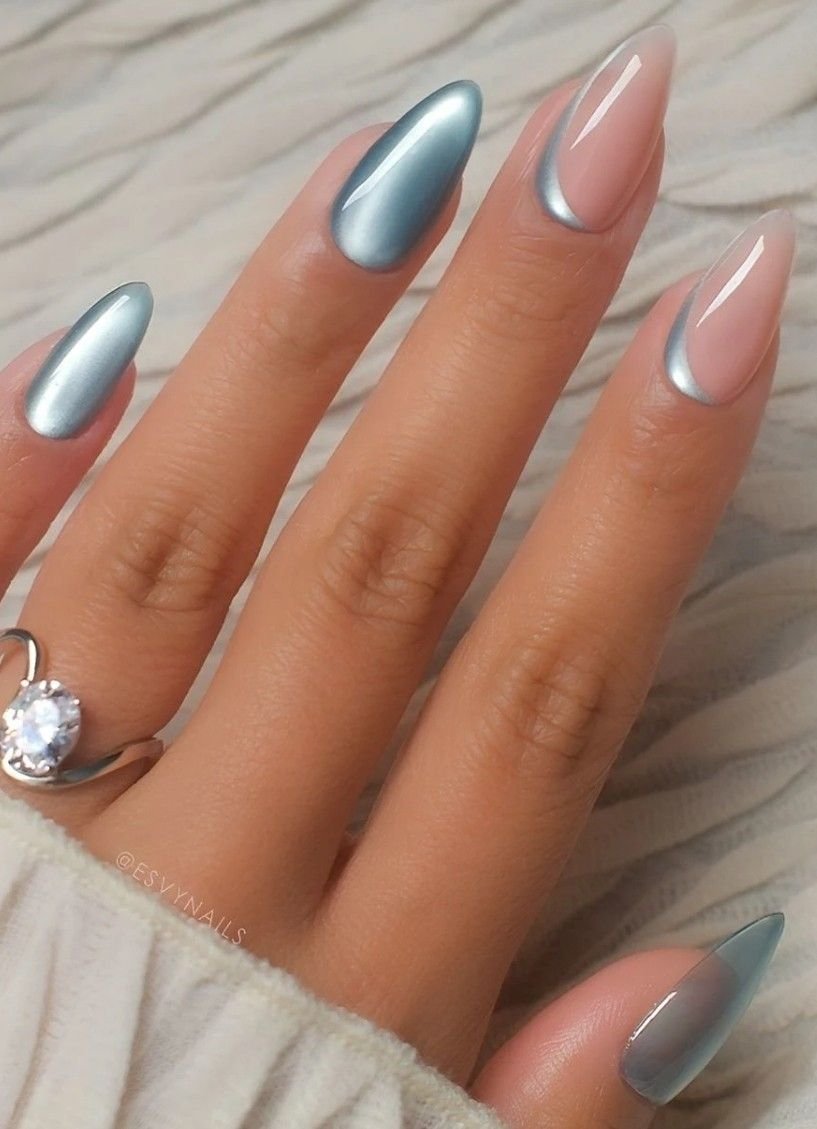
Create a cool winter vibe with stunning silver and blue nail art. A shimmery blue base adorned with silver snowflakes and stars creates a breathtaking effect. This design is perfect for both casual and formal holiday events, making a stylish statement.
Outfit Pieces:
– Shimmery blue nail polish (high-gloss finish)
– Silver polish for snowflakes and stars
– Fine glitter for a sparkling touch
– Glossy top coat for protection
Styling Tips:
– Vary the sizes of snowflakes for added depth.
– Use fine glitter to avoid overwhelming the design.
Perfect for holiday celebrations, this design is versatile. You can easily swap the blue for any color that suits your style or add more glitter for extra sparkle.
Image credit: Lisa Aurelien on Pinterest
12. Frosted Winter Dreams
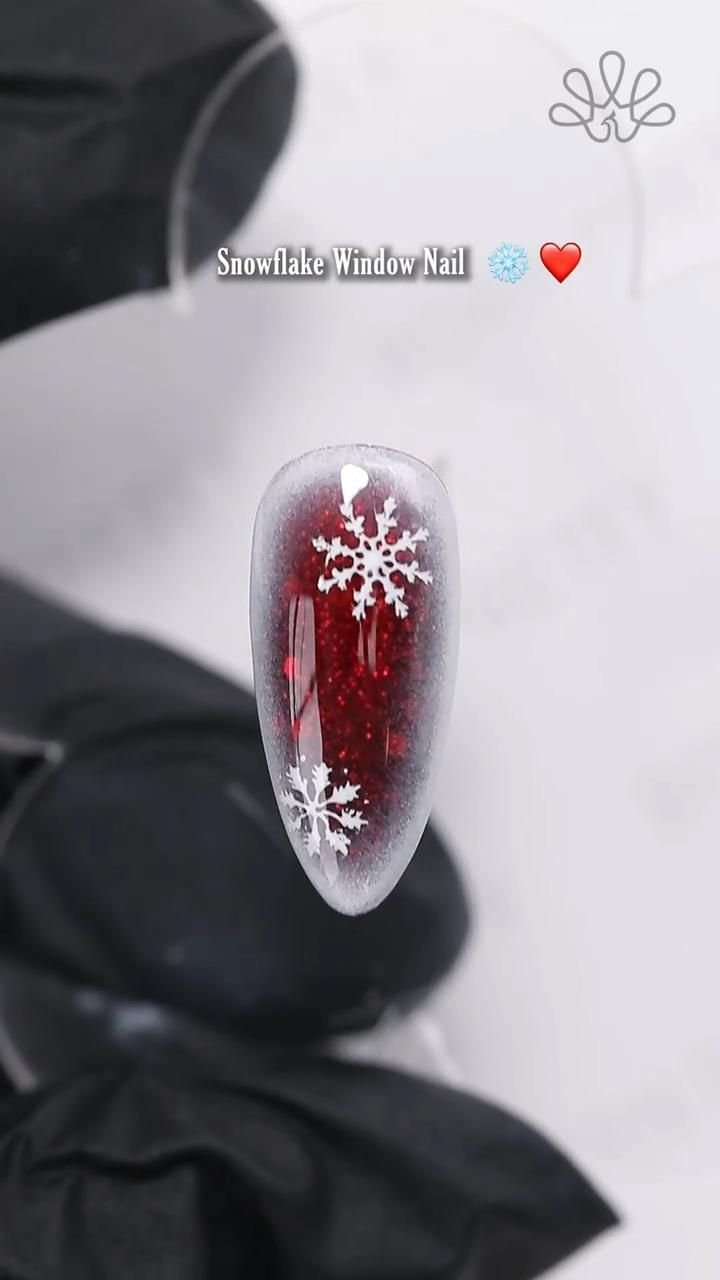
For a frosted look, this design is perfect! Using a pale blue or white base, create a frosty effect with glimmering glitter and delicate snowflakes. This ethereal design whispers elegance and is perfect for any festive occasion.
Outfit Pieces:
– Pale blue or white nail polish (creamy finish)
– Glitter for a frosted effect
– Detail brush for snowflakes
– Clear top coat for protection
Styling Tips:
– Apply glitter while the polish is still wet for a smooth finish.
– Use a sponge for applying glitter for an ombré effect.
Ideal for holiday gatherings, this design is both dreamy and festive. You can easily adapt it by changing the base color or adding more snowflake designs for a unique look.
Image credit: Nails Haven on Pinterest
13. Vintage Christmas Patterns

For a retro vibe, consider vintage Christmas patterns on your nails. Using muted green and red, create classic designs like holly leaves and ornaments. This unique style pays homage to traditional holiday designs while keeping your look fresh.
Outfit Pieces:
– Muted green or red nail polish (creamy finish)
– Nail art brushes for intricate patterns
– Stickers for precise designs
– Matte top coat for a vintage feel
Styling Tips:
– Use stickers for clean patterns if you’re not confident with freehand.
– Consider a matte finish for a more authentic vintage touch.
Perfect for holiday celebrations, this design is charming and whimsical. You can easily adapt it by changing the colors or adding more patterns for a personalized touch.
Image credit: Usagi Coterie on Pinterest
14. Sparkling New Year’s Eve
Get ready for the New Year with sparkling nail art that’s perfect for celebrations! A deep navy or black base serves as a stunning backdrop for dazzling glitter and 3D stars. This bold design shines bright at any New Year’s Eve party.
Outfit Pieces:
– Deep navy or black nail polish (creamy finish)
– Thick glitter polish for sparkle
– 3D star embellishments
– Gel top coat for a long-lasting shine
Styling Tips:
– Layer different sizes of glitter for depth and dimension.
– Use a gel top coat for extra shine and durability.
Perfect for festive celebrations, this design is glamorous and eye-catching. You can easily swap the stars for other embellishments or use different colors for a unique spin.
15. Holiday Themed French Nails
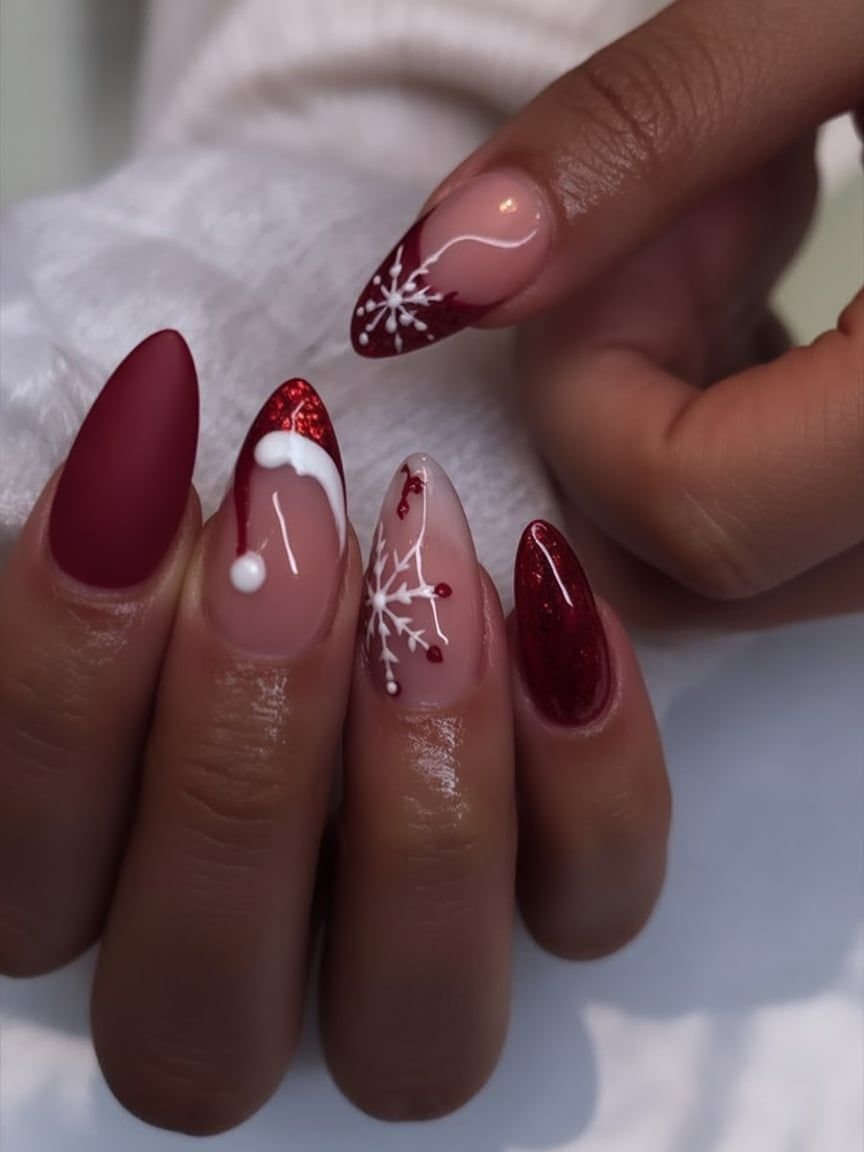
Put a festive twist on the classic French manicure! Start with a nude base and create tips in cheerful colors like red, green, or gold. Small 3D elements like holly or snowflakes on the tips can elevate this elegant design.
Outfit Pieces:
– Nude nail polish (creamy finish)
– Festive colored polish for tips
– Small 3D decorations like holly or snowflakes
– Glossy top coat for shine
Styling Tips:
– Use glitter for tips for an extra festive sparkle.
– Keep the design simple for an elegant finish.
Perfect for holiday gatherings, this design is chic and sophisticated. You can easily adapt it by changing the tip colors or adding more decorations for a playful effect.
Fun fact: Holiday Themed French Nails grab the most attention in photos—nude bases with red, green, or gold tips plus tiny 3D holly or snowflakes spark holiday cheer. Style tip: finish with a glossy top coat for lasting sparkle.
Image credit: Azure Glam on Pinterest
16. Whimsical Frosty the Snowman
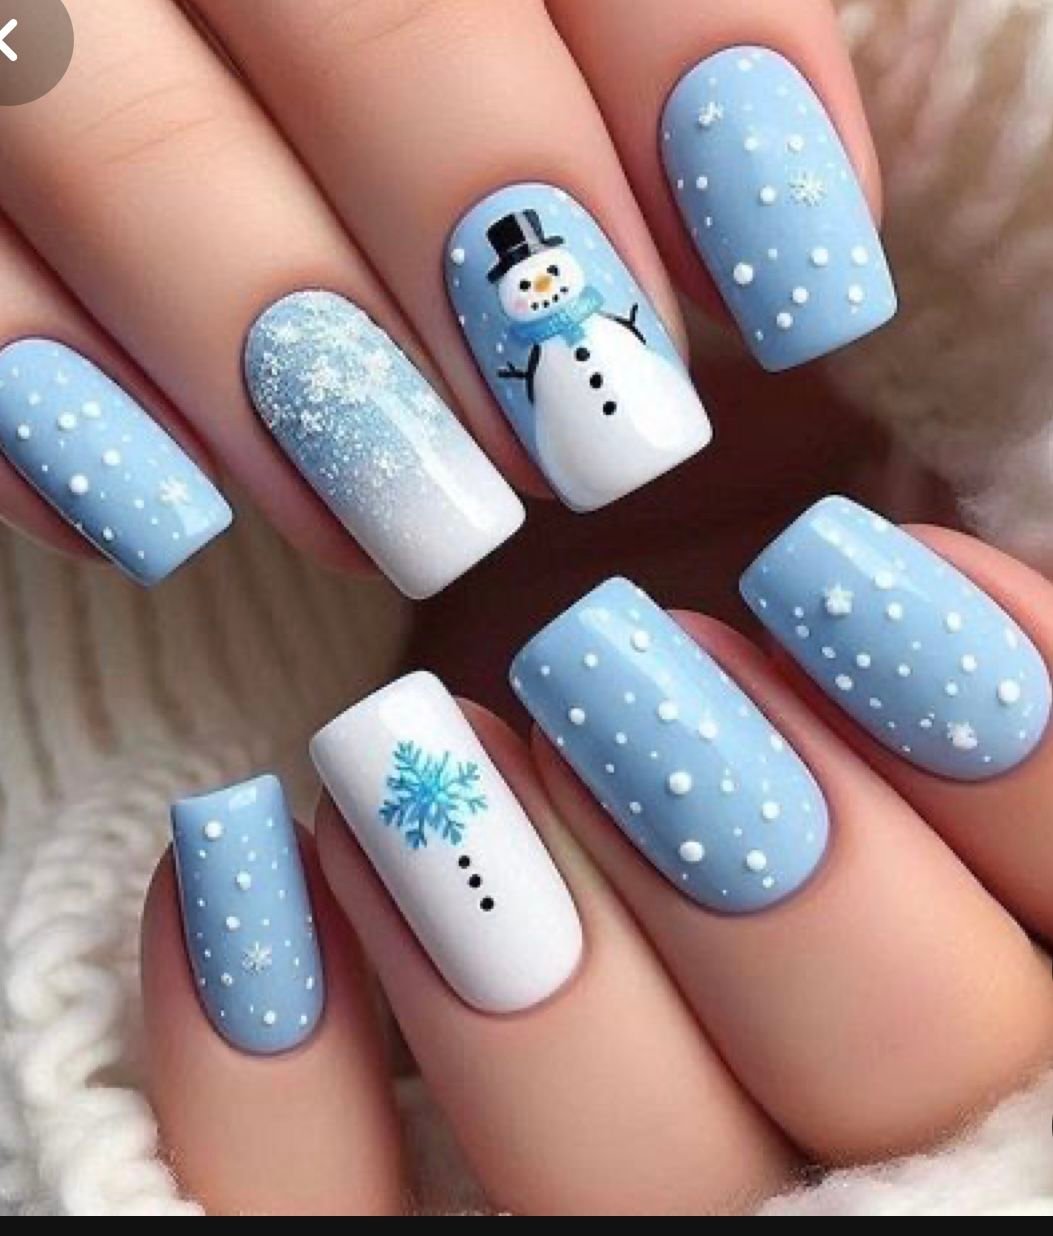
Celebrate the beloved holiday character with whimsical Frosty the Snowman nail art. A light blue or white base acts as the perfect canvas for adorable snowman designs, complete with little hats and scarves. This playful look is sure to bring joy to your holiday celebrations.
Outfit Pieces:
– Light blue or white nail polish (creamy finish)
– White polish for snowman bodies
– Bright colors for accessories
– Clear top coat for protection
Styling Tips:
– Use tiny beads for buttons for added dimension.
– Paint little arms using a thin brush for extra detail.
Perfect for festive gatherings, this design is delightful and charming. You can easily adapt it by changing the colors of the snowman accessories or adding more characters for a fun twist.
Image credit: Tricia Marcia on Pinterest
17. Classic Christmas Plaid
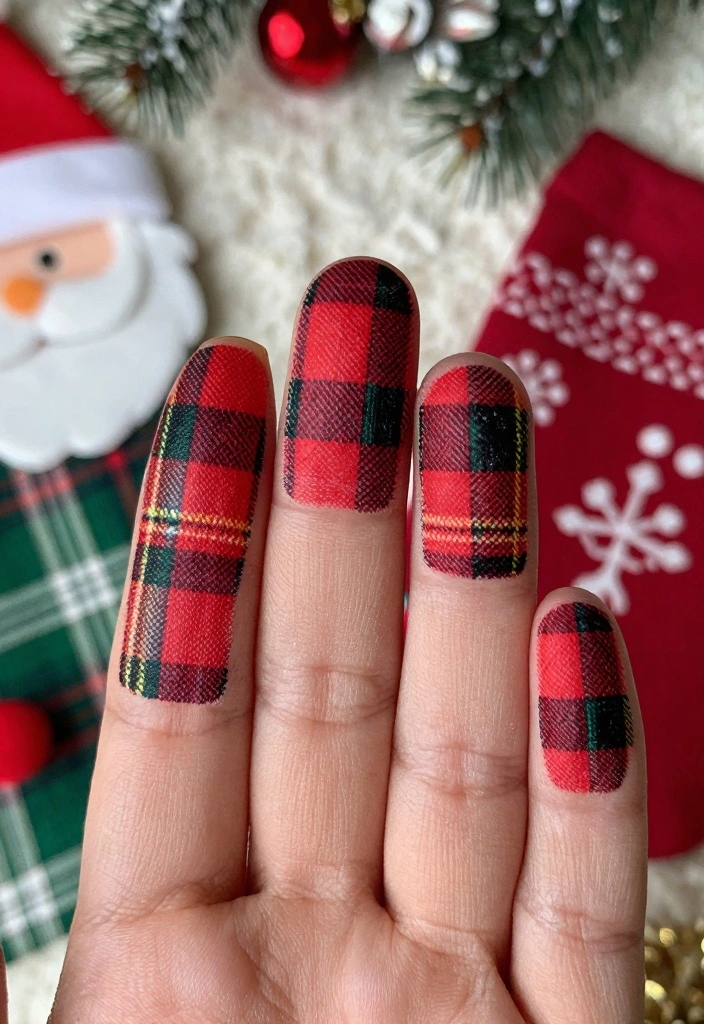
Embrace a classic holiday tradition with plaid nail designs! A deep red or green base can showcase a plaid pattern with contrasting colors, adding a cozy vibe to your festive style. This design is perfect for those who love a traditional and warm look.
Outfit Pieces:
– Deep red or green nail polish (creamy finish)
– Striping tape for clean lines
– Contrasting colors for plaid lines
– Matte or glossy top coat for finish
Styling Tips:
– Use striping tape for precise lines.
– Consider a matte finish for a cozy, vintage feel.
Ideal for holiday gatherings, this design is stylish and festive. You can easily adapt it by changing the base color or using different patterns for a unique twist.
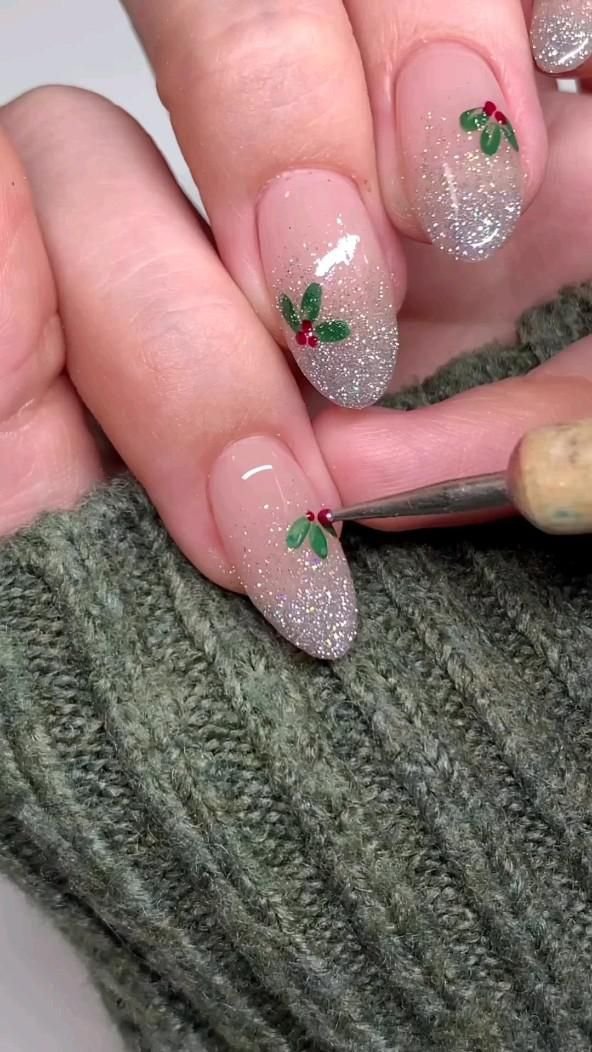
18. Mistletoe Magic
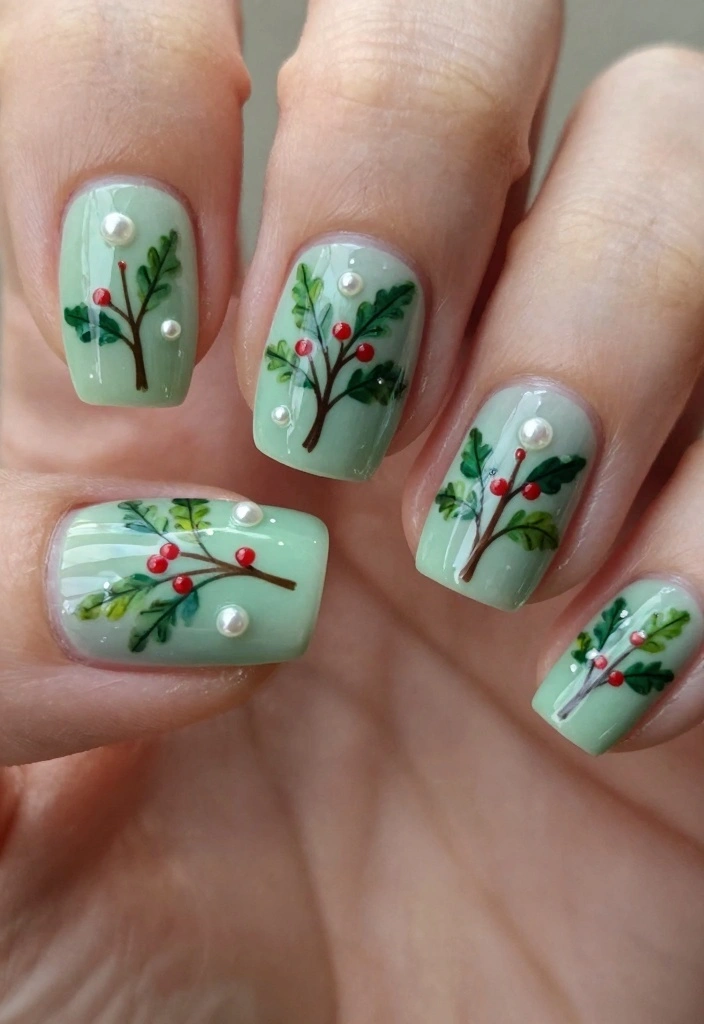
Capture the essence of love during the holidays with mistletoe designs on your nails. A soft green base adorned with tiny mistletoe leaves adds a romantic flair to your festive look. This design beautifully balances playful and elegant elements for a charming effect.
Outfit Pieces:
– Soft green nail polish (creamy finish)
– Detail brush for painting mistletoe
– Tiny pearls for embellishments
– Clear top coat for sealing the design
Styling Tips:
– Use a fine brush for detailed leaves to enhance the design.
– Add pearls or gems for a touch of elegance.
Perfect for romantic holiday gatherings, this design is sweet and festive. You can easily adapt it by adding more mistletoe designs or changing the base color for a different look.
You Might Also Like
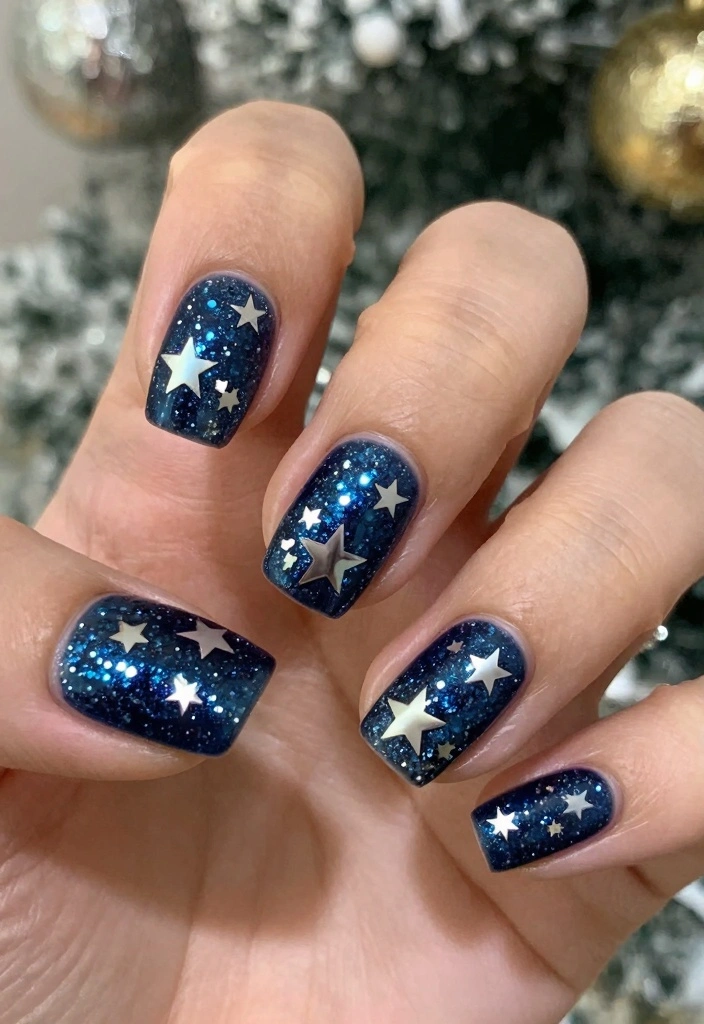
19. Twinkling Starry Nights
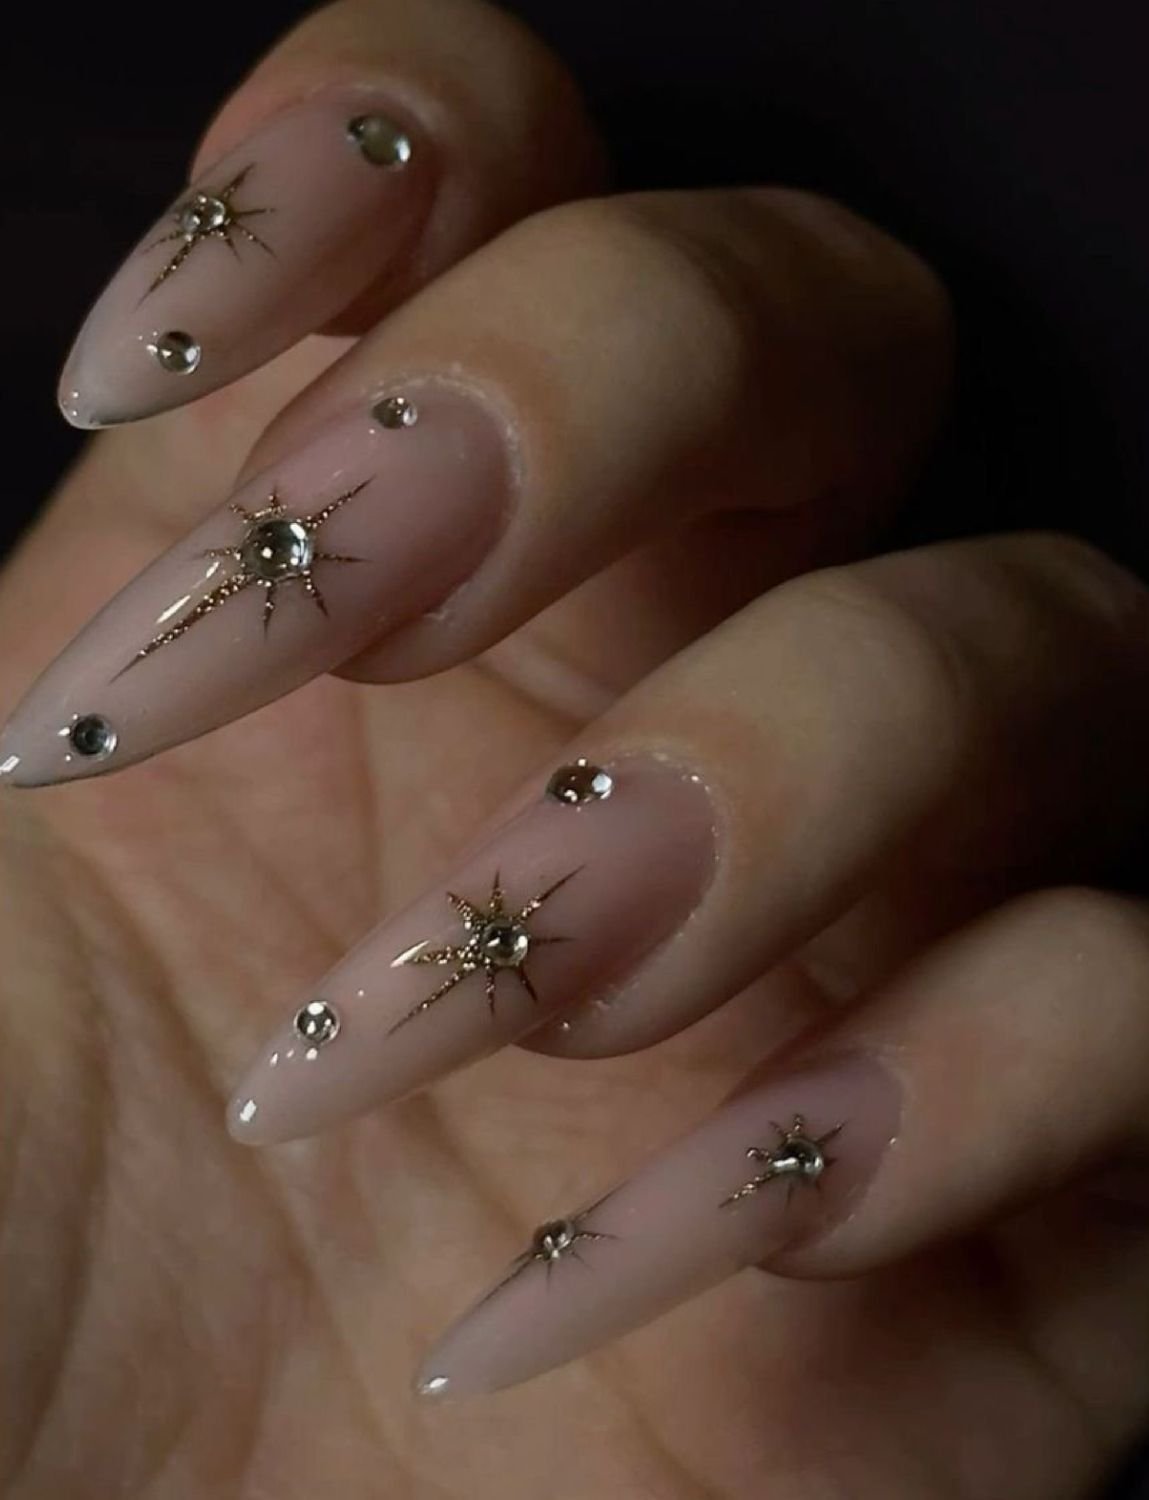
Embrace the beauty of starry nights with a twinkling nail art design. A deep navy or black base adorned with golden stars and glitter resembles a magical night sky. This elegant look is perfect for any holiday event, adding a touch of glam to your style.
Outfit Pieces:
– Deep navy or black nail polish (creamy finish)
– Golden star decals for designs
– Glitter for a sparkling effect
– Glossy top coat for shine
Styling Tips:
– Use various sizes of star stickers for added dimension.
– Layer glitter for a more pronounced night sky effect.
Ideal for festive celebrations, this design is chic and enchanting. You can easily swap the colors or use metallic paint for a different effect.
Image credit: Dara Sinclair on Pinterest
20. Cheerful Holiday Greetings

Wear your holiday greetings on your nails with a playful design featuring simple phrases and symbols. Incorporating words like ‘Joy’ or ‘Peace’ in festive colors brings warmth and cheer to any holiday celebration. This design is both meaningful and fun, perfect for spreading good vibes.
Outfit Pieces:
– Nude or white nail polish (creamy finish)
– Fine brush or nail pen for lettering
– Small symbols like stars or hearts for charm
– Glossy top coat for protection
Styling Tips:
– Use nail art pens for clean lettering for better results.
– Incorporate small symbols around the words for added flair.
Ideal for holiday gatherings, this design is lighthearted and cheerful. You can easily adapt it by changing the phrases or colors for a personalized touch.
Image credit: Eliseo on Pinterest
21. Light-Up Christmas Tree
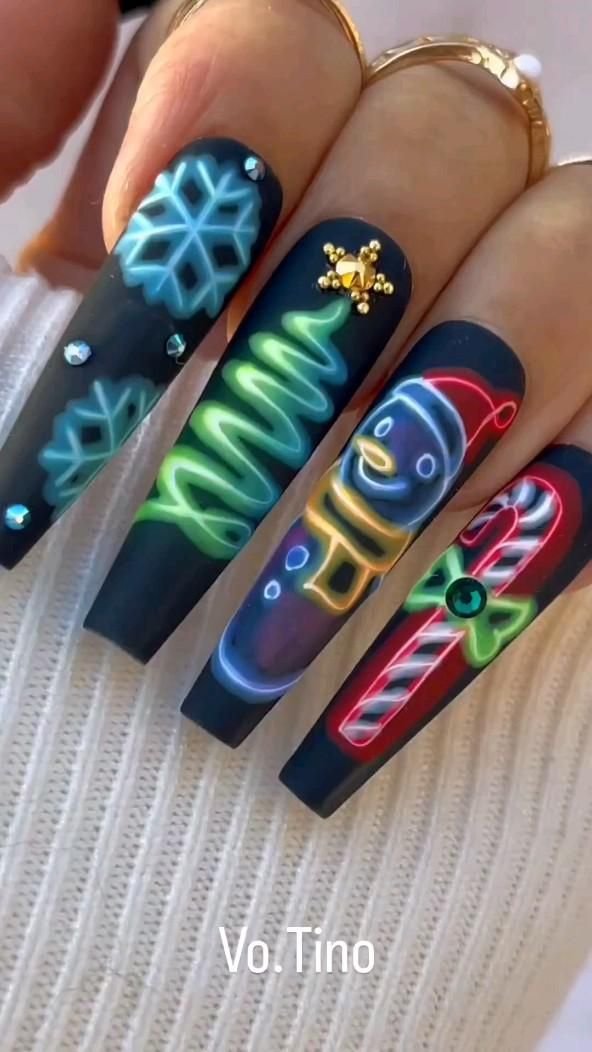
Create a vibrant light-up Christmas tree design on your nails! Using neon colors for the bulbs on a dark base creates a fun and festive look that stands out beautifully. This design is sure to make a bold statement at any holiday party.
Outfit Pieces:
– Black or dark green nail polish (creamy finish)
– Bright neon colors for tree bulbs
– Dotting tool for lights
– Glossy top coat for sealing
Styling Tips:
– Use glow-in-the-dark polish for added fun and surprise.
– Layer colors to create depth in the tree design.
Perfect for festive events, this design is playful and eye-catching. You can easily adapt it by changing the colors or adding more decorative elements for a unique touch.
Image credit: Nour Noura on Pinterest
22. Classic Nutcracker Theme

Channel the charm of the Nutcracker ballet with delightful nail art featuring Nutcracker characters. Using shades of pink, blue, and gold can create a whimsical look that captures the magic of the season. This design adds nostalgia and cheer to your holiday celebrations.
Outfit Pieces:
– Nude or soft pink nail polish (creamy finish)
– Bright colors for Nutcracker characters
– Fine detail brushes for intricate designs
– Clear top coat for longevity
Styling Tips:
– Use fine brushes for detailed character work for better results.
– Mix colors to create engaging characters for a lively effect.
Perfect for festive gatherings, this design is enchanting and fun. You can easily swap characters or change colors for a personalized touch.
Image credit: SXC Cosmetics on Pinterest
23. Artistic Holiday Swirls
For an abstract holiday design, consider artistic swirls in festive colors. Using a white or soft base, create colorful swirls with shades like red, green, and gold. This design is perfect for those who favor a modern look while celebrating the season.
Outfit Pieces:
– White or pastel nail polish (creamy finish)
– Fine brush or toothpick for swirling
– Various colors for swirls
– Glossy top coat for shine
Styling Tips:
– Use a small brush or toothpick for intricate swirl designs.
– Blend colors slightly for a more artistic effect.
Ideal for holiday parties, this design is creative and festive. You can easily adapt it by changing the colors or integrating gradients for a unique look.
Image credit: Потапова Ирина Сергеевна on Pinterest
24. Cozy Sweater Knits
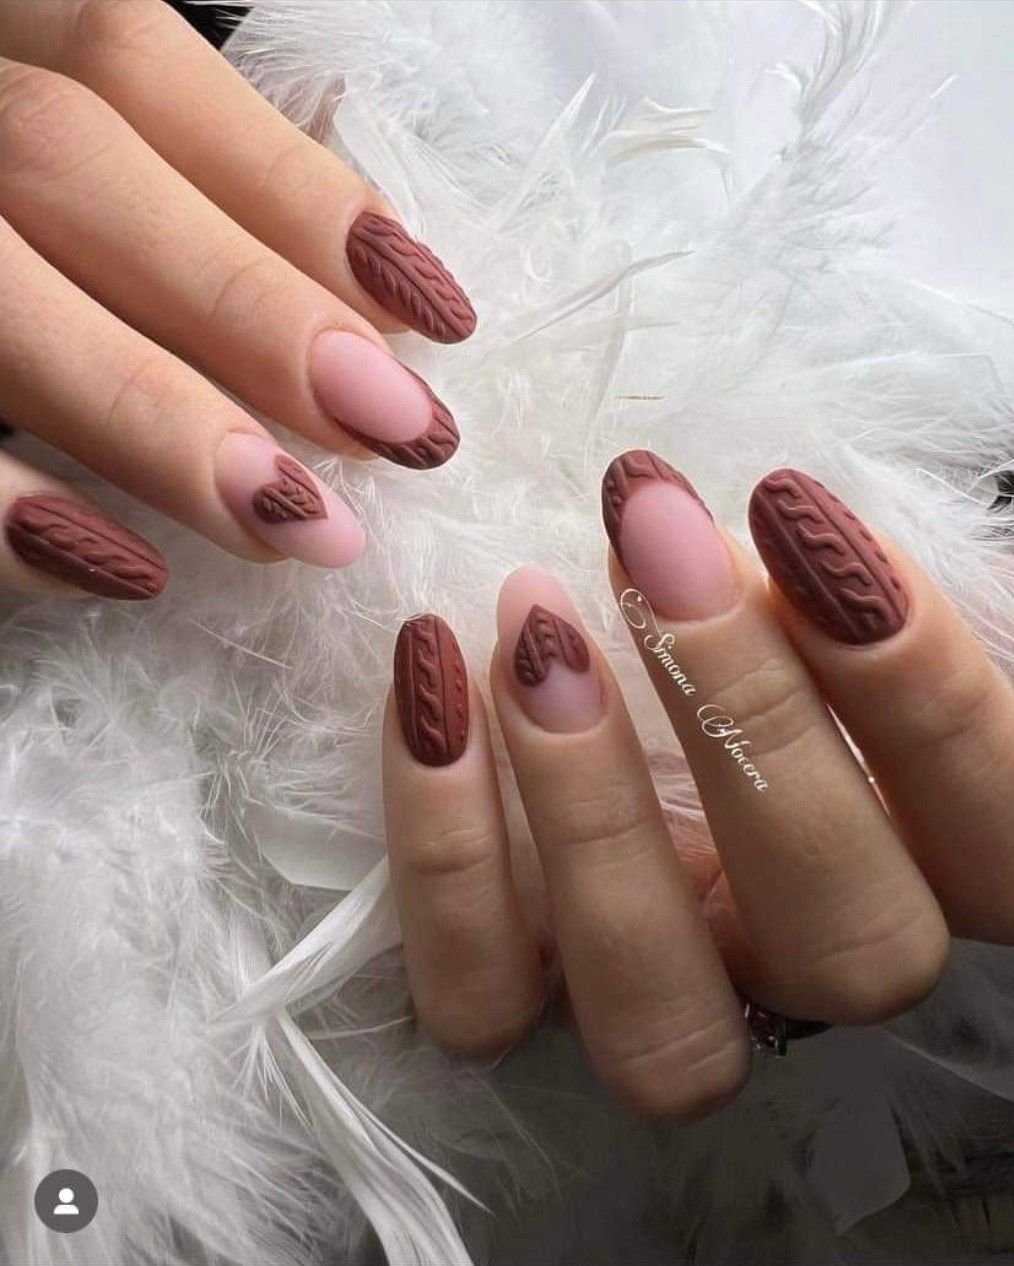
Bring the warmth of winter sweaters to your nails with cozy knit designs. A warm beige or soft blue base showcases intricate knit patterns that mimic your favorite holiday sweaters. This design is not only festive but also unique and comforting for the season.
Outfit Pieces:
– Warm beige or soft blue nail polish (creamy finish)
– Fine brush for knit patterns
– Small bows or beads for embellishments
– Clear top coat for protection
Styling Tips:
– Use a fine detail brush to mimic the knit pattern for a realistic look.
– Add small bows or beads for extra details and texture.
Perfect for cozy gatherings, this design is charming and festive. You can easily adapt it by changing the base color or adding more knit designs for a playful effect.
Image credit: Gwenny on Pinterest
25. Festive Balloon Bouquets
Celebrate the joy of the season with festive balloon bouquets on your nails! Bright colors like red, green, and gold create cheerful balloon shapes on a pastel base. This design is lively and perfect for spreading holiday joy.
Outfit Pieces:
– Pastel base coat (creamy finish)
– Bright polish in various colors for balloons
– Dotting tool for balloon shapes
– Clear top coat for sealing
Styling Tips:
– Use a dotting tool to create balloon shapes for better control.
– Add strings for each balloon with a fine brush for added detail.
Ideal for festive celebrations, this design is cheerful and fun. You can easily adapt it by changing the balloon colors or adding more decorations for a unique touch.
Image credit: ✨florinamadalina✨ on Pinterest
Conclusion
As you prepare for the holiday season, these 25 glam 3D Christmas nails offer a fantastic array of designs to choose from. Whether you prefer whimsical characters, elegant patterns, or festive colors, there’s something for everyone in this list to get you in the joyful spirit. Perfect for parties or cozy gatherings, these nail art ideas can bring a touch of magic to your celebrations.
So why not pick a design that resonates with your festive mood and make it part of your holiday charm?
Frequently Asked Questions
What exactly are 3D Christmas nails and how are they different from regular nail art?
3D Christmas nails feature raised, sculpted embellishments like tiny ornaments, bows, and snowflakes that sit on top of the nail, adding texture and major glam. Regular nail art stays flat and uses painting, decals, or glitter. 3D nails are built with acrylic, gel sculpting, or resin and then sealed with a thick top coat for durability. If you’re chasing the latest seasonal trends and glam nails, 3D designs are the standout choice for the holidays.
Tip: start with a solid base color, plan your 3D pieces, and cure or set according to your product’s instructions to keep everything secure through holiday plans.
How can I achieve glam 3D Christmas nails at home without a salon?
You can absolutely create chic 3D Christmas nails at home with a good kit and some patience. Begin with a clean, prepped nail and a smooth base color. Pick 1–2 small 3D pieces (like a tiny ornament or snowflake) and attach with nail glue or a gel builder. Cure if needed, then seal with a strong top coat. Finish with careful cleanup around the cuticles and allow everything to dry fully before typing or typing.
Pro tip: use shorter nails or lightweight 3D pieces to keep comfort up and lifting down, especially if you’re new to 3D nail art. This is a great way to stay on glam nails and seasonal trends without a salon visit.
What 3D nail designs are trending this holiday season for glam nails?
Trending 3D designs lean into classic holiday motifs with a luxe twist: 3D candy canes and gift boxes, tiny Christmas trees with rhinestone toppers, snowflake clusters, and metallic accents paired with red, green, gold, or silver bases. Add a few rhinestones or foil flakes for extra sparkle and keep the palette cohesive with your outfit.
These designs fit perfectly into seasonal trends and help you nail that glam nails vibe for parties, family photos, and festive events.
How long do 3D Christmas nails last and how should I care for them during the holidays?
Durability varies, but well-applied 3D nails with acrylic or gel can last about 2–3 weeks with proper care. To protect them during holiday activities: wear gloves for cleaning and dishwashing, avoid picking at 3D pieces, and moisturize cuticles regularly. If a piece loosens, don’t force it—re-adhere with nail glue or book a quick fill/repair.
For best results, avoid overly heavy 3D elements on short nails and keep your nails within a comfortable length so the decorations don’t lift with daily tasks.
Can I customize 3D Christmas nails to match outfits or events?
Absolutely. Tailor your 3D nails to your look by choosing colors that coordinate with your outfit or event vibe. For a cohesive party look, pair a metallic base with red and green accents, or use neutral tones with a single bold 3D statement piece. You can also add personalized touches like initials, holiday symbols, or a coordinating accent nail.
Customizing keeps your glam nails on theme and makes it easy to adapt from work-friendly days to festive evenings, all while staying on trend with the season.
Related Topics
3D Christmas Nails
glam nails
holiday nail art
seasonal trends
festive designs
beginner friendly
nail art techniques
winter nail styles
glitter accents
advanced nail art
DIY Christmas nails
trending nail designs

")


These nail designs are so festive! I can already picture myself showing them off at the holiday party. Which one do you think would look best with my red dress?
I tried doing my nails like this last year and ended up looking like a holiday ornament exploded! At least my friends got a good laugh out of it!