
Are you ready to show off your nails without breaking the bank or spending hours at a salon? If you’ve been craving some creativity in your nail art but feel intimidated by the thought of doing it yourself, you’re in the right place! This list of 20 creative nail designs is here to help you dive into the world of DIY nail art, tailored for beginners and seasoned pros alike.
Whether you’re preparing for a special occasion or just want to brighten your day, nail art can be a fun and satisfying way to express yourself. If you’re someone who loves to experiment with color and style, you’ll find the perfect designs that fit your vibe. This post is perfect for anyone looking to add a personal touch to their look. You’ll discover designs that are simple yet stunning, allowing you to embrace your inner artist without feeling overwhelmed.
Get ready to unleash your creativity! You’ll find a variety of nail art ideas that are easy to follow and don’t require fancy tools. From playful polka dots to elegant ombre effects, these designs will inspire you to grab some polish and get started. Plus, you’ll gain the confidence to try new techniques and styles, making your nails a canvas for your imagination. Let’s get those nails looking fabulous!
Key Takeaways
– You can create stunning nail arts at home even if you’re a beginner, using simple techniques and tools. – The designs range from playful patterns like polka dots to elegant styles like ombre and floral designs. – Each nail art idea is tailored to be easy, fun, and achievable, so you won’t feel overwhelmed. – You’ll gain confidence in trying new nail techniques, which can be a great way to express your personal style. – These designs can be customized further with your favorite colors and additional embellishments, making them unique to you.Contents
- 1. Polka Dot Fun
- 2. Ombre Delight
- 3. Stripes Galore
- 4. Floral Fantasy
- 5. Glitter Glam
- 6. Negative Space Nails
- 7. Marble Effect
- 8. Animal Prints
- 9. Color Block Nails
- 10. Metallic Magic
- 11. Gradient Glitter
- 12. Watercolor Wash
- 13. Geometric Shapes
- 14. Starry Night
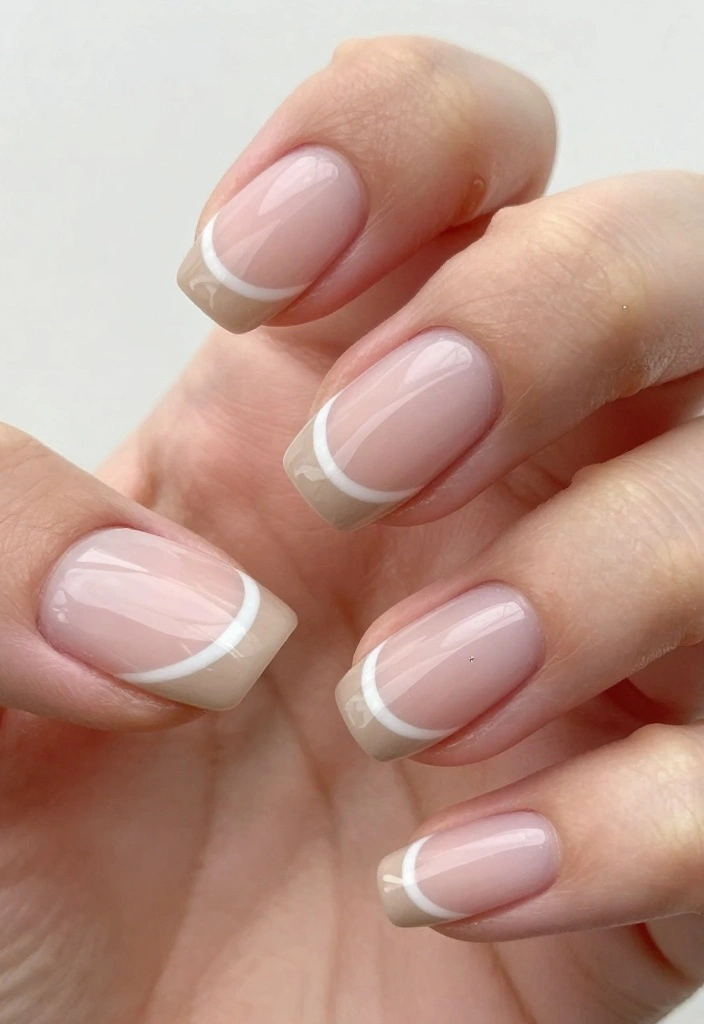
- 15. Simple French Tips with a Twist
- 16. Layered Colors
- 17. Inverted French Manicure
- 18. Seasonal Themes
- 19. Minimalist Nail Art
- 20. Personal Touch with Nail Stickers
1. Polka Dot Fun
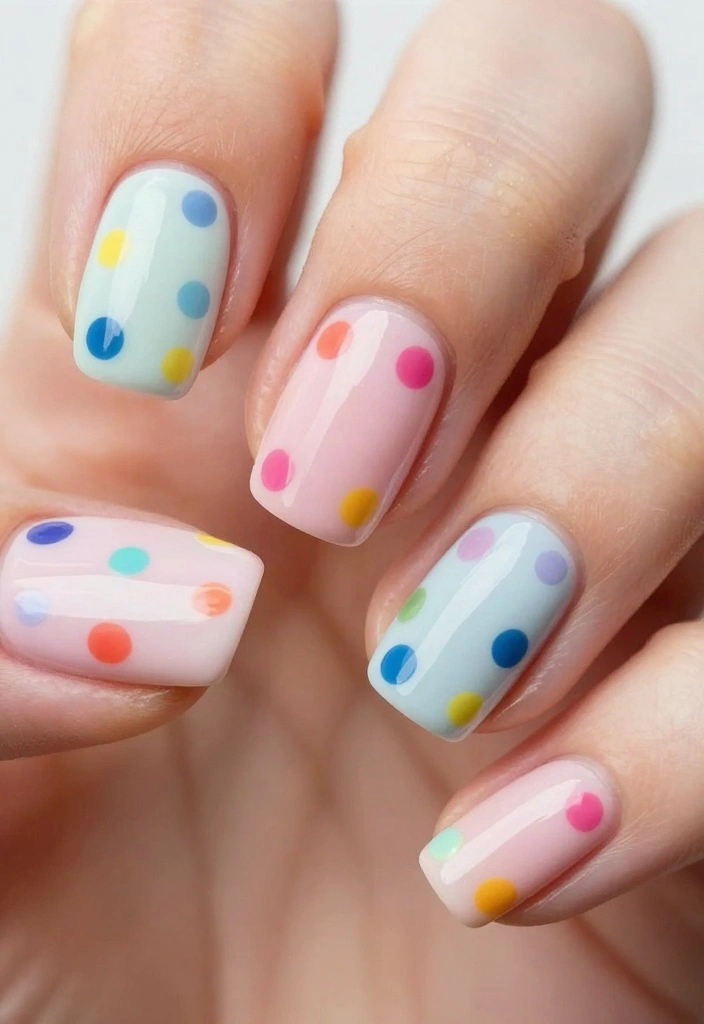
Polka dots are timeless and effortlessly charming. They add a playful touch to your nails while being simple to create, making them perfect for beginners. You can opt for a mix of vibrant colors for a retro feel or choose a monochromatic palette for a sleek, modern look.
Start with your favorite base coat, then grab a dotting tool or a bobby pin to create dots in various sizes. This design works great for any nail shape and length, allowing you to express your creativity with different color combinations.
– Apply a base coat and let it dry completely.
– Choose two contrasting colors for your dots (like red and white or blue and yellow).
– Dip the dotting tool into the polish and gently press it against your nail to form dots.
– Repeat with different colors and sizes to create a fun pattern.
– Finish with a top coat to seal your design and add durability.
This look is versatile for casual outings, parties, or even work. You can easily switch up the colors to match your mood or the season.
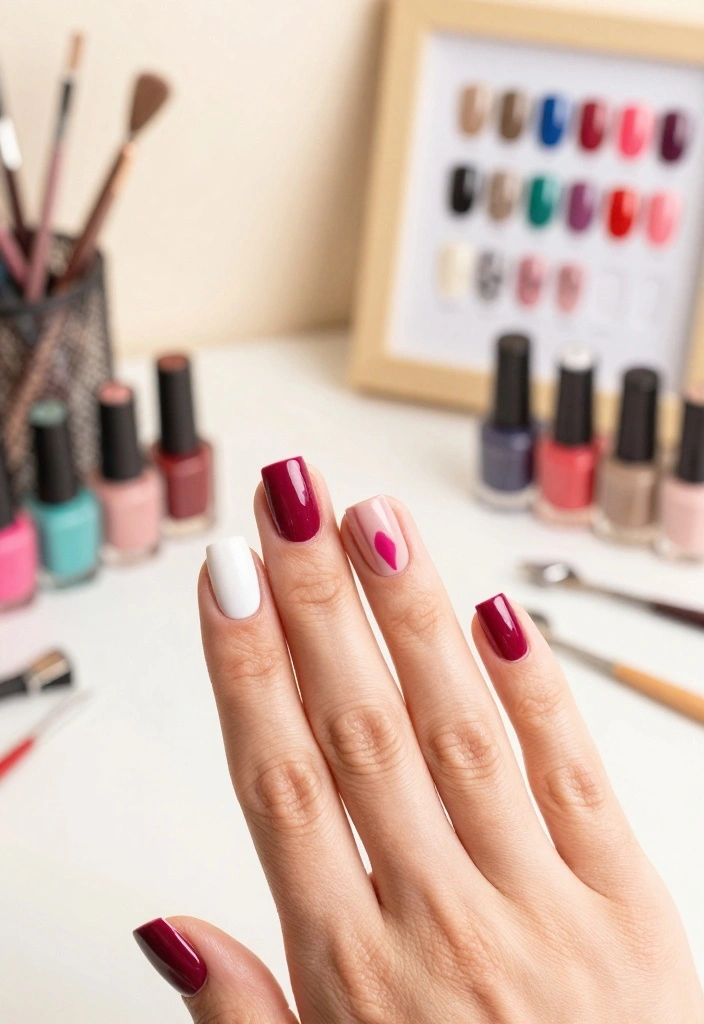
How To Choose The Right Nail Art Supplies
When it comes to creating beautiful nail arts at home, having the right supplies is crucial. Whether you’re just starting out or looking to enhance your collection, here’s how to pick the best tools and materials for your nail art journey.1. Nail Polish Quality Choosing the right nail polish is the foundation of any nail art. Look for polishes that are long-lasting and have a smooth application. Brands that offer a wide range of colors can help you mix and match for various designs. Don’t forget to check if they are quick-drying. This can save you time and prevent smudging your designs!
2. Nail Art Brushes Investing in a set of nail art brushes is a game changer. Brushes come in different shapes and sizes for various techniques. For instance, a fine detail brush is perfect for intricate designs, while a flat brush works great for filling in colors. Look for brushes with sturdy handles and soft bristles for better control.
3. Nail Tools Consider the tools you’ll need to perfect your nail art. Basic tools include a dotting tool, nail file, and cuticle pusher. A dotting tool can help create spots and patterns effortlessly. A good quality nail file will help shape your nails, ensuring a neat finish.
4. Nail Art Accessories Accessories can elevate your nail designs. Stickers, gems, and stencils add flair and creativity. If you’re a beginner, nail stickers are an easy way to add unique designs without much effort. Look for decals that are easy to apply and remove.
5. Base and Top Coats Base and top coats are essential for a professional finish. A base coat protects your nails from staining and helps the polish adhere better. A top coat adds shine and extends the life of your nail art, preventing chipping. Choose quick-drying formulas to make the process smoother.
6. Budget Considerations While it’s tempting to buy everything, setting a budget is wise. You can create great nail arts with basic supplies. Focus on high-quality essentials, and gradually build your collection. There are many affordable brands that offer great products for beginners.
Pro Tip: Start with a few basic colors and tools, and expand your collection as you discover your favorite styles. Experimenting with fewer products can lead you to find what works best for you!
By following these guidelines, you’ll ensure that you have the best supplies for your nail art projects. Get ready to create stunning designs, and don’t be afraid to express yourself!
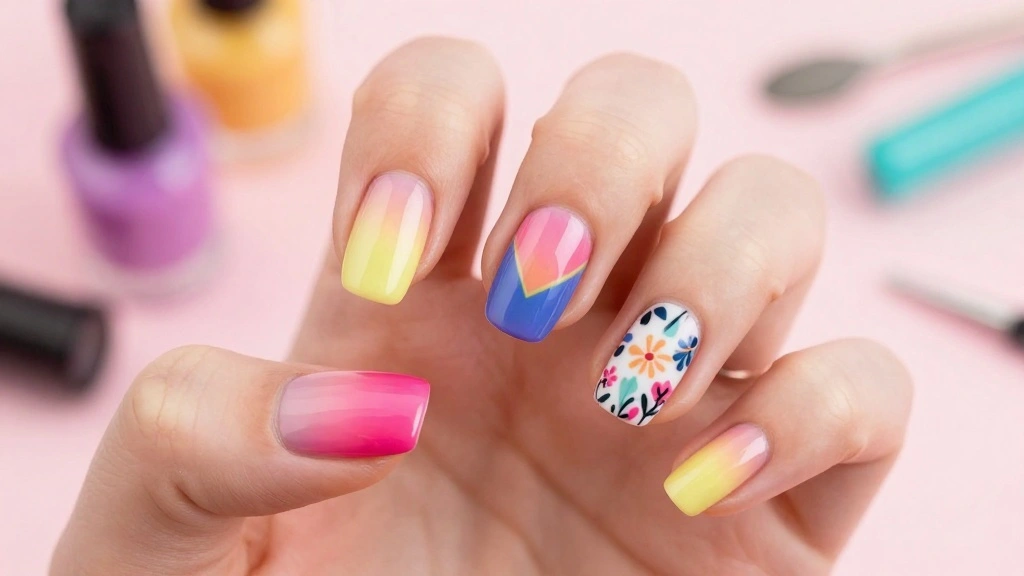
2. Ombre Delight
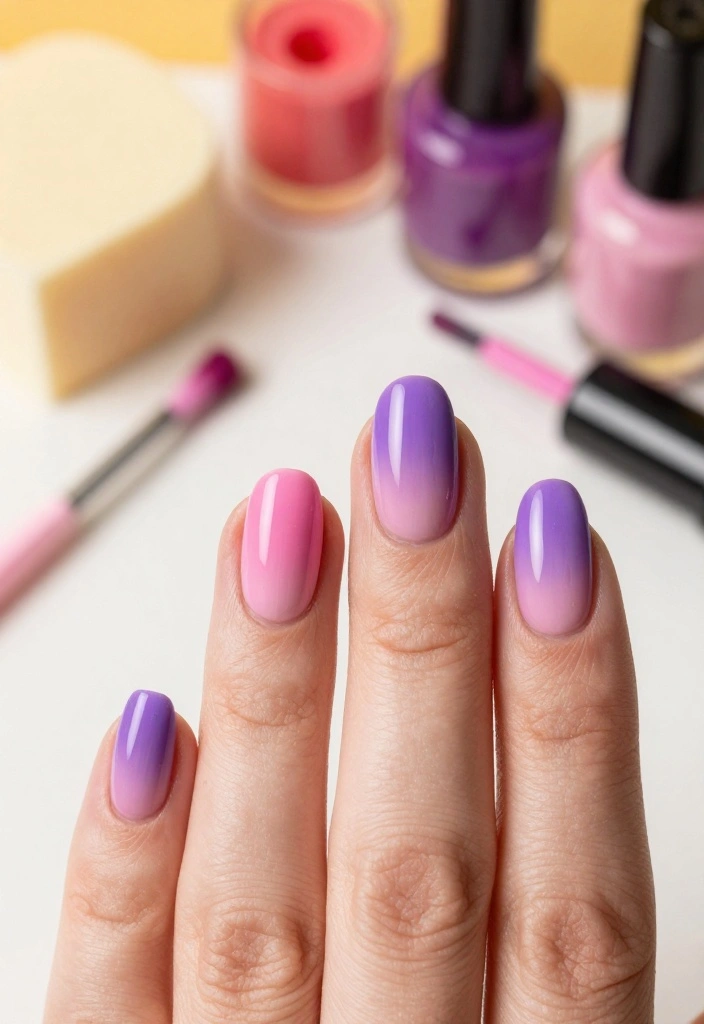
Ombre nails are all about that stunning gradient effect that blends seamlessly from one color to another. This style adds depth and dimension to your nails, and surprisingly, it’s very easy to do. All you need are two harmonizing shades to create a beautiful transition.
Start with a base coat of the lighter shade, and use a makeup sponge to apply the two colors side by side. This design is perfect for any occasion, whether it’s a casual brunch or a night out.
– Apply a base coat using the lighter color and let it dry completely.
– On a makeup sponge, apply both colors side by side (like pink and purple).
– Dab the sponge onto your nail, rolling it slightly to blend the colors together.
– Repeat until you achieve your desired gradient effect.
– Seal with a top coat for a polished finish.
Experiment with combinations like blue to green for a refreshing look, or pink to peach for something softer. For easier cleanup, use a latex barrier around your nails.
Fun fact: Ombre Nail Arts use just two harmonizing shades, creating a flawless gradient in minutes. A simple sponge dab gives you depth and a pro look—perfect for brunch or a night out, even if you’re a beginner.
3. Stripes Galore
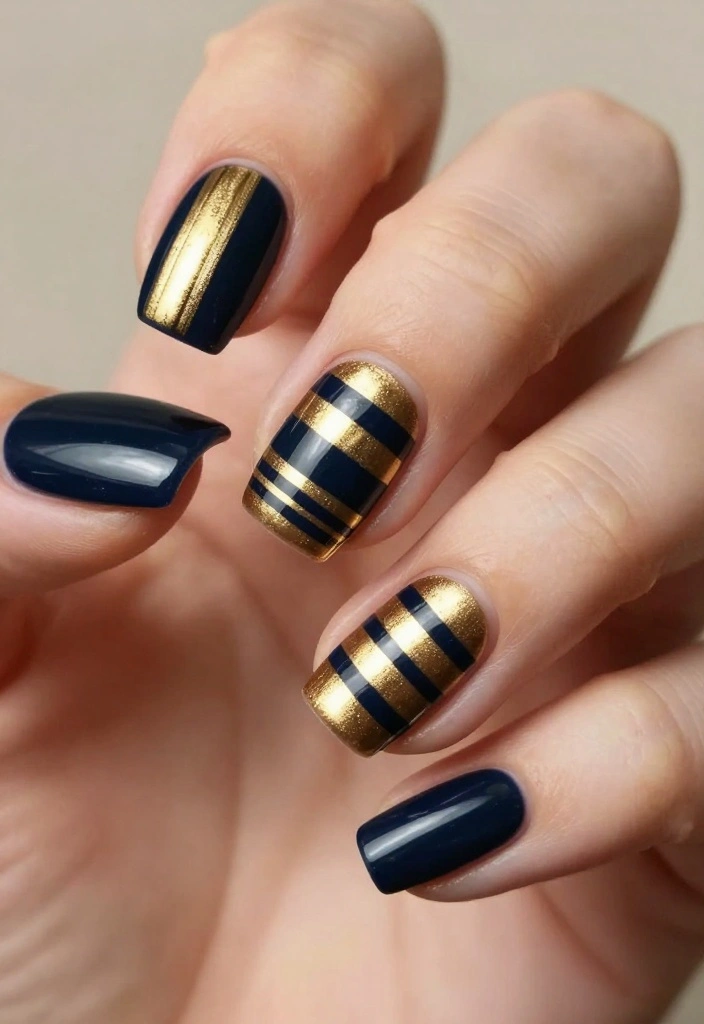
Stripes can elevate your nail art game while allowing you to go as bold or subtle as you like. They’re perfect for any event, whether you’re at a casual get-together or a formal function. You can play around with classic French tips or get creative with diagonal or zig-zag stripes.
Start with a base color and use tape or a thin brush to create clean lines. This design offers endless possibilities for color combinations and patterns.
– Paint your nails with your base color and let it dry.
– Use striping tape or a thin brush to create clean lines on your nails.
– Fill in the sections with your second color and remove the tape once it’s dry.
– Finish with a top coat to ensure longevity.
Mix and match colors for a playful vibe, or stick to a chic monochromatic scheme for elegance. Take your time with the lines for the best results.
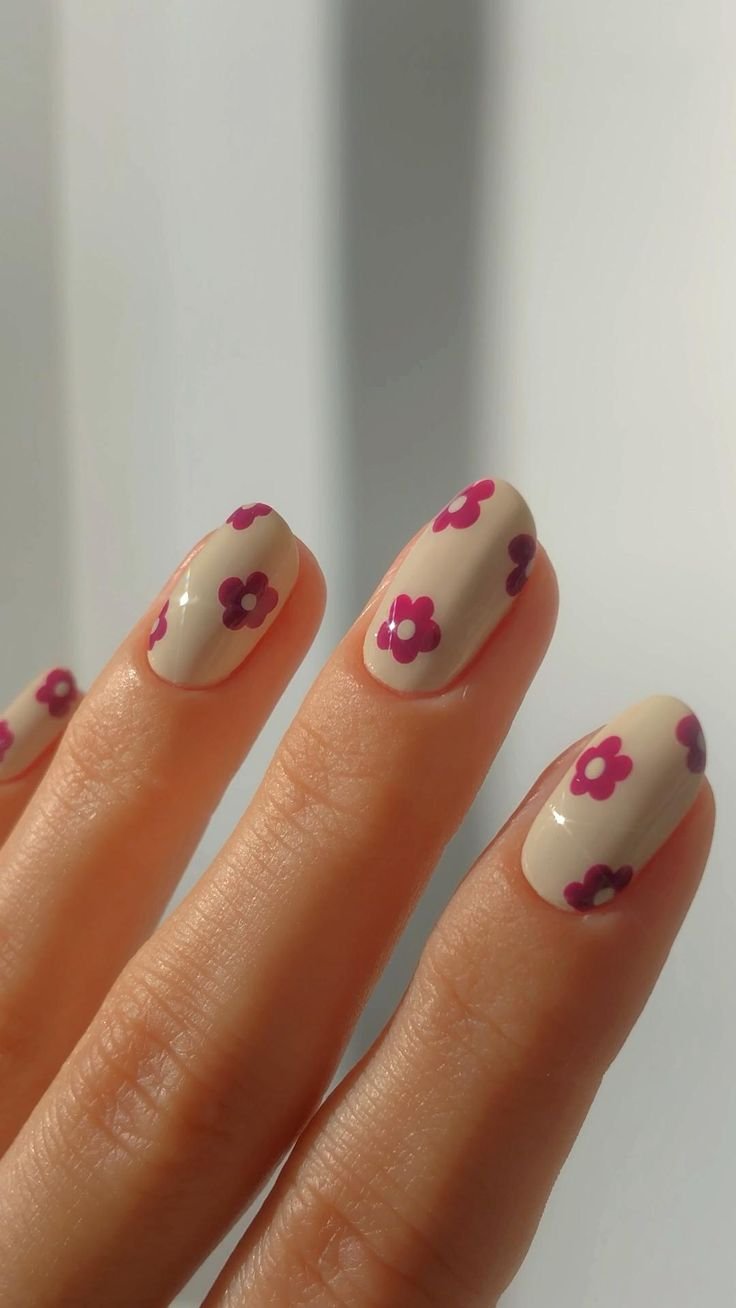
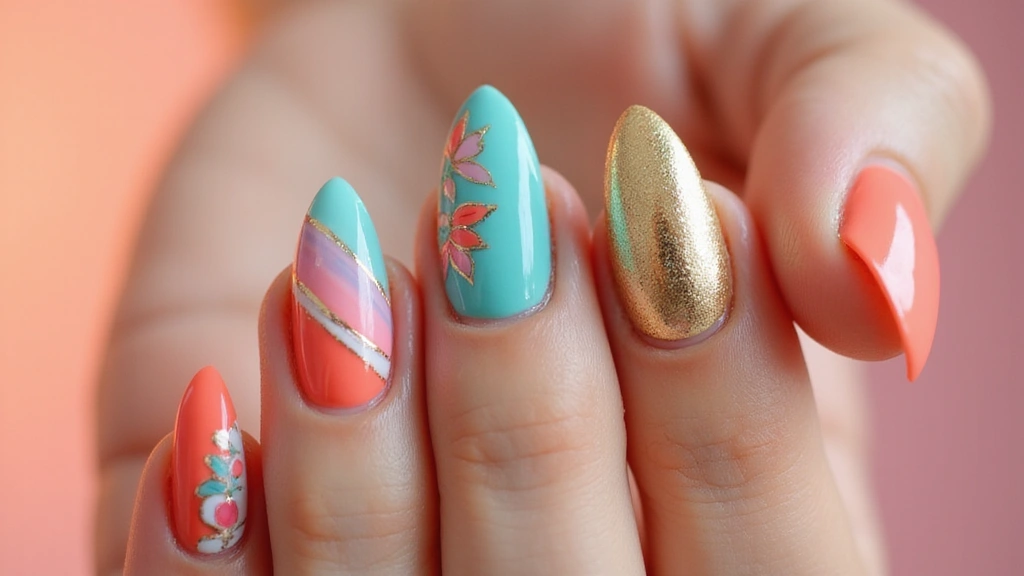
4. Floral Fantasy
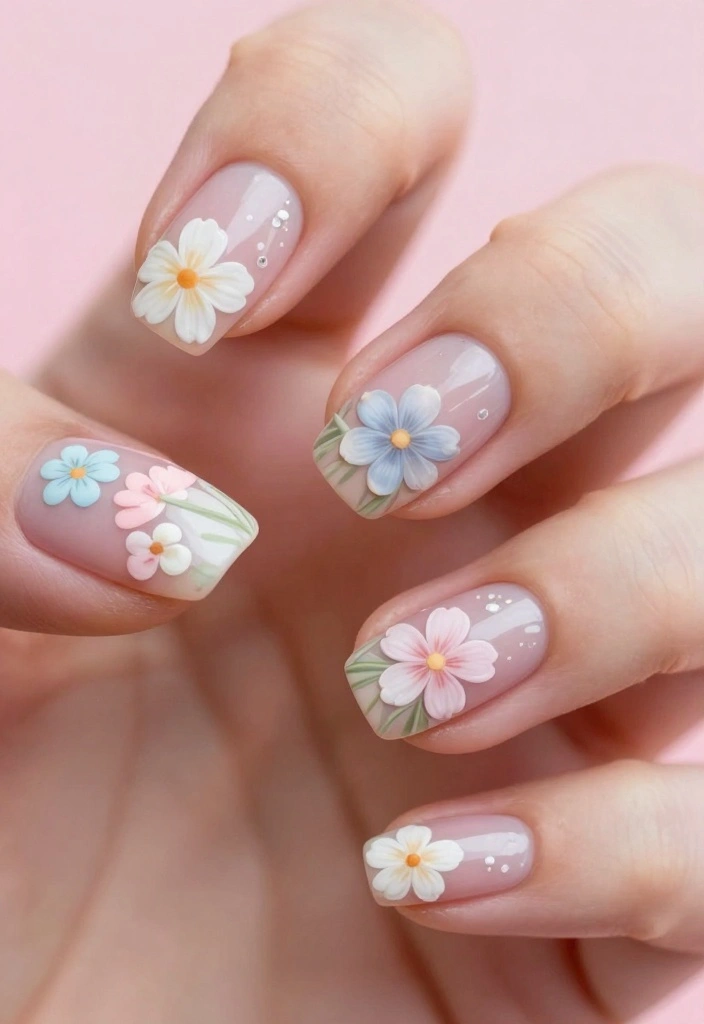
Floral designs instantly add a fresh and lively vibe to your nails. You can choose to go for intricate blooms or simple flower shapes, making this design adaptable for any season or occasion. Start with a solid base coat, then use a thin brush to paint flowers in contrasting colors to make them pop.
This design allows for endless creativity, letting you customize it according to your personal style.
– Paint your nails with a solid base color.
– Using a small brush, paint simple flower shapes in contrasting colors (like white on a pastel base).
– Add details like leaves or dots to enhance the design.
– Let your artwork dry and finish with a top coat.
If you’re unsure, practice your flower shapes on paper first. Stick to a few colors for a cohesive look that captures attention.
5. Glitter Glam
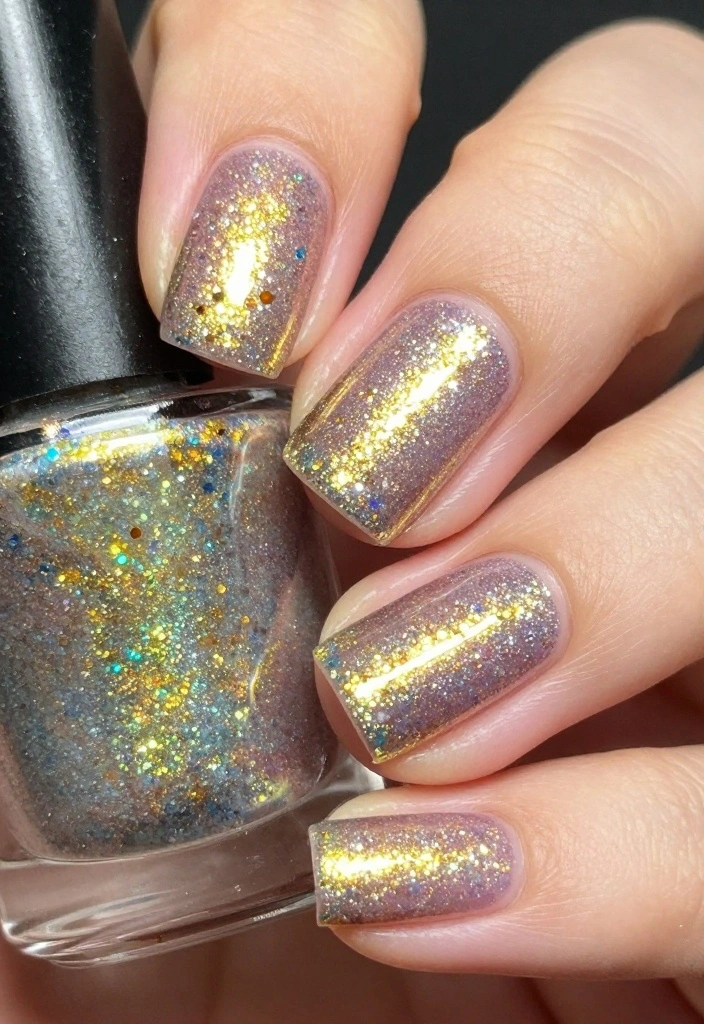
Glitter can instantly elevate your nail look, adding sparkle and flair with minimal effort. It’s the perfect way to make a bold statement or simply glam up your everyday style. You can use glitter polish or loose glitter for a dazzling effect.
Start with a base color and layer on the glitter for a striking finish. This design is ideal for parties, celebrations, or any time you want to shine!
– Begin with a base color; clear or a solid color works great.
– Apply a coat of glitter polish over your base.
– For a more dramatic look, layer the glitter or apply loose glitter with a top coat.
– Seal everything with a top coat to prevent chipping.
Use a makeup sponge for applying loose glitter to ensure better adherence. Mixing different sizes of glitter can also create a captivating dimension.
6. Negative Space Nails

Negative space nail art is a modern and chic way to showcase your natural nails while incorporating artistic designs. This technique leaves parts of your nails bare, allowing two contrasting colors to shine. It’s a creative way to play with shapes and colors.
Start with a clear or nude base coat, and use tape or a nail art brush for precise outlines. This design is perfect for anyone looking to make a stylish statement.
– Begin with a clear or nude base coat.
– Use tape or a nail art brush to outline the shapes you want to keep bare.
– Fill in the other areas with your chosen color.
– Carefully remove the tape and apply a top coat.
Experiment with various shapes—triangles, half-moons, or bold lines—for a unique artistic touch.
📹 Related Video: DIY Negative Space Polygel Nails | Nail Tutorial
7. Marble Effect

Marble nail art brings an exquisite look to your nails, mimicking the elegance of real marble. You can achieve this stunning design using a simple water marbling technique that’s surprisingly easy.
The result is a beautiful pattern that adds sophistication to your style, perfect for special occasions or everyday glam.
– Fill a cup with water and drop in different nail polish colors.
– Use a toothpick to swirl the colors gently in the water.
– Dip your nail quickly into the water and pull it out.
– Clean up any excess polish and apply a top coat.
Practice the swirling technique on paper first to get the hang of it. Work swiftly to ensure your polish doesn’t dry in the water.
8. Animal Prints
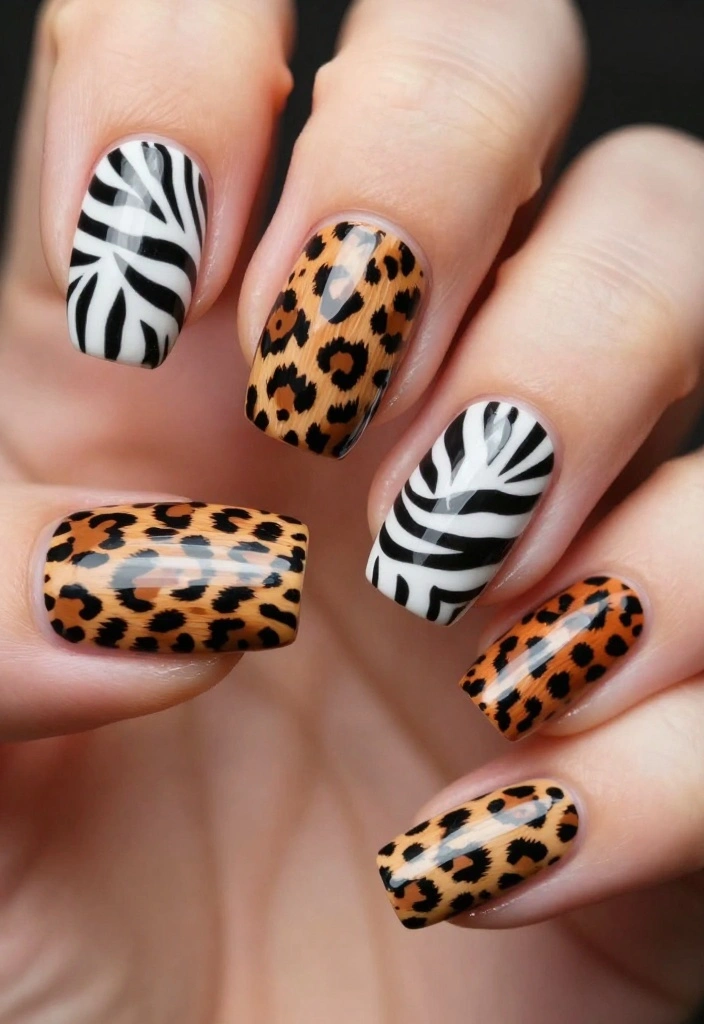
Add a wild touch to your nails with fun animal prints! From leopard spots to zebra stripes, these designs are playful and sure to grab attention. Choose a base color that complements your print, and let your imagination run wild!
Start with a solid base coat, then use a thin brush or dotting tool to create your desired animal print pattern. This look is great for those who want to express their adventurous side.
– Apply a base coat of your chosen color.
– Use a thin brush or dotting tool to draw your animal print pattern.
– Add details like spots or stripes for realism.
– Seal it all with a top coat for durability.
Consider using a matte top coat for a unique finish, or mix different animal prints for an eclectic style.
Fun fact: Nail Arts lovers share animal-print nails among the most popular designs online, with about 60% of beginners trying leopard or zebra patterns. Start with a solid base coat, then use a thin brush or dotting tool to create the print. Practice makes it bold.
You might also like
9. Color Block Nails
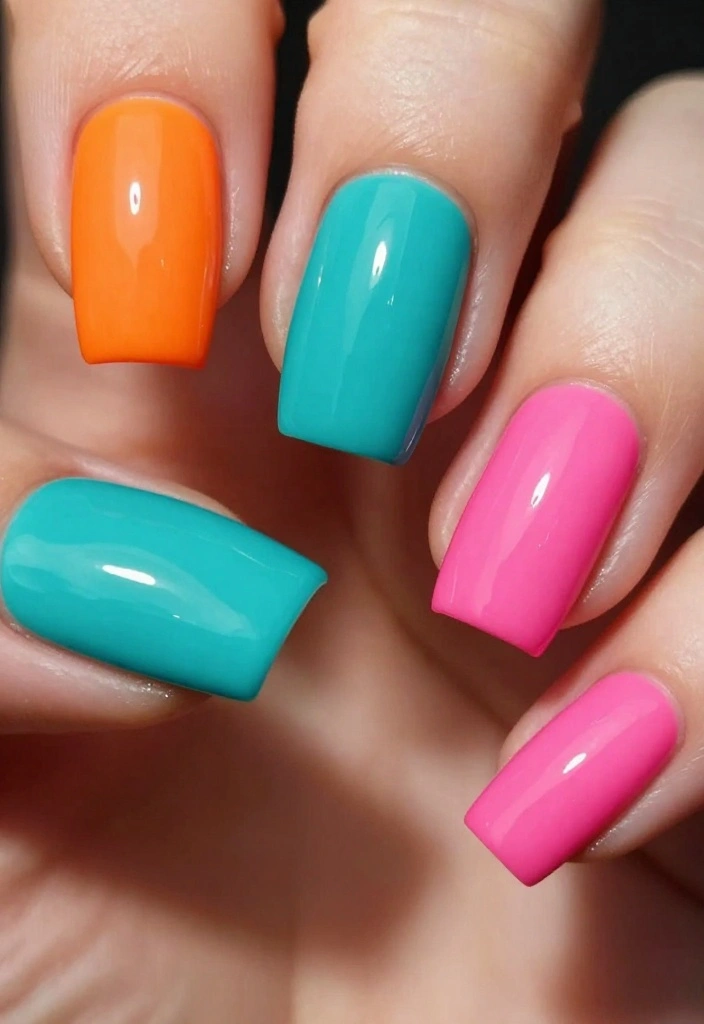
Color blocking is all about bold colors and sharp shapes, creating a striking visual impact on your nails. It’s a fun way to showcase your favorite shades while keeping it stylish.
Start with a light base coat, and use tape to section off parts of your nails for clean, defined areas. This design is perfect for both casual and formal occasions.
– Start with a base coat of your lightest color.
– Once dry, use tape to section off parts of your nails.
– Paint the exposed areas with bright, contrasting colors.
– Carefully remove the tape to reveal clean lines. br>- Finish with a top coat!
Use contrasting colors for a bold statement, or stick to similar shades for a softer look.
10. Metallic Magic
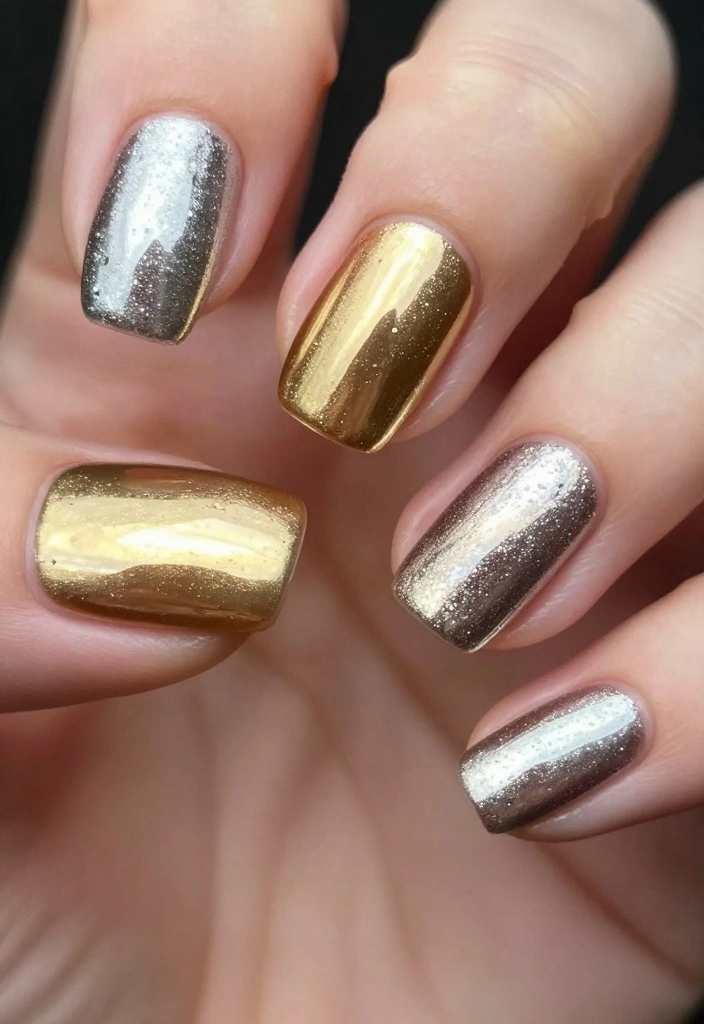
Shiny metallics can elevate your nail art instantly, adding a touch of luxury to your look. Whether you prefer gold, silver, or rose gold, metallic polishes are eye-catching and chic.
Start with a base coat in your chosen color, and apply metallic polish for a stunning finish. This design is perfect for parties or any occasion where you want to shine.
– Apply a base coat in the color of your choice.
– Use a metallic polish and apply one or two coats as needed for full coverage.
– Add designs with contrasting polish if desired.
– Seal your look with a top coat for a brilliant shine.
Try sponge-dabbing metallic polish for a textured effect or mix metallic shades with matte finishes for added contrast.
❝ Metallic nails just level up your Nail Arts game, and they are beginner friendly too. Start with a clear base coat, then one or two coats of metallic polish for full coverage, and finish with top coat for lasting shine. You will feel glam in minutes, no drama required. ❞
11. Gradient Glitter
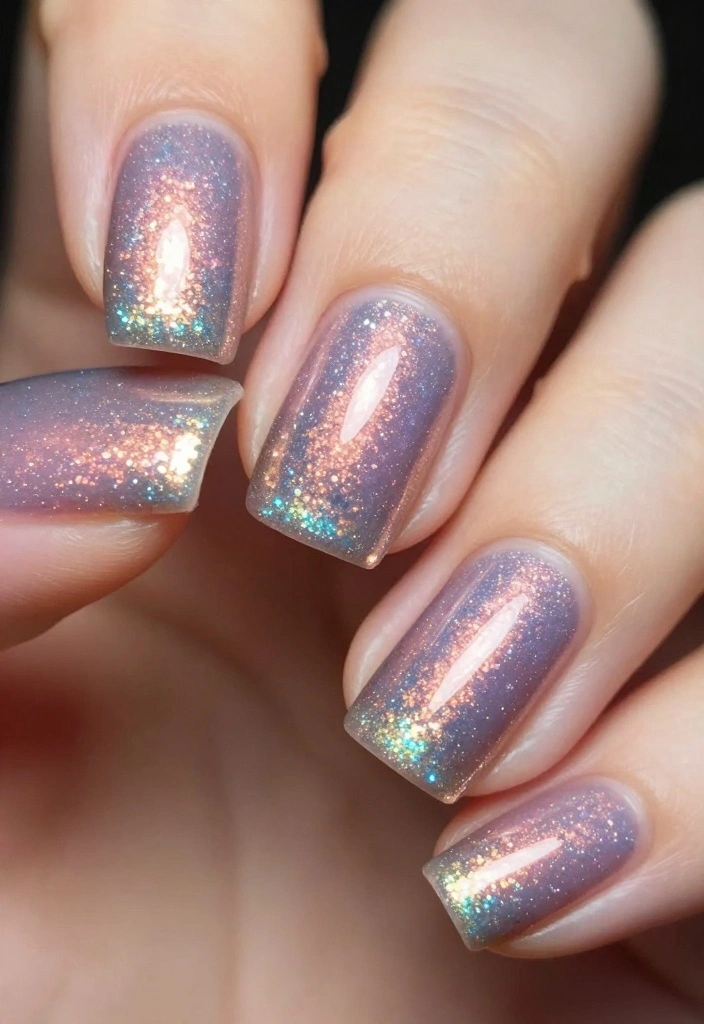
Combine the elegance of ombre with the sparkle of glitter for an eye-catching effect! Gradient glitter nails are sure to turn heads and can be achieved with just a few simple steps.
Start with a base color, and layer on the glitter from the tips down for a dazzling gradient. This design is perfect for celebrations or anytime you want to add a little sparkle to your day.
– Start with a base color and let it dry completely.
– Apply glitter polish from the tips of your nails toward the base for a gradient effect.
– Use a makeup sponge to blend if necessary for a smooth transition.
– Finish with a top coat for extra shine and protection.
Choose colors that complement each other to create a beautiful gradient effect.
12. Watercolor Wash
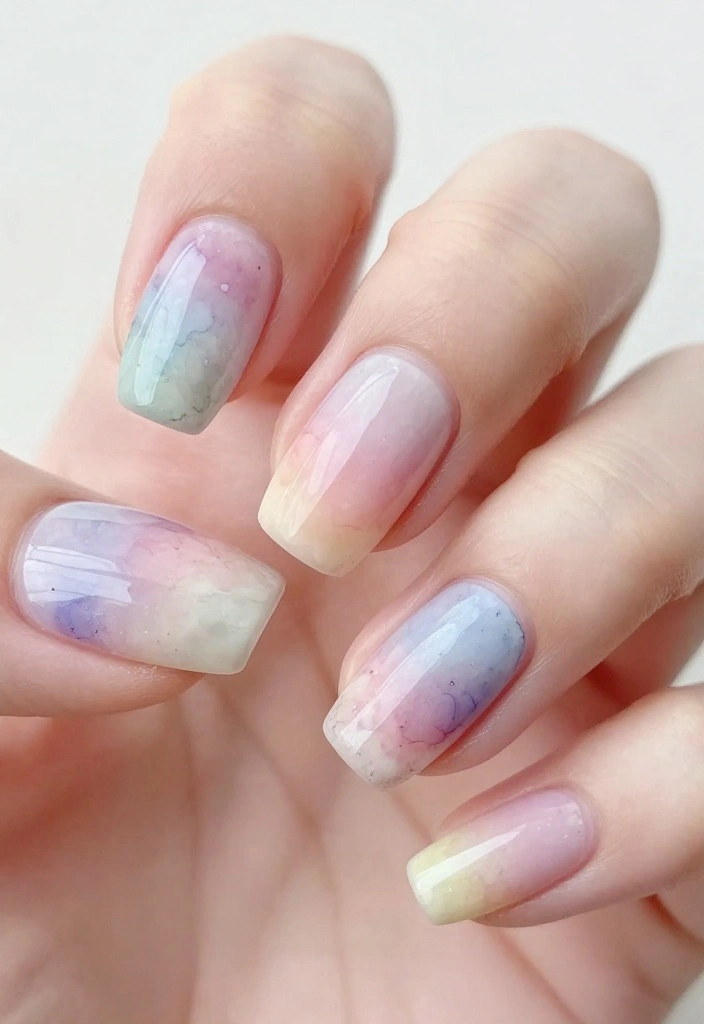
Watercolor nails create a dreamy, soft effect that looks effortlessly artistic. This technique allows you to blend colors in a way that mimics real watercolor paintings.
Start with a white base coat and use a small brush to apply drops of different colors, blending them while wet. This design is perfect for those who love a whimsical and creative look.
– Start with a white base coat.
– Use a small brush to apply a few drops of different colors and blend them while still wet.
– Allow to dry, then add a clear top coat to seal your design.
– Experiment with lighter shades for a subtle effect or bold colors for more impact.
Keep a light hand for a softer wash, and don’t hesitate to mix colors directly on your nails.
13. Geometric Shapes
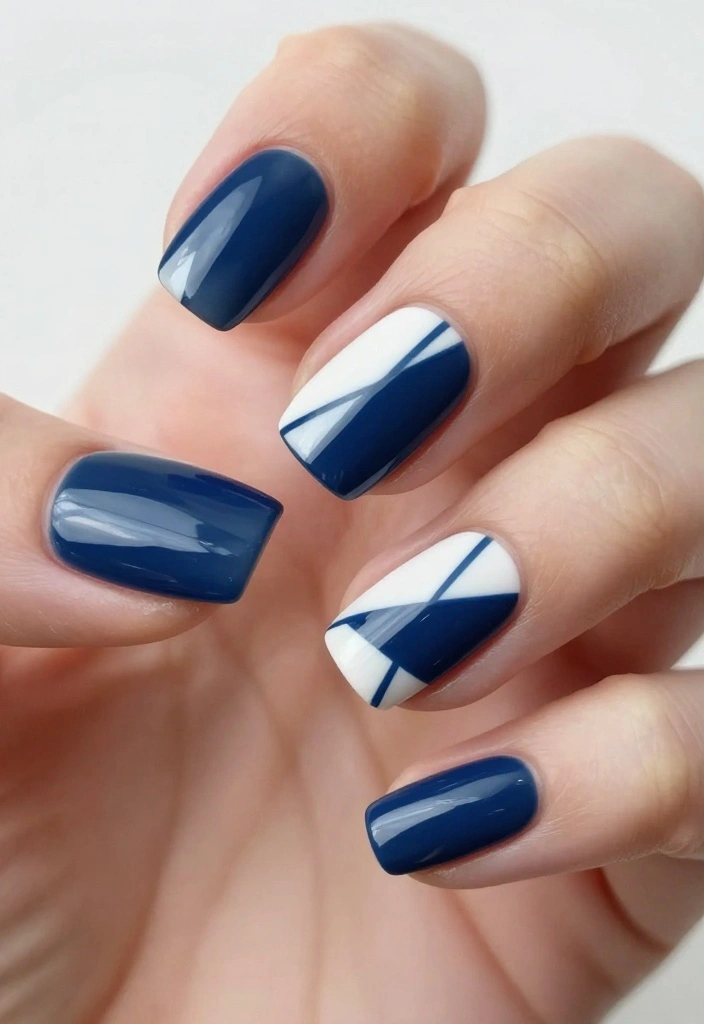
Geometric designs are perfect for those who appreciate clean lines and modern aesthetics. This art style can be bold or subtle, depending on your choice of colors and shapes.
Start with a base color and use tape to create various shapes, applying contrasting colors in the taped areas. This design works well for both casual and professional settings.
– Start with a base color of your choice.
– Use tape to create shapes like triangles or diamonds on your nails.
– Apply contrasting colors in the taped areas and remove the tape once dry.
– Seal your design with a top coat for a polished appearance.
Consider using a matte top coat over a glossy base for an interesting visual contrast.
14. Starry Night

Transform your nails into a starry night sky with this enchanting design! It’s perfect for evenings out or whenever you want to express your love for the cosmos.
Start with a dark base color, and use a small brush to add stars and dots in white or metallic polish. This design captures wonder and magic, making it a favorite among stargazers.
– Paint your nails with a dark base color, like deep blue or black.
– Once dry, use a small brush to add stars and dots with white or metallic polish.
– You can even add a moon for an extra touch of whimsy!
– Seal your design with a clear top coat for durability.
For added fun, use glow-in-the-dark polish for the stars to shine in the dark!
15. Simple French Tips with a Twist
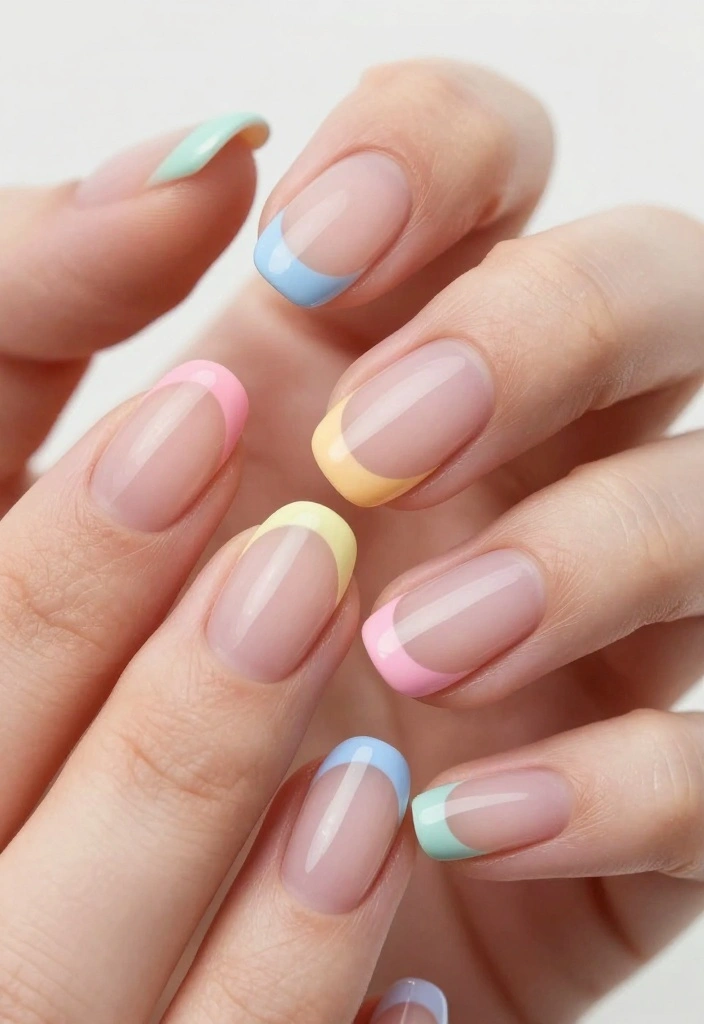
French tips are classic, but you can give them a modern twist by using colorful tips instead of the classic white. This fresh take keeps things stylish while still being timeless.
Start with a neutral base coat and use tape for precision when adding colored tips. This design is versatile enough for any occasion, from casual to formal.
– Apply a base coat in a neutral or nude shade.
– Add tips with your chosen color using tape for clean lines.
– Consider using glitter at the tips for a fun sparkle!
– Finish with a top coat for durability.
Mixing and matching colors for the tips can create a unique style that truly reflects your personality.
You Might Also Like
16. Layered Colors

Layering colors can produce visually stunning results, allowing you to blend different shades for a unique nail art look. This technique can create depth and interest on your nails.
Start with a base coat in a light shade, and apply a second color on top, leaving some areas bare. Use a sponge to blend where the colors meet for a smooth transition.
– Begin with a base coat in a light shade.
– Apply a second color on top, leaving some areas bare for contrast.
– Use a sponge to blend the edges where the colors meet.
– Seal everything with a top coat for a smooth finish.
Choose colors that complement each other well to enhance the layered effect.
17. Inverted French Manicure
Reinvent the classic French manicure by flipping it upside-down! This edgy style is both chic and sophisticated, making it suitable for any occasion.
Start with a neutral base coat, and instead of tips, paint a half-moon at the base of your nails with a contrasting color. You can even add a glitter line for an extra touch.
– Start with a neutral base coat.
– Instead of painting tips, create a half-moon at the base of your nails with a contrasting color.
– Optionally, add a glitter line for added sparkle!
– Seal your design with a top coat to keep everything intact.
Experiment with bold colors for a striking look or keep it classic with soft whites and nudes.
18. Seasonal Themes
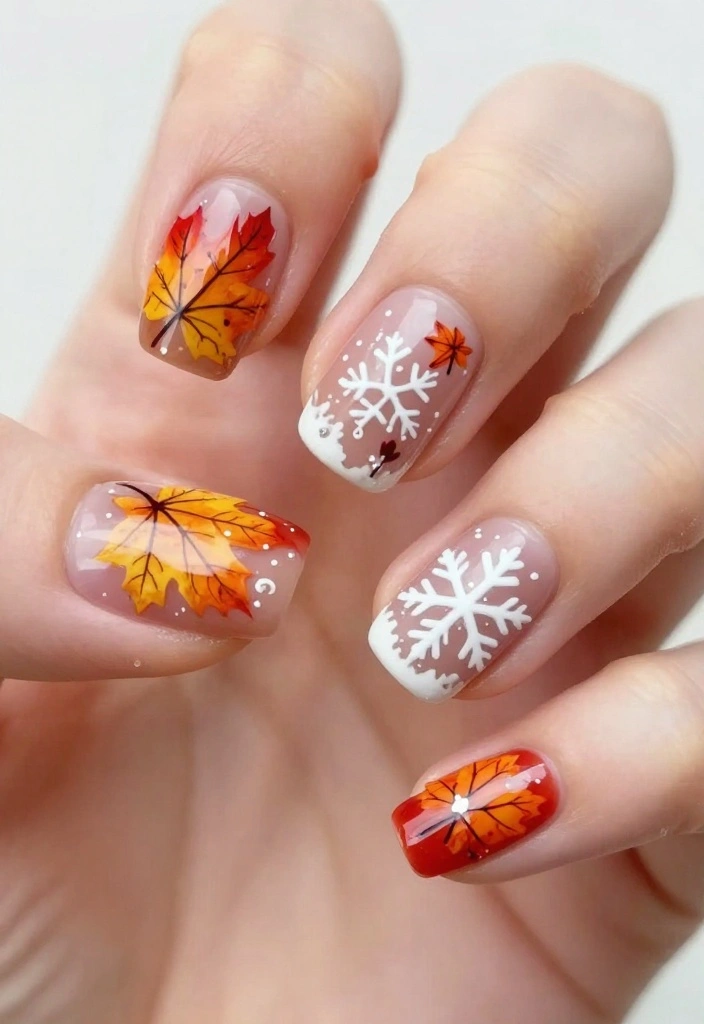
Celebrate the seasons with fun seasonal nail art! From autumn leaves to winter snowflakes, this nail art allows you to express your love for various times of the year.
Start with a base coat that represents the season, and use a thin brush to add designs that reflect it. This design is perfect for those who enjoy customization and creativity.
– Begin with a base coat of your choice for the season.
– Use a thin brush to add seasonal designs like leaves for fall or snowflakes for winter.
– Get creative with colors that represent the season.
– Finish with a top coat for durability.
Consider using stickers for added convenience or mix and match seasonal designs for a playful look.
19. Minimalist Nail Art
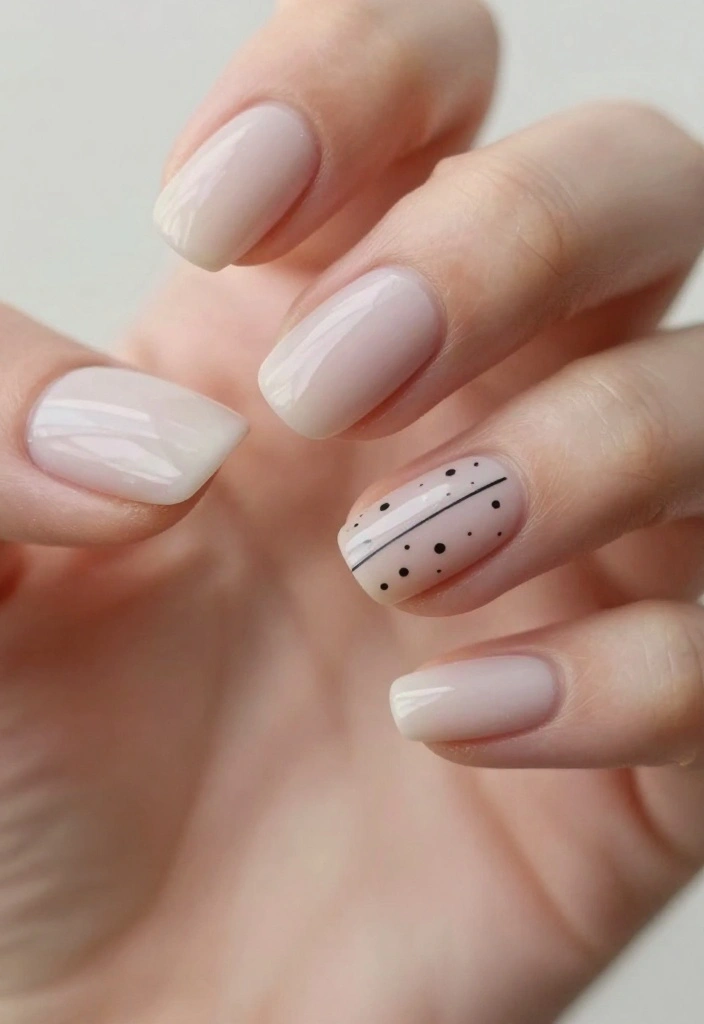
Less is more with minimalist nail art! Simple lines or dots in neutral colors can create stunning, understated elegance. This design is ideal for those who prefer a sleek, modern look.
Start with a clean, neutral base coat, and use a thin brush to add simple designs. This technique allows for creativity without being overwhelming.
– Begin with a clean, neutral base coat.
– Use a thin brush to add simple designs like small lines or dots.
– Keep it straightforward and clean for a chic appearance.
– Apply a top coat to finish.
Stick to a monochromatic palette for a sleek look or add a pop of color for a touch of contrast.
20. Personal Touch with Nail Stickers

If you’re short on time or want to add intricate designs without the effort, nail stickers are your best friend! With a variety of designs available, you can easily personalize your nails to reflect your style.
Start with a solid color base and carefully apply your favorite stickers for a quick and fun design. This method is perfect for those who want a polished look without spending too much time.
– Paint your nails with a solid color and let it dry completely.
– Choose your favorite stickers and carefully peel them off.
– Apply the stickers to your nails, pressing gently to adhere.
– Seal with a clear top coat for longevity.
Mixing different stickers can create a playful look, or use them for accent nails to complement your main design.
Conclusion
Nail art is an exciting avenue for self-expression and creativity, offering various styles that cater to every preference. From simple polka dots to intricate floral designs, you’ll find inspiration for your nails in these creative ideas. Embrace the fun of DIY nail art and let your personality shine through. What design will you try next?
Frequently Asked Questions
What are some easy Nail Arts ideas I can try at home as a beginner?
Here are beginner-friendly, easy Nail Arts ideas you can try at home. Start with a simple base color and a clear top coat, and gather basics like base coat, a few nail polishes, top coat, a dotting tool or toothpick, striping tape, and a small brush for detail.
Try these creative and easy designs: classic stripes using striping tape, polka dots with a dotting tool, negative-space nails by leaving a portion unpainted, and a simple gradient using a cosmetic sponge. Each look is part of the Nail Arts journey and should feel fun, not stressful.
Finish with a thin layer of top coat to seal your design and prevent chipping. With practice, your nail arts will look polished and Nail Arts can be really creative and easy.
What tools and supplies do I need to start Nail Arts at home?
You can start with a minimal, budget-friendly kit. Essentials include a base coat, your favorite nail polishes, a top coat, nail polish remover, and cotton swabs for cleanup.
Tools that help: a dotting tool or bobby pin, a thin striping brush, striping tape, a small nail brush for clean edges, a nail file, buffer, and cuticle pusher. Optional but handy: a quick-dry top coat or drops, and a makeup sponge for gradient effects. These basics set you up for Nail Arts at home.
How can I make my at-home Nail Arts look neat and last longer?
Prep is everything. Start by shaping and buffing nails, pushing back cuticles, and cleaning the surface for better paint adhesion.
Apply a base coat to protect nails, use thin coats of polish rather than thick layers, and seal with a top coat after each design. Let each layer dry fully before the next to avoid smudges, and finish with a top coat every couple of days to keep your Nail Arts looking fresh. Avoid water for a couple of hours after painting to help the polish cure.
Are there Nail Arts designs that work well on short nails or for a subtle look?
Absolutely. Short nails can shine with easy and creative designs like minimalist lines, tiny dots near the cuticle, or a sharp negative-space accent. Try a classic French tip with a twist, a single accent nail, or a delicate geometric pattern using striping tape. These options keep it stylish without overwhelming the nail length, making your Nail Arts feel polished and approachable.
What common mistakes should beginners avoid when doing Nail Arts at home?
Avoid heavy or thick coats that take forever to dry and can peel. Skipping base coats or top coats reduces durability and shine.
Don’t rush the design—give each layer time to dry and clean up excess polish around the edges with a cotton swab dipped in remover. Using the wrong tools or overusing tape can make designs look messy. And finally, forget not to seal with a top coat to protect your Nail Arts.
Related Topics


")


These nail designs look so fun! I tried a simple polka dot design last week, and it turned out way better than I expected. What’s your favorite design to try first?
I love how easy these designs seem! I once attempted a galaxy nail look and ended up with more glitter on my face than on my nails. Glitter is sneaky like that!
Did you know that nail art dates back to ancient Egypt? They used to color their nails with natural dyes. Imagine how long that took without all the tools we have now!
I remember trying to do a rainbow design, and it turned into a total mess! But it made for a great laugh with my friends when we all got together. Have you ever had a nail fail that turned into a funny story?
For anyone just starting, a good tip is to use a base coat to protect your nails before you start painting. It makes a big difference and helps your designs last longer!