
Nail art has become a significant form of self-expression for many of us. If you’ve been scrolling through social media or visiting your favorite nail salon, you’ve probably noticed the stunning trend of gem nails. These sparkling designs can add a touch of glamour to any manicure, making them perfect for everyday wear or special occasions. I created this post to help you discover how easy it is to elevate your nail game with simple and gorgeous gem nail designs.
If you love fashion and enjoy exploring creative avenues, this guide is just for you. Whether you’re a nail art novice or a seasoned pro looking for fresh ideas, you’ll find plenty of inspiration here. From bold geometric patterns to delicate floral accents, there’s something for every style. This collection of 15 simple gem nail ideas will not only help you step up your nail art game but also provide you with DIY tips to create these trendy designs at home.
Get ready to unlock your inner nail artist! With these gem nail ideas, you’ll learn how to blend beauty and creativity, ensuring that your nails always reflect your unique style. Let’s dive into these captivating designs and make your manicure shine.
Key Takeaways
– Simple Designs: You’ll find 15 easy gem nail ideas that anyone can create with a little practice and the right tools.
– DIY Tips: Each design includes practical tips for getting salon-quality results at home, so you can confidently try them out yourself.
– Variety of Styles: From classic elegance to playful designs, there’s a gem nail idea that suits every occasion and personality.
– Trendy Accents: Discover how to incorporate gems in trendy ways, whether as a bold focal point or subtle accents.
– Inspiration for All: This guide caters to all skill levels, ensuring that both beginners and experienced nail artists will find something new to try.
Contents
- 1. Stunning Single Gem Accent
- 2. Glitter Gradient with Gem Accents
- 3. Geometric Gem Designs
- 4. Floral Gem Accents
- 5. Ombre with Crystal Tips
- 6. Color Block Chic with Gems
- 7. Metallic Gems with Matte Base
- 8. Gradient Gem Stones
- 9. Natural Stone Effect with Gems
- 10. Rainbow Gem Nails
- 11. Elegant French Tip with Gems
- 12. Fun Animal Print with Gem Details
- 13. Whimsical Cloud Nails with Gem Raindrops
- 14. Elegant Negative Space with Gems
- 15. Crystalized Ice Effect
1. Stunning Single Gem Accent
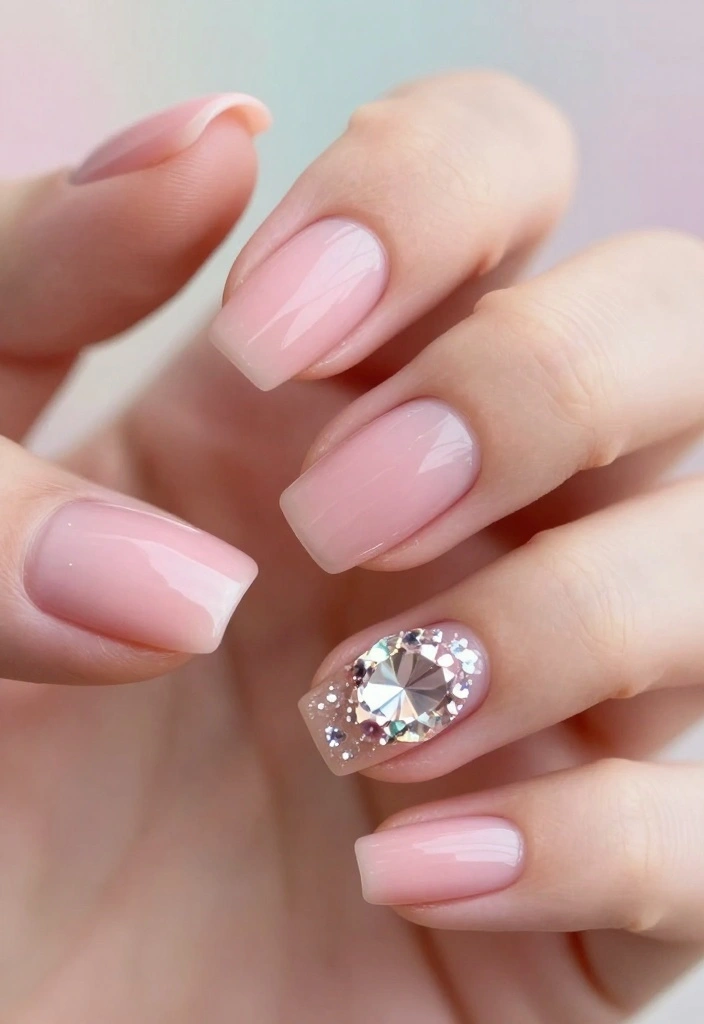
A single gem accent nail is a chic way to elevate your manicure. This style features a neutral base like soft pink or nude, enhanced by a single sparkling gem on one or two nails. It’s an understated yet striking choice, perfect for adding a hint of glam without overwhelming your look.
What makes this design work is its versatility. It’s suitable for both professional settings and casual outings. Choosing a gem that contrasts with your base color can really enhance its shine and bring a refined elegance to your nails.
Outfit Pieces:
– Soft pink or nude nail polish
– Sparkling gem (choose a color that pops)
– Optional: clear top coat for added shine
Styling Tips:
– Use a toothpick or dotting tool for precision when applying nail glue.
– Make sure your base color is completely dry before placing the gem.
– Try different sizes of gems; a larger gem on a shorter nail can create a bold impact!
This look is perfect for any occasion, from office meetings to brunch dates. You can easily swap the gem for a different color to match your outfit, making it a wonderfully adaptable choice.
2. Glitter Gradient with Gem Accents
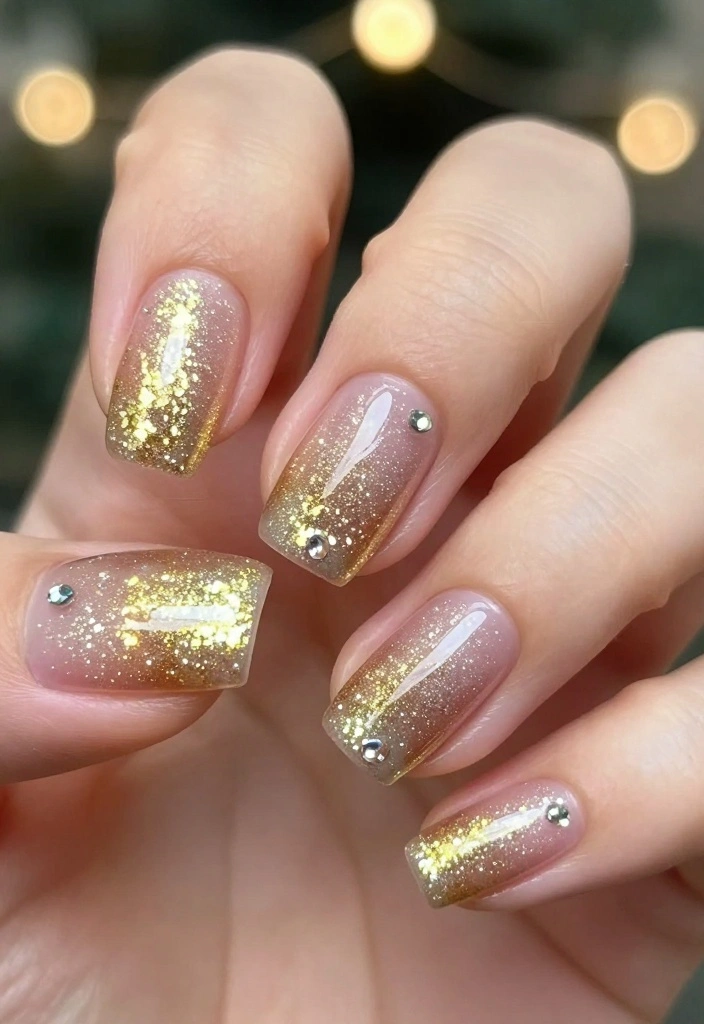
Sparkle meets elegance with a glitter gradient and gem accents! This design involves applying glitter polish from the tips of your nails, fading it towards the cuticle for a stunning ombre effect. It’s an eye-catching style that works well for any celebration.
Once your glitter is set, placing tiny gems at the base or along your cuticle line adds a touch of dazzle. The combination of glitter and gems offers a glamorous look that’s surprisingly easy to achieve at home.
Outfit Pieces:
– Glitter polish (choose your favorite color)
– Base color that complements the glitter
– Tiny gems (color-matched or complementary)
– Top coat for durability
Styling Tips:
– Apply a quality top coat to seal in your glitter and enhance longevity.
– Mix different sizes of glitter for a textured finish.
– Choose gem colors that blend or contrast with your glitter for a cohesive appearance.
This design shines at parties or a night out. You can easily alter the color scheme to fit any season, ensuring your nails are always ready for fun!
3. Geometric Gem Designs
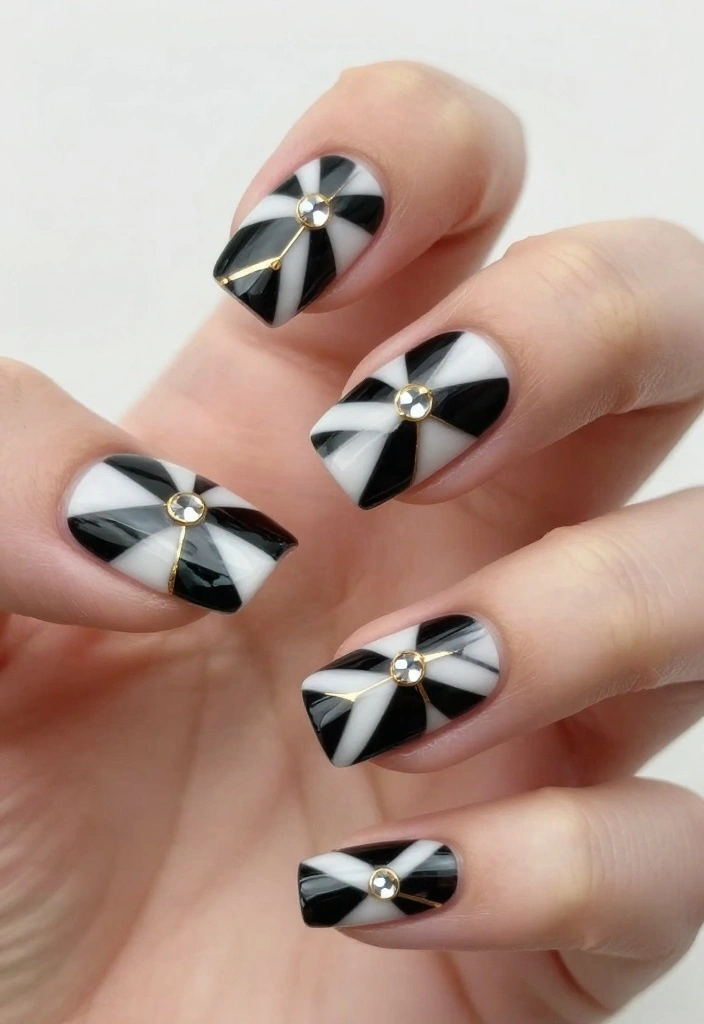
If modern art speaks to you, consider geometric gem designs! This style features bold geometric patterns enhanced with strategically placed gems. You can play with contrasting colors or soft pastels to create unique shapes.
The placement of gems at the intersections of shapes adds a sophisticated flair. This design allows for creativity and personalization, making it a standout choice for those who appreciate art.
Outfit Pieces:
– Base colors that contrast (like black and white)
– Nail tape for clean lines
– Gems in various shapes (triangles or squares)
– Optional: top coat to protect your design
Styling Tips:
– Use nail tape to create clean angles and lines.
– Experiment with different gem shapes to enhance your geometric theme.
– A good base coat can prevent staining from darker colors.
This trendy design adapts to fit any season or mood, allowing you to express your unique style effortlessly!
📹 Related Video: CRYSTAL PLACEMENT 💎✨| HOW TO APPLY CRYSTALS TO NAILS | 20 DESIGNS!| + ANNOUNCING GIVEAWAY WINNERS🥳
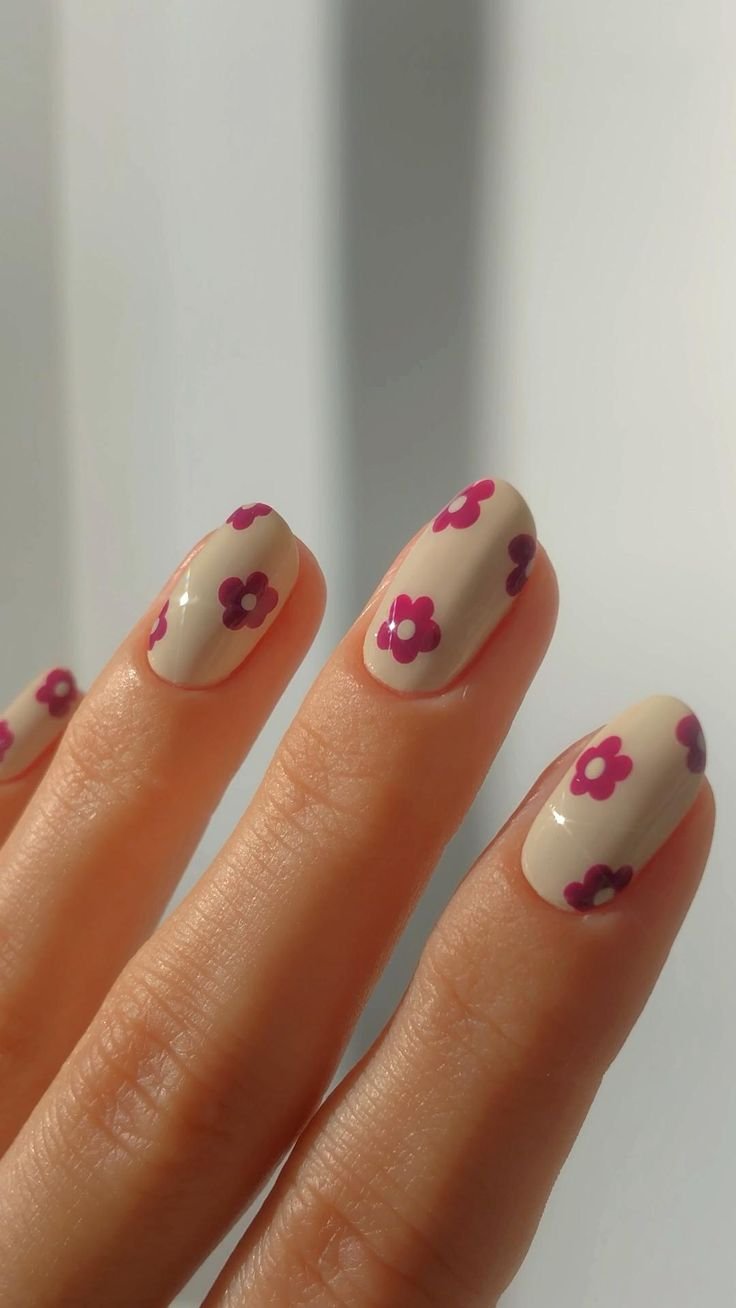
4. Floral Gem Accents
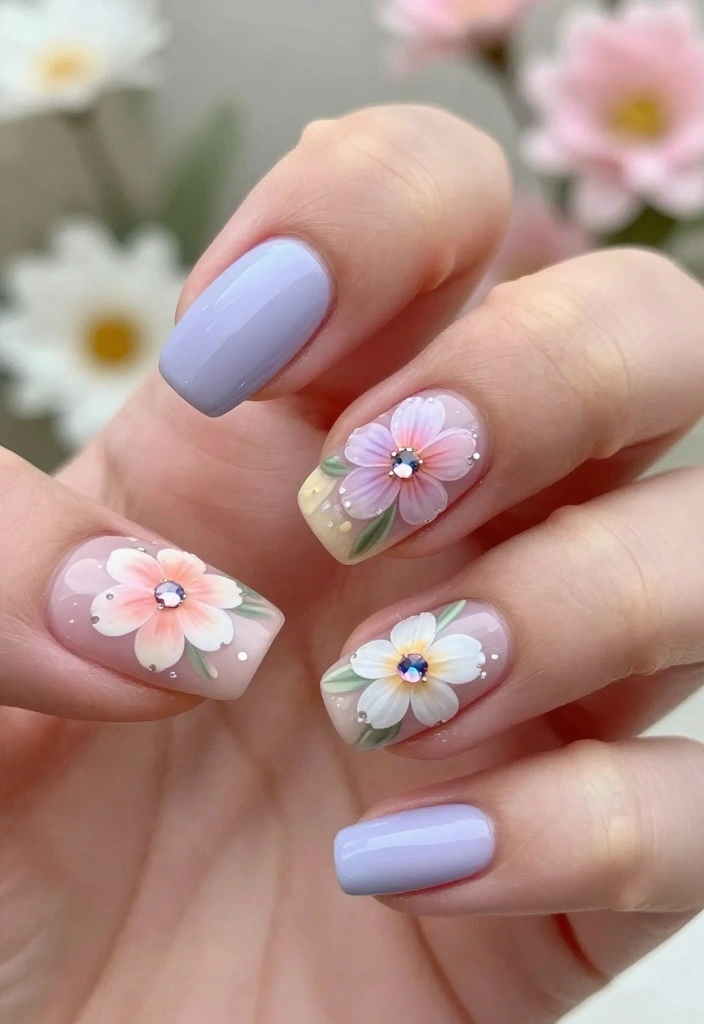
Floral designs paired with gems create an enchanting combination! Start with a soft pastel base and use a nail art brush or stamping plate to create delicate flower shapes. Adding small gems at the center of each flower enhances the romantic vibe.
This design is perfect for spring weddings or any feminine gathering, blending playful elements with elegance. The charming mix of flowers and gems makes your nails truly stand out.
Outfit Pieces:
– Pastel base color (like lavender or mint)
– Nail art brush or stamping plate for flowers
– Small gems in pastel shades
– Top coat for a polished finish
Styling Tips:
– Use a fine brush for detailed floral designs.
– Choose gem colors that complement your floral palette.
– Seal your artwork with a top coat to keep it looking fresh.
This whimsical design is sure to turn heads and highlight your artistic side at any gathering!
Fun fact: floral designs with tiny gems boost nail art photos’ brightness and engagement by up to 40%. Pro tip: start with a soft pastel base, stamp delicate flowers, then place a small gem at each flower’s center for instant Gem Nails Simple glam.
5. Ombre with Crystal Tips
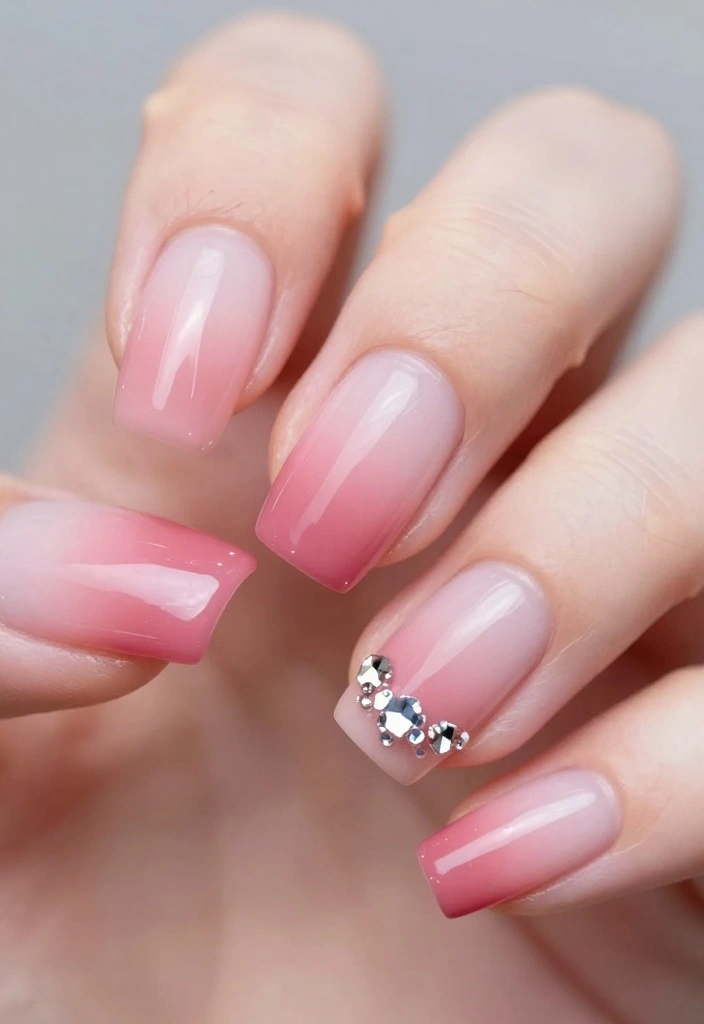
Ombre nails create a stunning visual impact, and adding crystal tips takes it up a notch! Start with a light color at the base, gradually darkening towards the tips for a beautiful gradient.
After your ombre is dry, apply a row of small crystals along the tips for a dazzling finish. This look suits any event, especially when you want to add a touch of glamour to your style.
Outfit Pieces:
– Light and dark polish for ombre effect
– Small crystals (choose sizes that complement your nails)
– Optional: glitter polish for added sparkle
– Top coat for durability
Styling Tips:
– Use a makeup sponge for a smooth ombre transition.
– Ensure the ombre is fully dried before adding crystals.
– You can alternate crystal colors for a playful twist.
With this style, you’ll always have a show-stopping manicure that captures attention!
6. Color Block Chic with Gems
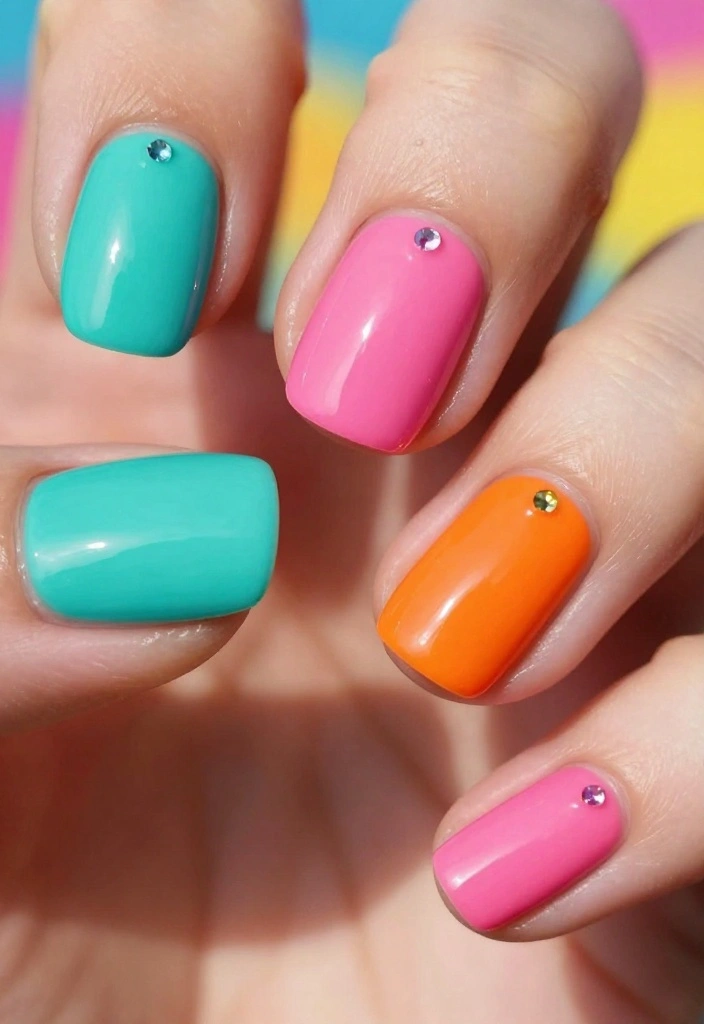
Color blocking is a vibrant way to showcase your nails. This technique involves applying solid blocks of color on each nail, creating a bold and fun look. By adding gems where colors meet, you can elevate your style even further.
Mixing bright and neutral colors allows for playful combinations that still feel chic. This design is perfect for those who love to experiment with color and make a statement.
Outfit Pieces:
– Bright nail polishes in your favorite shades
– Neutral colors for balance
– Gems to accentuate color transitions
– Top coat to protect your artwork
Styling Tips:
– Use a fine brush for precise color application.
– Wait until each color layer is dry before placing gems.
– Try mixing matte and glossy finishes for added depth.
This design is incredibly versatile and perfect for any fun occasion, showcasing your creative side!
7. Metallic Gems with Matte Base
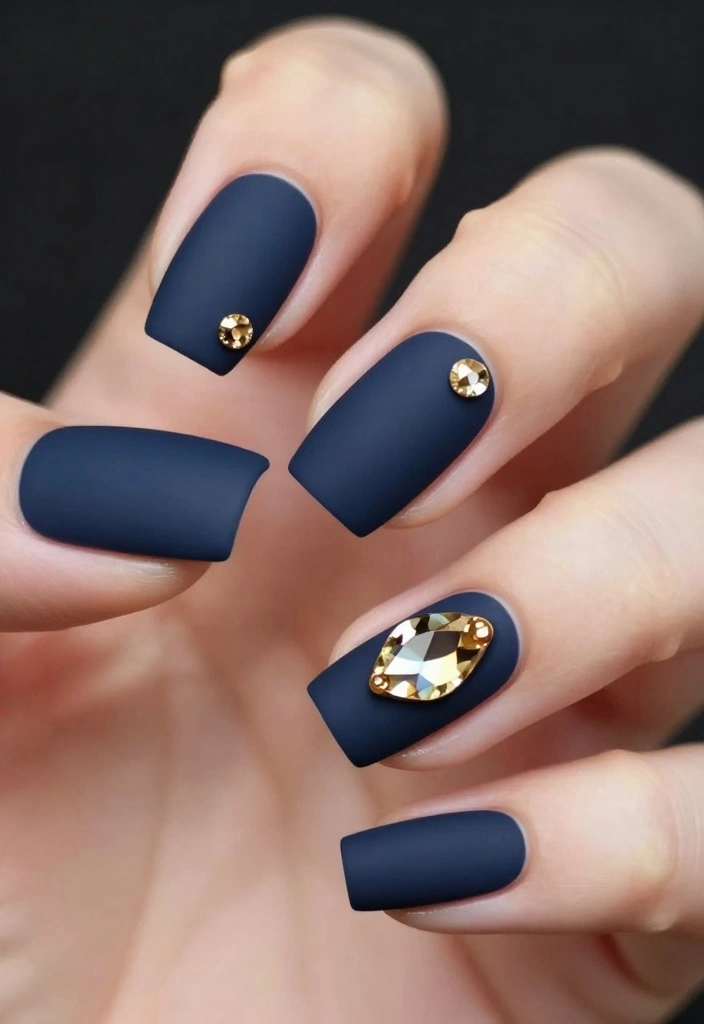
For a modern twist, pair a matte base with metallic gems. The contrast between the matte finish and shiny gems creates a striking look that’s perfect for trendy individuals.
Opt for deep shades like navy or burgundy for your base, then add metallic gold or silver gems for a luxurious touch. This design is sophisticated enough for both casual and formal events.
Outfit Pieces:
– Matte nail polish in deep colors
– Metallic gems in gold or silver
– Optional: subtle pattern beneath gems
– Top coat for a polished look
Styling Tips:
– Apply a matte topcoat to achieve that trendy finish.
– Choose larger gems to create a bold statement against the matte nails.
– Consider adding unique patterns beneath the gems for extra flair.
This combination of matte and metallic is sure to elevate your nail game and leave a lasting impression!
You might also like

How To Choose the Right Gem Nails Simple Designs
When it comes to elevating your nail game with gem nails, it’s essential to choose designs that match your style and occasion. Here’s how to select the perfect gem nail designs that reflect your personality and skills.
1. Purpose of the Design
Think about where you’ll wear your gem nails. Are they for a casual outing, a wedding, or a special event? Choosing the right design based on the occasion will ensure you feel confident and stylish. For example, a simple single gem accent might be perfect for everyday wear, while a more detailed gradient gem design could shine at a party.
2. Skill Level
Consider your nail art skills. If you’re a beginner, simple designs like a stunning single gem accent or floral gem accents are great starting points. As you gain confidence, you can experiment with more complex styles like geometric designs or negative space with gems. Making sure to work within your skill range will lead to better results and a more enjoyable experience.
3. Color Palette
Select colors that resonate with your personal style. Choose shades that complement your skin tone or match your outfit. For example, pastel colors paired with soft gems can create a delicate look, while bold colors with metallic gems can make a statement. Consider creating a cohesive color scheme to ensure your nails harmonize well with your overall look.
4. Type of Gems
Decide on the type of gems you want to use. There are many options like rhinestones, crystals, or even natural stones. Each type offers a different aesthetic. Crystal gems provide a sparkly effect, while natural stones can give a more earthy and sophisticated vibe. Think about the look you want to achieve and choose gems accordingly.
5. Nail Length and Shape
Your nail length and shape play a crucial role in the design you choose. Long, stiletto-shaped nails can handle intricate designs, while shorter nails might benefit from simpler accents. Consider your nail shape when selecting gem placements to ensure they fit well and look proportional.
6. Maintenance and Durability
Finally, think about how much upkeep you’re willing to do. Some designs might chip or wear more quickly than others. For a longer-lasting look, choose simpler designs that require less maintenance, like a glitter gradient with gem accents. If you love a more elaborate look, just be prepared for some touch-ups along the way.
Pro Tip: Always practice on a nail wheel or practice nails before applying your chosen design. This will allow you to perfect your technique and get a sense of how the final look will turn out without any commitment.
By considering these factors, you can confidently choose the right gem nails simple designs that enhance your style and express your creativity. Whether you opt for DIY methods or seek trendy designs from a professional, understanding your preferences and needs will help you achieve stunning results. Enjoy the process and let your nails shine!
8. Gradient Gem Stones
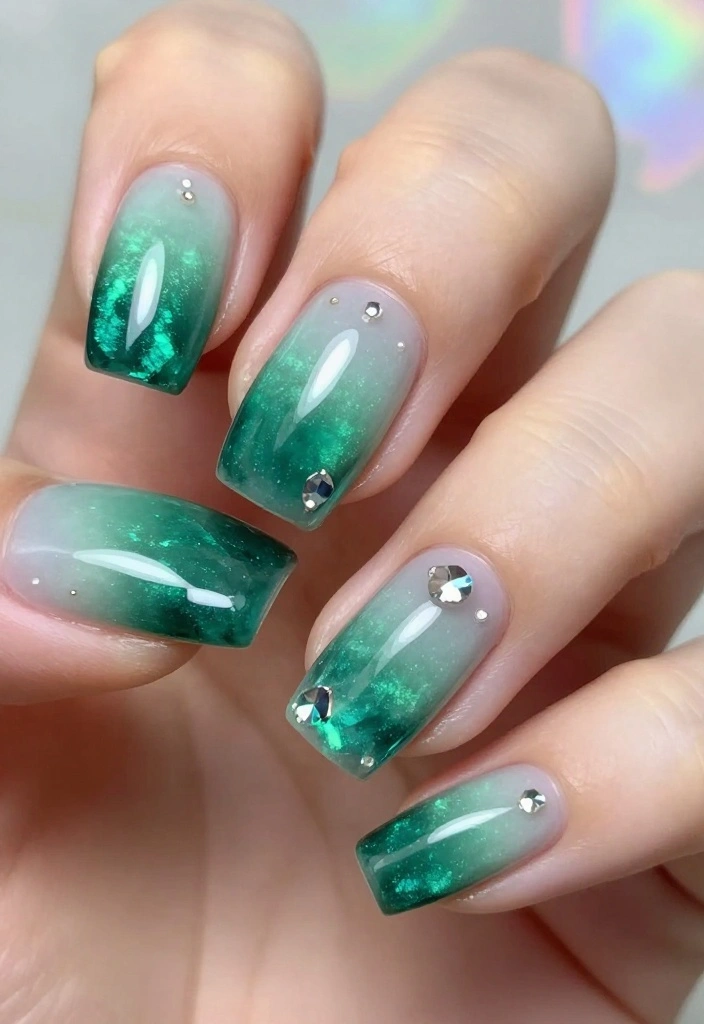
For an intricate design, gradient gem stones offer a stunning option! This technique mimics the beauty of gemstones by seamlessly blending colors together.
Start with a rich emerald green at the base, transitioning to lighter shades toward the tips. Adding strategically placed gems that match the gradient creates a cohesive and luxurious look.
Outfit Pieces:
– Deep green nail polish and lighter shades for gradient
– Gems to match the gradient colors
– Optional: top coat for added shine
Styling Tips:
– Use a striping brush for controlled color fading.
– Choose a top coat that enhances the shine of your design.
– Clear gems can add understated elegance to your look.
With this artistic style, you can effortlessly bring a touch of opulence to your everyday manicure!
Gradient gem stones take your nails from simple to luxe in minutes. Start with emerald base and fade to lighter tips, then anchor the sparkle with a few well-placed gems—your nails will look polished and cohesive. Gem Nails Simple, but wow!
9. Natural Stone Effect with Gems
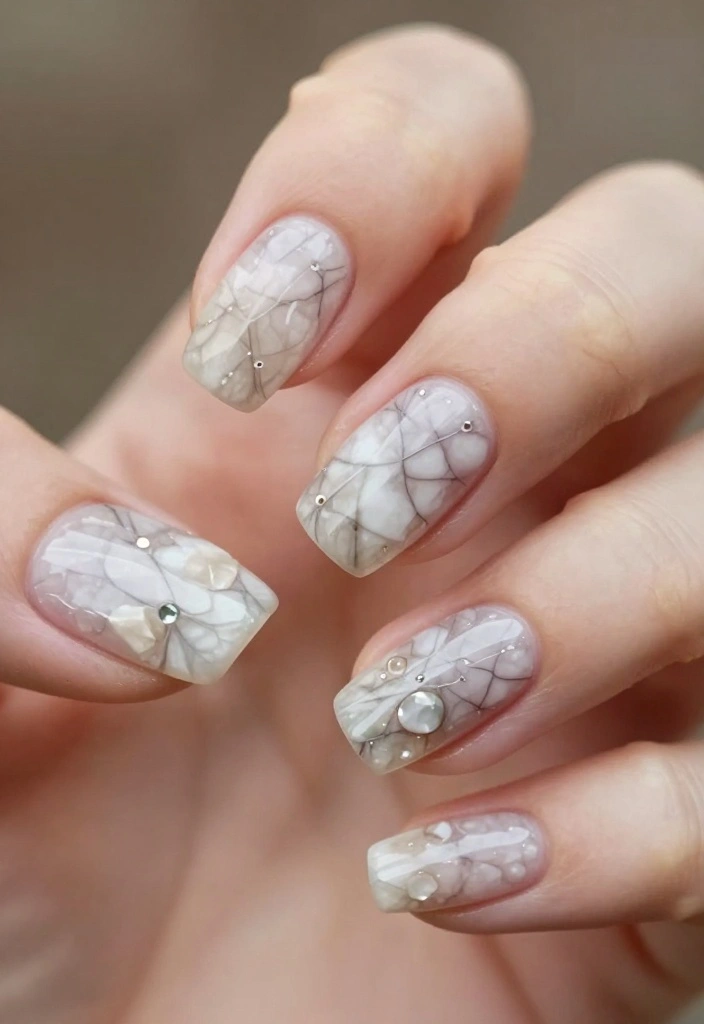
Embrace nature with a natural stone effect for your nails! This chic design mimics marble or other stone textures, starting with a white or nude base.
Create swirls with a fine brush to replicate natural veining, then place small gems in the swirled areas to accentuate the look. The final result is sophisticated and trendy, perfect for any occasion.
Outfit Pieces:
– White or nude nail polish for base
– Fine brush for swirls
– Small gems in various colors
– Optional: matte top coat for a classic finish
Styling Tips:
– Use a thin brush for fine lines to achieve an authentic stone look.
– A matte topcoat can enhance the classic stone effect.
– Mix gem colors to add depth and interest to your design.
This unique style is a fantastic conversation starter, showcasing your creativity and artistic talent!
10. Rainbow Gem Nails
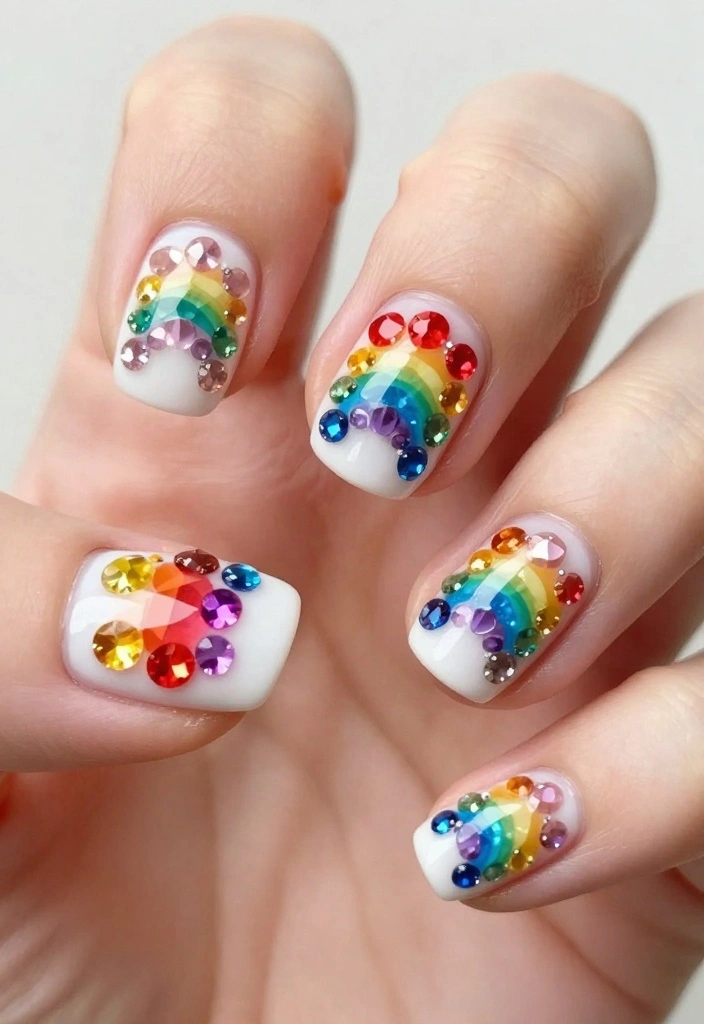
Showcase your vibrant side with rainbow gem nails! This playful design can be both fun and chic, depending on your styling choices.
Start with a base coat of white or light pastel colors, then apply various colored gems in a rainbow pattern across your nails. This look is perfect for festivals, parties, or any celebration that calls for joy and color.
Outfit Pieces:
– Light base colors (like white or pastels)
– Gems in rainbow colors
– Strong top coat to secure gems
– Optional: other colorful nail art techniques for added flair
Styling Tips:
– Use varying sizes of gems for a playful effect.
– Seal the design with a robust top coat to keep gems in place.
– Pair with other colorful nail art for a standout look.
This design ensures that every day feels like a celebration, making your nails a joyful canvas!
Rainbow Gem Nails are my mood booster — they turn any outfit into a celebration. Start with a white base, dot on rainbow gems, and seal with a strong top coat for long-lasting sparkle. Gem Nails Simple and totally wearable.
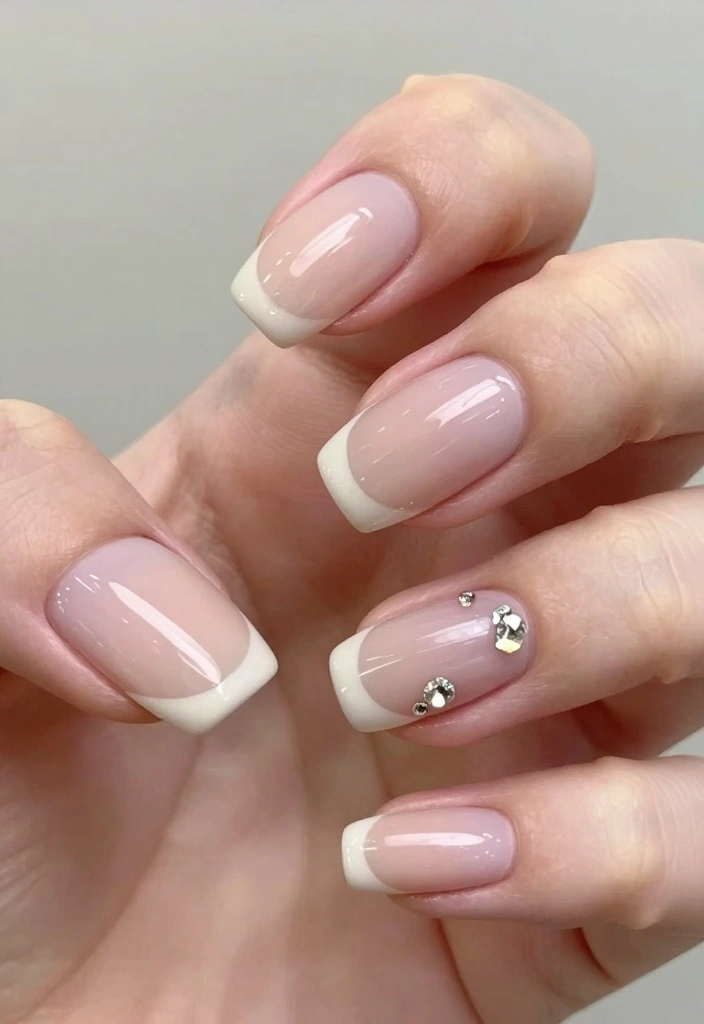
11. Elegant French Tip with Gems
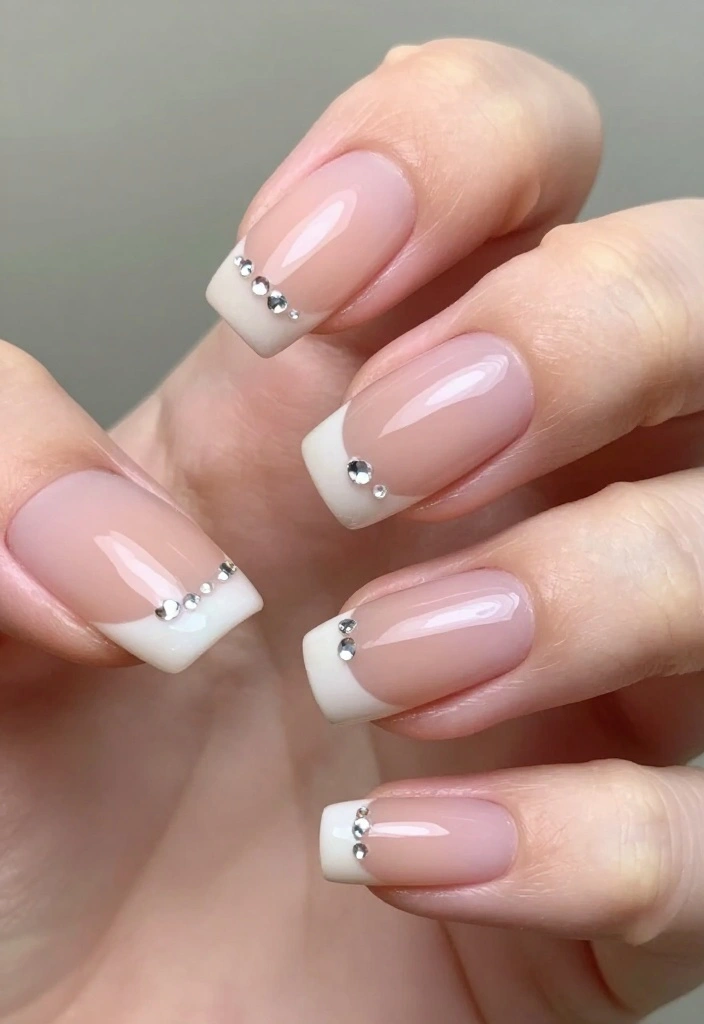
Elevate the classic French manicure by incorporating gems! The timeless elegance of a French tip gets a modern twist with the addition of tiny gems at the base or tips
This design is perfect for weddings and formal events, offering sophistication and a touch of glam. You can choose clear gems for a subtle sparkle or colored ones to match your outfit, resulting in a stunning finish.
Outfit Pieces:
– White or nude polish for French tips
– Tiny gems in clear or matching colors
– Top coat to secure the gems and maintain longevity
Styling Tips:
– Ensure your tips are neatly painted for a polished look.
– Use a strong topcoat to secure the gems and prolong your manicure.
– Mixing gem sizes can add dimension and texture.
This elegant design is bound to impress, adding a beautiful touch to any manicure!
12. Fun Animal Print with Gem Details
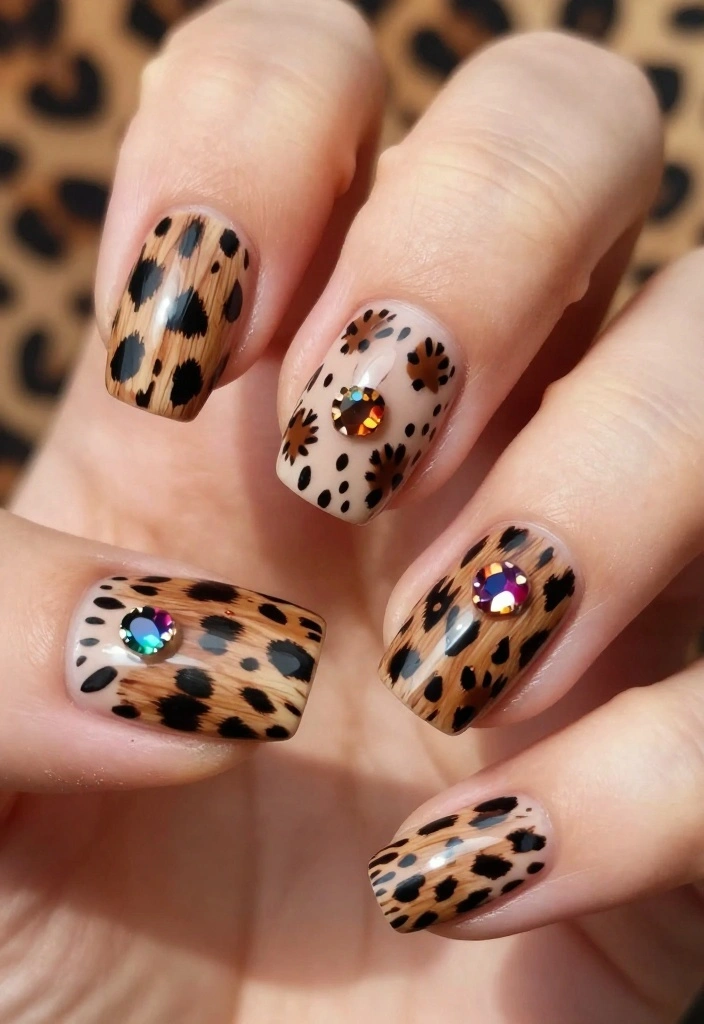
Make a bold statement by combining animal prints with gems! Start with a neutral base color and create your favorite animal print, like leopard or zebra, using nail polish.
Enhance the playful design by adding gems in similar colors, making this style edgy and trendy. It’s perfect for the fashion-forward individual who loves to stand out.
Outfit Pieces:
– Neutral base color for your animal print
– Nail polish in colors for the animal pattern
– Gems in similar or contrasting colors
– Strong top coat for durability
Styling Tips:
– Use a fine brush to achieve detailed animal print designs.
– Consider contrasting gem colors to make them pop.
– Seal your design with a strong topcoat for lasting results.
This fun look can elevate any outfit, ensuring you capture attention wherever you go!
You Might Also Like

13. Whimsical Cloud Nails with Gem Raindrops
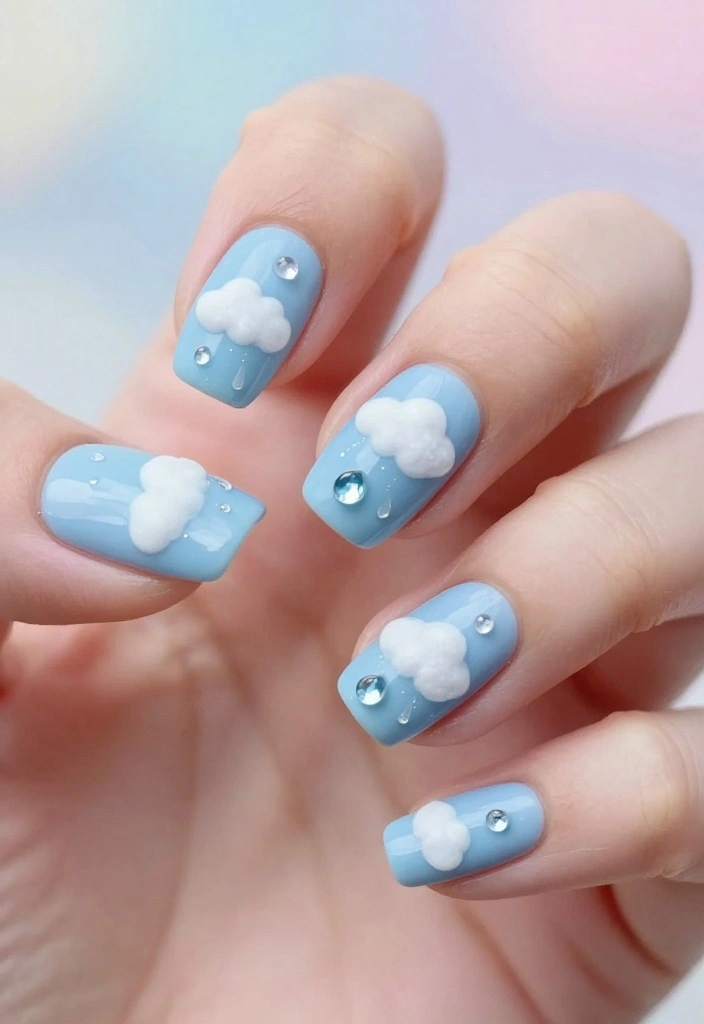
Add a touch of whimsy to your nails with a cloud design, complete with gem raindrops! Start with a soft blue base to mimic the sky and create fluffy cloud shapes with white polish.
Using small gems as raindrops introduces a playful twist, making this design perfect for spring and summer.
Outfit Pieces:
– Soft blue nail polish for the base
– White polish for cloud shapes
– Small gems in blue or clear
– Optional: matte top coat for a unique finish
Styling Tips:
– Use a dotting tool for perfect cloud shapes.
– Choose gems that match your color palette for a cohesive look.
– A matte topcoat can add a special touch to your design.
This cute design embodies a cheerful vibe, ensuring your nails are as fun as your personality!
14. Elegant Negative Space with Gems
Negative space designs highlight the natural nail while incorporating art in a modern twist. Start by painting only parts of your nails, leaving some areas bare. Adding small gems to the painted sections introduces a touch of glam.
This minimalist yet chic style is perfect for the modern woman looking for something unique.
Outfit Pieces:
– Base color for painted sections
– Gems in your choice of colors
– Optional: tape for clean lines
– Top coat to keep your design intact
Styling Tips:
– Use tape to create clean angles in your design.
– Subtle colors will give a more sophisticated look.
– Place gems at unique angles for added flair.
This trendy design is easy to maintain, making it a great option for busy individuals!
15. Crystalized Ice Effect
For a unique and artistic approach, try a crystalized ice effect! This design mimics the look of frost with a cool-toned base, making it perfect for winter months.
Apply a textured top coat to create the ice appearance, then add gems to resemble glistening ice crystals. This enchanting finish will leave you feeling magical.
Outfit Pieces:
– Cool-toned polish for the base
– Textured nail polish for authenticity
– Clear and white gems for the ice effect
– Glossy top coat for a stunning shine
Styling Tips:
– Use a textured polish to achieve an authentic ice look.
– Stick to clear and white gems to maintain the frosty theme.
– Seal everything with a glossy top coat for maximum shine.
This captivating design is perfect for winter events or to embrace the magic of the season!
Conclusion
Elevating your nail game with gem nails doesn’t have to be complicated. With these 15 gorgeous ideas, you have a range of styles to try that fit any occasion or mood. From simple accents to intricate designs, there’s something for everyone to love!
Have fun experimenting with colors, patterns, and gem placements until you find your perfect look. Remember, the best part about nail art is that it’s all about personal expression, so let your creativity shine!
Frequently Asked Questions
What are some Gem Nails Simple ideas I can try to elevate my nail game?
Gem Nails Simple ideas are all about quick, gorgeous touches you can DIY at home. Here are a few to start:
One statement gem on an accent nail for a chic focal point; a delicate line of tiny crystals along the cuticle for subtle sparkle; scattered gems over a clear or soft nude base for glam without overdoing it; a mix of gems with a simple foil overlay for a trendy twist. Pro tip: choose 1–2 gem colors that match your outfit and keep the rest of the nails clean to let the gems shine. For durability, prep nails well and seal with a solid top coat.
What supplies do I need for a DIY Gem Nails Simple look?
For a successful DIY Gem Nails Simple look, gather these essentials: a clean base coat, a sheer or nude polish, a strong top coat, and a good nail buffer. Add gem features with a small rhinestone set, a rhinestone picker or tweezers, and a reliable nail glue or gel adhesive. Don’t forget a nail file, cuticle pusher, and a UV/LED lamp if you’re doing gel. Finish with cuticle oil. Pro tip: pick 2–3 gem colors that coordinate with your go-to outfits to keep things cohesive.
How long do Gem Nails Simple designs last and how should I care for them?
With proper prep, Gem Nails Simple designs can last about 1–2 weeks on natural nails, depending on activity and how you care for them. Start with clean nails, push back cuticles, lightly buff, apply a base coat, use a quality top coat, and avoid soaking hands in hot water for the first 24 hours after application. Protect gems with a thicker top coat to prevent snagging, wear gloves while doing chores, and reapply top coat every 3–4 days. If a gem loosens, reattach with a dab of clear glue and seal again.
Which Gem Nails Simple designs are trendy and beginner-friendly?
Trend alert: natural nude with a single crystal accent, curved lines of gems along the smile line, scattered tiny gems on a glassy finish, or a negative space gem pattern. These are all trendy designs that beginners can master with a steady hand and a tweezer. To start, pick one accent nail and keep the rest clean, then gradually add more gems as you feel confident. Use a thin brush to place gems and seal with a top coat.
How can I apply gems without damaging my natural nails when doing Gem Nails Simple at home?
To apply gems without causing damage, prep nails well: push back cuticles, lightly buff, wipe with alcohol. Use a tiny dab of nail glue or a gel adhesive to fix gems in place, place with a rhinestone picker or tweezers, press gently for 10–15 seconds, and seal with a thick top coat. Cure if using gel. Avoid picking at gems and don’t file over them aggressively. Remove with gentle acetone when you’re ready. This keeps natural nails healthy while you rock your Gem Nails Simple designs.
Related Topics
gem nails simple
nail art
DIY nail designs
trendy nail ideas
beginner friendly
easy techniques
minimalist nail art
nail decor
fashion nails
quick nail tips
stylish manicure
seasonal nail trends

")
")

")
")
These gem nails are stunning! I love how simple yet elegant they look. Have you tried any of these designs yourself?
I tried doing gem nails once and ended up with more glitter on my face than on my nails! 😂 What’s your funniest nail fail?
Did you know that some gems can actually help with nail health? For example, amethyst is said to promote healing! So fancy nails might be good for you too!
I remember the first time I tried nail art, I painted my nails with bright yellow and added tiny googly eyes. It was hilarious but definitely not the chic look I was going for! Have you ever had a nail art disaster?
If you’re going for gem nails, try using a clear topcoat to make them shine even more! It really helps the gems pop and lasts longer too.